Best Action Cameras for Vlogging to Buy in July 2026
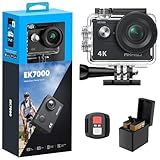
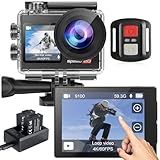
AKASO EK7000 4K30FPS 20MP WiFi Action Camera with EIS Ultra HD 131FT Waterproof Underwater Camera Remote Control 4X Zoom Support External Microphone Black
- CAPTURE STUNNING 4K VIDEOS AND 20MP PHOTOS IN ANY ENVIRONMENT.
- ENJOY SMOOTH, STEADY FOOTAGE WITH ADVANCED ELECTRONIC IMAGE STABILIZATION.
- CONTROL YOUR SHOTS HANDS-FREE WITH A WIRELESS WRIST REMOTE FOR CONVENIENCE.


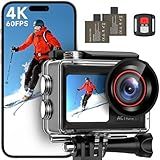
ODDV 4K60FPS 30MP Action Camera with Front LCD and Touch Rear Screens, Underwater Camera with 5X Zoom, 132FT Waterproof Camera, EIS, WiFi Remote Control(Black)
- CAPTURE STUNNING 4K60FPS VIDEOS AND 30MP PHOTOS WITH EASE.
- DUAL SCREEN DESIGN FOR EFFORTLESS SHOOTING AND PERFECT SELFIES.
- EXCEPTIONAL STABILIZATION ENSURES SMOOTH FOOTAGE IN ANY ADVENTURE.
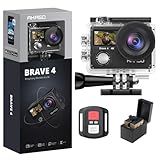
AKASO Brave 4 Action Camera 4K 30fps Ultra Hd Video 20MP Photo, EIS, WiFi Remote Control, 2X Batteries, Waterproof Underwater Camera for Snorkel, Travel, Motorcycle, Bicycle, Helmet Accessories Kit
-
CAPTURE STUNNING 4K30FPS VIDEOS & 20MP PHOTOS ANYTIME, ANYWHERE.
-
ENJOY SMOOTH FOOTAGE WITH 170° VIEW ANGLE & ADVANCED STABILIZATION.
-
SHARE EFFORTLESSLY VIA WI-FI/HDMI; PERFECT FOR ADVENTURES & MEMORIES.
Hiicam Action Camera 4K Waterproof Camera 20MP with Touch Screen Underwater Camera 131FT with EIS for Snorkeling Helmet Bike 170° Wide Angle Remote WiFi 5XZoom
-
CAPTURE STUNNING 4K60FPS VIDEO AND 20MP PHOTOS FOR EVERY ADVENTURE.
-
DUAL SCREENS AND TOUCH CONTROL FOR ULTIMATE FILMING FLEXIBILITY.
-
EIS TECHNOLOGY ENSURES STABLE FOOTAGE FOR EPIC ACTION SHOTS.
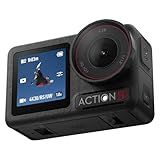
DJI Osmo Action 5 Pro Essential Combo, Waterproof Action Camera with 1/1.3" Sensor, 4K/120fps Video, Subject Tracking, Stabilization, Dual OLED Touchscreens, Ideal for Sports, Vlog
-
CAPTURE EVERY MOMENT EFFORTLESSLY WITH VOICE CONTROL & DUAL SCREENS!
-
UNMATCHED 4K IMAGING QUALITY FOR STUNNING LOW-LIGHT PERFORMANCE.
-
WATERPROOF DESIGN & LONG BATTERY LIFE ENSURE ALL-DAY ADVENTURES!
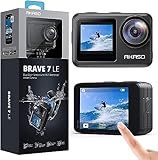
AKASO Brave 7 LE 4K30FPS 20MP WiFi Action Camera with Touch Screen EIS 2.0 Zoom Remote Control 131 Feet Underwater Camera with 2X 1350mAh Batteries Support External Microphone Vlog Camera
- WEATHERPROOF DESIGN: IPX7 RATED FOR RAIN, SNOW, AND UNDERWATER USE.
- SHOOT STUNNING 4K VIDEO AND 20MP PHOTOS FOR VIBRANT ADVENTURES.
- DUAL-DISPLAY FOR EASY SELFIES AND SEAMLESS FRAMING ADJUSTMENTS.
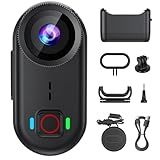
toberto 4K Thumb Action Camera, Mini Body Camera with WiFi, Magnetic Wearable 150° Hands-Free Recording POV Camera, EIS Stabilization, Waterproof, 64GB, Mount Anywhere for Sports Vlogging (Black)
- ULTRA-LIGHT & PORTABLE: WEIGHS JUST 1.25 OZ FOR ALL-DAY COMFORT.
- TRUE 4K POV RECORDING: CAPTURE SMOOTH, IMMERSIVE VIDEO HANDS-FREE.
- 10M WATERPROOF RATING: READY FOR ANY ADVENTURE, RAIN OR SHINE!
Action cameras can be a practical choice for vlogging, depending on your specific needs and style. Their compact and lightweight design makes them highly portable and easy to mount or carry, which is ideal for capturing on-the-go footage or adventures where traditional cameras might be cumbersome. With features such as wide-angle lenses, high-resolution video capabilities, and robust image stabilization, action cameras can produce high-quality videos even in dynamic or rugged environments. They are also often designed to withstand harsh conditions, being water, dust, and shock resistant, which adds to their versatility.
However, they may have limitations such as the lack of advanced audio input options, smaller sensors compared to dedicated vlogging cameras, and more limited manual controls, which can affect video quality and creative control. The ultra-wide-angle view, while immersive, might not be suitable for all types of vlogging content, particularly if you want a more focused shot or a background that isn't distorted. Additionally, some action cameras might not perform optimally in low-light conditions.
Ultimately, whether an action camera is good for vlogging will depend on balancing the type of content you want to create with the strengths and weaknesses of these devices. If mobility, durability, and ease of use in active settings are your priorities, an action camera could be an excellent choice for your vlogging endeavors.
What is time-lapse functionality in action cameras?
Time-lapse functionality in action cameras allows users to capture a series of photos at set intervals, which can then be compiled to create a video that shows changes occurring over time. This is useful for capturing slow processes that happen over longer periods, such as sunsets, city traffic, crowds, or natural events like plant growth.
Key aspects of time-lapse functionality include:
- Interval Setting: Users can select the time interval between shots-ranging from seconds to minutes or even hours, depending on the desired effect.
- Playback Speed: The captured images are played back at a normal video frame rate (like 24 or 30 frames per second), which speeds up the action significantly. For example, an hour's worth of footage might be condensed into a few seconds.
- Storage Efficiency: Since time-lapse involves taking still photos rather than recording continuous video, it requires less storage space, which is practical for lengthy captures.
- Battery Life: Time-lapse can be more battery-efficient compared to continuous video recording, as the camera may not need to operate continuously at full power between shots.
- Creative Control: Users can experiment with different settings to capture unique perspectives and can adjust factors such as exposure or focus to enhance the final result.
By using time-lapse, action cameras provide a dynamic way to visualize events that unfold too slowly to appreciate in real time, making them popular for both amateur and professional videographers seeking to add creative variety to their projects.
How to live stream using an action camera for vlogs?
Live streaming with an action camera can be a great way to enhance your vlogs, especially if you're capturing dynamic scenes or action-packed activities. Here's a step-by-step guide to help you set up your action camera for live streaming:
- Check Compatibility: Ensure your action camera supports live streaming. Popular models like GoPro HERO8 and later versions, DJI Osmo Action, or some Sony models offer live streaming capabilities. Update the camera’s firmware to the latest version for the best performance and features.
- Choose a Streaming Platform: Decide on a platform where you want to live stream, such as YouTube, Facebook, Twitch, or any other streaming service. Each has different requirements and procedures for setting up a live stream.
- Set Up Your Streaming Account: On platforms like YouTube, you may need to verify your account for live streaming, which can take up to 24 hours. Adjust privacy settings according to your preferences (public, unlisted, private).
- Install Necessary Apps: Download the corresponding app for your action camera on your smartphone. For GoPro, it’s the GoPro Quik app.
- Connect Your Camera to the App: Use Wi-Fi or Bluetooth to connect your action camera to your smartphone via the camera app. Follow the app’s instructions to pair the devices.
- Configure Live Stream Settings: Using the app, navigate to the live stream settings. Sign in with your account credentials for the streaming platform you’ve chosen. Input the necessary streaming details like title, description, resolution, and privacy settings. Some cameras allow you to choose between resolutions like 720p, 1080p, etc.
- Establish a Network Connection: Ensure you have a stable internet connection, ideally via Wi-Fi. Some cameras can stream using a mobile hotspot, but you’ll need strong cellular data coverage.
- Prepare Your Setup: Mount your action camera on a suitable mount or tripod that allows you to capture the desired angle. Ensure the battery is fully charged, or connect to an external power source if available.
- Test Your Stream: Do a test run to ensure the video quality and connection are adequate. Check audio quality and make adjustments if necessary, such as using external microphones if supported.
- Start Streaming:
- Once everything is set up and tested, you’re ready to start your live stream.
- Use the app to begin streaming, and keep an eye on comments or interactions if you are able to engage with your audience live.
- End Your Stream:
- Once you’ve finished streaming, ensure you properly stop the live stream using the app or the camera controls.
- Save the recorded footage if you plan to use it for future content.
By following these steps, you can effectively live stream using your action camera and engage your audience with high-quality video content.
What is the maximum resolution available on modern action cameras?
As of the latest available data up to October 2023, modern action cameras have pushed the limits of video resolution significantly. Some of the top-tier action cameras now support video recording in 5.3K resolution at various frame rates. For example, the GoPro HERO11 Black supports 5.3K video at 60 frames per second. There are also other cameras in the market that offer similar or slightly higher resolutions, including 6K or even 8K capabilities, though these higher resolutions are less common and typically found in specialized or high-end models. Keep in mind that resolution is only one aspect of camera quality; factors like frame rate, stabilization, lens quality, and low-light performance are also crucial in determining overall video performance.
What is the field of view offered by most action cameras?
Most action cameras offer a wide field of view, typically ranging from 140 to 170 degrees. This wide-angle perspective is designed to capture more of the scene, making it ideal for recording dynamic and immersive footage, especially in sports and adventure settings. Some cameras also provide the option to adjust the field of view, offering settings such as narrow, medium, and linear to help reduce distortion or focus on specific details.
How to connect an action camera to a smartphone for vlogging?
Connecting an action camera to a smartphone can significantly enhance your vlogging experience, allowing you to control the camera remotely and transfer files easily. Here’s how you can typically connect an action camera to a smartphone:
- Check Compatibility: Ensure that both your action camera and smartphone are compatible. Most modern action cameras support smartphone connectivity via Wi-Fi or Bluetooth.
- Install the App: Download the corresponding app for your action camera. Popular action camera brands like GoPro, DJI, and Insta360 have their own apps available on the App Store for iOS devices and Google Play Store for Android devices.
- Turn on the Camera’s Wi-Fi/Bluetooth: Enable Wi-Fi or Bluetooth on your action camera. This is usually done through the camera's settings menu.
- Connect to the Camera’s Network: Wi-Fi Connection: Go to the Wi-Fi settings on your smartphone and look for your camera’s Wi-Fi network. It’s typically named after the camera model, like "GoPro-XXXX". Connect to it using the default password provided in the camera manual. Bluetooth Connection: Sometimes, initial connection might still require Wi-Fi, but Bluetooth can be used for syncing and other functions. Follow the app's instructions to establish a Bluetooth connection.
- Launch the App: Open the action camera app on your smartphone. The app will search for available cameras and prompt you to connect to yours.
- Pair the Devices: If prompted, verify the connection between your smartphone and the camera by following on-screen instructions, which may include entering a code displayed on either device.
- Remote Control and Settings: Once connected, you can remotely control your camera using the app. This functionality generally includes starting/stopping recording, changing camera settings, and switching modes.
- Preview and Transfer: Use the app to view a live feed from the camera on your phone. You can also transfer photos and videos from the camera to your phone for editing and sharing.
- Troubleshooting: If you encounter any issues, consult the support section of the app or the action camera’s user manual. Common issues include Wi-Fi interference or needing firmware updates.
- Additional Accessories: Consider using mounts or selfie sticks to enhance your vlogging setup. These accessories can be paired with the camera’s app functionalities to improve your filming experience.
Using these steps, you can easily connect your action camera to your smartphone and make the most out of your vlogging sessions. Remember that the exact steps can vary slightly depending on the brand and model of your devices.