
Best Outdoor Showers for Beachgoers to Buy in July 2026
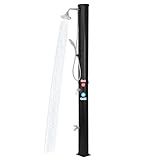
9.3 Gallon Solar Heated Outdoor Shower, 7.2FT Height, 360°Rotating Rainfall + 6FT Handheld Shower + Foot Faucet, Freestanding Black Poolside Shower with Hot & Cold Water Adjustment
- ENJOY 9.3 GALLONS OF HOT WATER FOR THE PERFECT OUTDOOR SHOWER!
- DURABLE, SCRATCH-RESISTANT CONSTRUCTION FOR LONG-LASTING USE OUTDOORS.
- EASY ASSEMBLY ON SOLID SURFACES FOR QUICK INSTALLATION ANYWHERE!


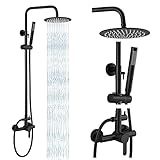
gotonovo Outdoor Shower Fixtures SUS304 Stainless Steel Rain Shower Kit Faucet High Pressure Wall Mount 2 Dual Function 8 Inch Showerhead and Handheld Spray Combo, Single Handle, Matte Black
-
DURABLE DESIGN: CRAFTED FROM SUS STAINLESS STEEL 304 FOR LASTING QUALITY.
-
VERSATILE FUNCTIONALITY: SWITCH BETWEEN TOP AND HANDHELD SHOWER EFFORTLESSLY.
-
SIMPLE INSTALLATION: RETROFIT YOUR EXISTING SHOWER FAST WITH INCLUDED HARDWARE.
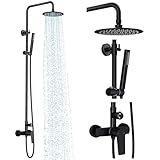
Rainsworth Outdoor Shower Kit Matte Black - Single Handle Brass Valve, 8 Inch Rain Shower Head and Handheld Spray Shower Fixture Combo, 304 Stainless Steel Wall Mount
-
FLEXIBLE INSTALLATION: FITS STANDARD WALL HOLES FROM 5.5 TO 6.3 EASILY.
-
DURABLE & VERSATILE: MADE OF RUST-RESISTANT 304 STAINLESS STEEL AND BRASS.
-
DUAL SHOWER FUNCTIONALITY: SWITCH EASILY BETWEEN RAIN SHOWER AND HANDHELD SPRAYER.
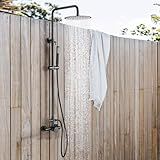
RBROHANT Outdoor Shower, Wall Mount Outdoor Shower Kit, Outside Shower Faucet with Height Adjustable Rain Shower Head and Handheld, Exposed Shower System for Yard, Wall Mounted, Matte Black, JK0145
- ADJUSTABLE HEIGHT FOR EVERY FAMILY MEMBER’S COMFORT
- DUAL FUNCTION VALVE FOR VERSATILE SHOWERING OPTIONS
- HIGH PRESSURE SHOWER HEAD SAVES WATER & ENHANCES EXPERIENCE
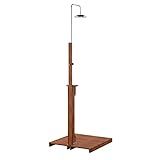
SEI Furniture Rain-Style Outdoor Shower, Oiled Eucalyptus - Natural
- ELEGANT OILED EUCALYPTUS DESIGN ENHANCES ANY OUTDOOR SPACE.
- EASY CONNECTION TO WATER HOSE FOR CONVENIENT OUTDOOR USE.
- DURABLE STAINLESS STEEL ENSURES LONG-LASTING PERFORMANCE AND STYLE.

CHALIRS 316 Marine Grade Stainless Steel Free Standing Outdoor Shower with Foot Wash, 3-Function Matte Black Shower Kit with 10''Rain Shower Head,Outdoor Shower Fixture for Yard Beach Poolside Garden
- RUST-FREE STAINLESS STEEL DESIGN ENSURES DURABILITY IN ANY CLIMATE.
- 10 RAIN SHOWER HEAD SIMULATES NATURE FOR A REFRESHING EXPERIENCE.
- EASY-TO-USE DIVERTER VALVE FOR SEAMLESS HOT/COLD WATER CONTROL.
Yes, outdoor showers can be used for rinsing off after the beach. They provide a convenient way to remove sand, saltwater, and sunscreen from your body before entering your home or car. Designed to withstand outdoor conditions, these showers are typically made from durable materials resistant to rust and corrosion. They are often installed in coastal areas and are equipped with features to make the experience comfortable and efficient, such as adjustable water pressure and temperature controls. Outdoor showers can be attached to a home's plumbing system or be part of a more temporary setup with a simple hose attachment. They are not only practical but also help to keep indoor spaces clean by reducing the amount of sand and debris brought inside.
How to maintain an outdoor shower exposed to sand and saltwater?
Maintaining an outdoor shower that's exposed to sand and saltwater involves regular cleaning and preventive measures to protect it from corrosion and build-up. Here are some tips to help you:
- Regular Cleaning: Rinse After Use: Encourage rinsing the shower with fresh water after each use to wash away sand, salt, and other residues. Weekly Cleaning: Use a mild soap or a solution of vinegar and water to regularly clean the surfaces. This helps remove salt deposits and prevents build-up.
- Material Selection: Rust-Resistant Materials: Choose fixtures made from stainless steel, brass, or other rust-resistant materials. These materials are more durable in salty environments. Resilient Flooring: Install tiles or decking made from rot-resistant woods or composite materials that can withstand exposure to moisture and salt.
- Preventive Maintenance: Check for Leaks and Corrosion: Regularly inspect pipes, fixtures, and joints for signs of corrosion or leaks and address them promptly. Apply Protective Coatings: Use protective coatings on metal parts to prevent corrosion. This can include applying marine-grade sealants or waxes.
- Sealing and Waterproofing: Seal Porous Surfaces: Seal any natural stone or porous surfaces to prevent water absorption and damage. Waterproof Coatings: Apply water repellent treatments to wood and other susceptible materials to prolong their lifespan.
- Drainage Management: Proper Drainage: Ensure the shower has adequate drainage to prevent water pooling. This can be done by sloping the floor towards a drain or using permeable materials that allow water to percolate through.
- Seasonal Maintenance: Inspect Fixtures: Before and after seasonal changes, inspect and tighten any loose fittings, replace worn-out washers, and check for any needed repairs. Winterizing: In colder climates, make sure to turn off and drain pipes to prevent freezing damage during winter months.
- Keep Surroundings Clean: Regular Sweeping: Sweep the area around the shower often to keep sand at bay. Landscape Management: Trim nearby plants and manage landscaping to reduce debris and minimize the impact of salt carried by wind and rain.
By consistently following these practices, you can extend the life of your outdoor shower and keep it functioning optimally despite exposure to challenging elements like sand and saltwater.
What is the easiest way to connect an outdoor shower to the water supply?
Connecting an outdoor shower to your water supply can vary in complexity depending on the setup you choose. Here’s a simple approach you might consider:
- Location and Planning: Choose a suitable location for your outdoor shower, ideally close to an existing water line or hose bib for easy access. Consider factors like drainage, privacy, and exposure to wind and sun.
- Materials and Tools Needed: Garden hose or PEX tubing (for more permanent installations) Hose splitter (optional, to maintain a secondary hose connection) Shower fixture or kit Pipe fittings and clamps suitable to connect the hose/PEX to your fixture Waterproof sealant or tape Basic tools: wrench, drill (if mounting), and screwdriver
- Using a Garden Hose: This is the simplest and most temporary solution. Attach a garden hose to an outdoor tap. Connect the other end of the garden hose to a simple outdoor shower fixture, often available as a stand or wall-mounted unit. Ensure the showerhead and the height are comfortable for use.
- Hard Piping with PEX/Copper: For a more permanent solution, use PEX tubing or copper pipes. This might require professional help if you’re not comfortable handling plumbing. Connect the PEX tubing or copper pipes to your house’s water supply, ensuring to install shut-off valves for control. Secure the pipes, run them to the shower location, and connect them to your shower fixture. Consider installing a mixing valve if you want both hot and cold water.
- Check for Leaks and Secure Connections: Turn on the water and check all connections for leaks. Secure all fittings with clamps or appropriate fasteners and use waterproof tape or sealant as needed.
- Drainage Considerations: Ensure proper drainage at your shower site. Create a slight slope to direct water away from your house, and optionally, install gravel, a French drain, or vegetation that can absorb water.
This approach provides a straightforward method of installation suitable for DIY enthusiasts. For more advanced systems, including plumbing into existing hot water systems or complicated drainage requirements, professional assistance is recommended.
How to winterize an outdoor shower?
Winterizing an outdoor shower is essential to prevent damage from freezing temperatures. Here’s a step-by-step guide to help you through the process:
- Turn Off the Water Supply: Locate the shut-off valve that controls the water flow to your outdoor shower and turn it off. It’s typically found inside your home or in the basement, close to where the shower pipes emerge from the wall.
- Drain the Pipes: Once the water supply is off, open the shower valves and let any remaining water drain out. Leave the valves open throughout the winter to prevent pressure build-up.
- Blow Out the Pipes: If possible, use an air compressor to blow out any remaining water in the pipes. Attach the air compressor to the drain valve and gently blow air through the pipes to expel any residual water.
- Insulate Exposed Pipes: Wrap any exposed pipes with foam pipe insulation or heat tape. Secure the insulation with duct tape or zip ties. This will help protect the pipes from freezing temperatures.
- Protect Fixtures: Remove the showerhead if possible and store it indoors. Alternatively, wrap the showerhead, taps, and other exposed fixtures with a towel, bubble wrap, or specially designed outdoor faucet insulation covers.
- Cover the Shower Area: If your outdoor shower is enclosed or has a cover, secure it in place. This will help keep out snow and debris. If there's no existing cover, consider using a tarp to shield the structure.
- Check for Leaks: Inspect your plumbing for any leaks or damage before winter sets in. Address these issues to prevent further complications during the cold months.
- Plan for Spring: Keep a note of what insulation or protection you’ve used so you can easily reverse the process when temperatures rise, and you’re ready to use the shower again.
By following these steps, you can help ensure your outdoor shower is well-protected during the winter months.
How to install an outdoor shower for beach use?
Installing an outdoor shower can be a great convenience when returning from the beach. Here’s a basic guide to help you with the installation process:
- Choose a Location: Select a location that's easily accessible from the beach but also offers some privacy. Ensure it's near a water source like an outdoor hose bib or connection point. Consider drainage; the area should naturally slope away from the house to avoid water pooling.
- Check Local Regulations: Check with your local municipality about any permits or specific regulations regarding outdoor plumbing installations. Some areas may have restrictions on drainage or need specific types of fixtures.
- Prepare the Area: Clear the area of any debris or obstacles. Install a stable, level platform for the shower area. Options include concrete pavers, wooden pallets, or a small deck to stand on. Consider privacy screens or enclosures if needed.
- Water Supply Installation: For a basic setup, you can use a garden hose with a shower attachment. Ensure it’s long enough to reach the chosen location. For a more permanent solution, run a dedicated cold water line using PVC or copper piping from the main water line. If you want hot water, extend your water heater lines outside or consider a solar outdoor shower kit.
- Install the Shower Fixture: You can purchase outdoor shower kits that come with poles, fixtures, and showerheads. Secure the shower fixture to a stable post or attach it directly to an exterior wall. Connect the water line to your shower fixture. Use outdoor-rated plumbing materials to ensure durability.
- Connect Drainage (if needed): Direct water runoff to a well-drained area or into a gravel pit. In some cases, connecting it to a greywater drainage system may be necessary but ensure compliance with local codes.
- Accessorize and Finish: Add hooks for towels and a bench or chair for convenience. Consider non-slip materials for the walking surface. Incorporate a small enclosure for privacy and protection from wind or sun.
- Testing and Adjustments: Test the water flow and drainage to ensure everything works properly. Make any necessary adjustments for optimal operation and comfort.
Tips:
- Use outdoor-rated materials to prevent rust and deterioration.
- Invest in a showerhead with an on-off switch to conserve water.
- Consider installing a foot shower for rinsing sand off feet separately.
By following these steps, you can install a functional and convenient outdoor shower for beach use.