
Best Outdoor Storage Sheds with Floors to Buy in July 2026
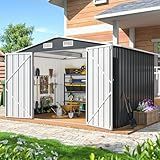
YADSUNY 10x8 FT Outdoor Storage Shed, Metal Garden Tool Shed with Updated Frame Structure and Lockable Doors, Ideal for Backyard Garden Patio Lawn, Grey
-
DURABLE GALVANIZED STEEL: ALL-WEATHER PROTECTION WITH RUST AND UV RESISTANCE.
-
EASY ASSEMBLY: REINFORCED STRUCTURE ALLOWS 35% EASIER SETUP.
-
AMPLE STORAGE SPACE: SPACIOUS DESIGN FOR ORGANIZED TOOL AND EQUIPMENT STORAGE.


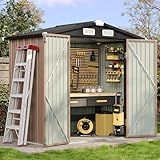
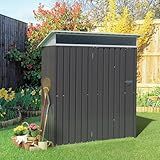
Aoxun 6.2x4 FT Shed Outdoor Storage Shed with Lockable Doors & Slooping Roof Metal Garden Tool Shed for Backyard, Patio, Poolside (Brown)
- BUILT TO LAST: HEAVY-DUTY GALVANIZED STEEL WITHSTANDS HARSH WEATHER.
- MAXIMIZE SPACE: SLOPED ROOF PREVENTS WATER BUILDUP, ENHANCES AIRFLOW.
- MULTI-PURPOSE USE: IDEAL FOR GARDEN TOOLS, PET SHELTER, AND MORE!
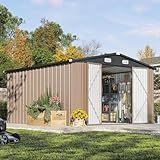
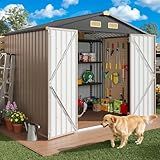
Aoxun 10 x 12FT Outdoor Storage Shed with Double Hinged Large Door Utility Garden Shed with Lockable Door & Sloped Roof Metal Sheds Outdoor Storage for Garden, Backyard, Patio and Backyard, Brown
- SPACIOUS DESIGN: EFFORTLESSLY STORE ALL YOUR OUTDOOR ESSENTIALS.
- ENHANCED DURABILITY: BUILT TO WITHSTAND RUST AND HARSH WEATHER.
- VERSATILE USE: IDEAL FOR GARDENS, PATIOS, AND POOLSIDES.
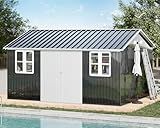
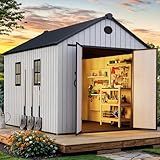
VanAcc 12x14x8.5 FT Galvanized Steel Outdoor Storage Shed with 2 4-Pane Windows Lockable Door, Nordic Cottage Shed for Backyard, Garden, Patio, Dark Grey/White
-
STYLISH NORDIC DESIGN: ELEVATE YOUR YARD WITH FUNCTIONAL COTTAGE CHARM.
-
VERSATILE STORAGE: PERFECT FOR TOOLS, EQUIPMENT, AND SEASONAL ITEMS.
-
DURABLE & WATERPROOF: BUILT TO LAST WITH ROBUST DRAINAGE AND AIR CIRCULATION.
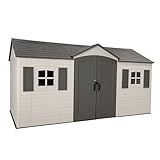
Lifetime Outdoor Storage Shed, 15x8 Ft, Desert Sand, Resin Backyard Tool Shed with Lockable Doors and UV-Protected Panels
- DURABLE DESIGN: UV-PROTECTED & STAIN-RESISTANT EXTERIOR NEEDS NO PAINTING.
- STRONG STRUCTURE: STEEL-REINFORCED, DUAL-WALL HDPE PANELS ENHANCE STABILITY.
- SPACIOUS & BRIGHT: HIGH-PITCHED ROOF AND SKYLIGHTS OFFER AMPLE INTERIOR SPACE.
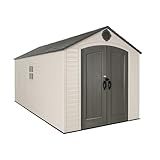
Lifetime Outdoor Storage Shed, 8x15 Ft, Desert Sand, Resin Backyard Tool Shed with Lockable Doors and Weather-Resistant Panels
- HIGH-PITCHED ROOF ENSURES QUICK RAIN/SNOW DRAINAGE & SPACIOUS WALK-AROUND.
- REINFORCED DOUBLE WALL SYSTEM FOR UNMATCHED STRENGTH & DURABILITY.
- LOCKABLE DOORS WITH HIGH-IMPACT HANDLES FOR ADDED SECURITY & CONVENIENCE.
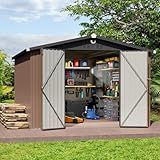
Metal Storage Shed,10x12 Outdoor Storage Building,Large Backyard Sheds with Lockable Door,Waterproof Outside Storage Shed
-
EXTRA SPACIOUS DESIGN: 10X12 FT SHED OFFERS UNMATCHED STORAGE CAPACITY.
-
COMPLETE SETUP VALUE: INCLUDES SOLAR AND WORK LIGHTS FOR ADDED CONVENIENCE.
-
DURABLE WEATHER RESISTANCE: BUILT WITH STURDY MATERIALS FOR ALL CLIMATES.
YITAHOME 8x10 FT Outdoor Storage Shed with Floor, Plastic Garden Shed for Bikes, Tools, Supplies, Waterproof Resin Shed with Lockable Doors, 2 Windows & 2 Vents for Patio, Backyard, 556 cu. Ft., Gray
-
SPACIOUS DESIGN: ACCOMMODATES BIKES, TOOLS, AND MORE IN 556 CU. FT.
-
ALL-WEATHER PROTECTION: THICK RESIN CONSTRUCTION KEEPS GEAR DRY YEAR-ROUND.
-
SECURE & BRIGHT: LOCKABLE DOORS AND WINDOWS FOR LIGHT AND VENTILATION.
Vongrasig 5 x 3 x 6 FT Outdoor Storage Shed Clearance, Metal Garden Shed with Large Window and Lockable Door, Anti-Corrosion Waterproof Tool Shed for Backyard Patio, Lawn (Dark Gray)
- DURABLE WEATHER-RESISTANT DESIGN ENSURES LONG-LASTING PERFORMANCE.
- BRIGHT, SPACIOUS INTERIOR WITH LARGE WINDOW FOR AMPLE SUNLIGHT.
- VERSATILE SHED-IDEAL FOR TOOLS, PETS, AND BACKYARD ORGANIZATION.
IRONCK 8x6FT Outdoor Storage Shed with Lockable Doors, 7.4x5.3FT Base Galvanized Steel Metal Garden Tool Shed with Breathable Vent for Yard Bins/Generator/Wheelbarrow Storage, Brown
-
DURABLE GALVANIZED STEEL FOR ALL-WEATHER PROTECTION AND LONGEVITY.
-
SPACIOUS DESIGN SUPPORTS TOOLS, BIKES, AND EVEN PET HOUSES.
-
EASY ASSEMBLY WITH CLEAR GUIDES FOR QUICK SETUP AND COMFORT.
Outdoor storage sheds with floors do require maintenance to ensure they remain functional and in good condition over time. Regular maintenance tasks often include checking the structural integrity of the shed, addressing any signs of wear and tear, and ensuring that the flooring remains solid and free from rot or pests. It's important to keep the shed clean and free from debris both inside and out, as well as to repaint or refinish the exterior when necessary to protect it from the elements. Proper ventilation can help prevent moisture buildup, which can lead to mold and mildew growth. Additionally, inspecting the roof for leaks and repairing any damaged shingles or panels is crucial to prevent water damage. Keeping the surrounding area clear of vegetation can also help reduce the risk of pest infestations and moisture accumulation. Overall, regular inspections and timely repairs can significantly extend the lifespan of an outdoor storage shed with a floor.
What is the ideal material for a shed floor?
The ideal material for a shed floor depends on factors like the intended use of the shed, climate conditions, budget, and desired durability. Here are some common options:
- Pressure-Treated Plywood: This is a popular choice due to its affordability, ease of installation, and resistance to moisture and insects. It provides a sturdy and durable surface suitable for most general purposes.
- Concrete Slab: A concrete floor is incredibly durable and low-maintenance, making it ideal for heavy-duty storage or if the shed will house heavy equipment. It's resistant to moisture and pests, but it's more expensive and requires more skill and preparation to install.
- Wooden Planks or Decking: Solid wood planks, especially those treated for outdoor use, offer a natural appearance and are robust. They provide a good aesthetic and are generally easier to repair than concrete.
- Composite Decking: Made from a mix of wood and plastic, composite decking is resistant to rot, splintering, and insects. It offers a long-lasting, low-maintenance flooring option but can be costly.
- Gravel or Crushed Stone: For a more budget-friendly and permeable option, a gravel floor can work well for smaller sheds or those primarily used for garden storage. However, it might not be suitable for heavy items or where a smooth, even surface is needed.
- Vinyl Flooring over Plywood: If you want a clean surface that is easy to clean and maintain, installing vinyl flooring over plywood can be an effective choice. It's best for a shed used as a workspace where comfort underfoot is a priority.
When choosing the material, consider the local climate (e.g., moisture levels, potential for flooding) and any specific requirements based on how the shed will be used.
What is the best method to prevent pests in a shed?
Preventing pests in a shed involves a combination of cleanliness, physical barriers, and preventive treatments. Here are some effective methods:
- Maintain Cleanliness: Regularly clean the shed to remove any debris, food sources, or nesting materials that might attract pests. Sweep the floors and clean shelves to make the environment less hospitable to insects and rodents.
- Proper Storage: Store items in sealed, pest-proof containers. Use plastic bins with tight-fitting lids instead of cardboard boxes, which can be easily chewed through or damaged by moisture.
- Seal Entry Points: Inspect the shed for any holes, cracks, or gaps in the walls, doors, windows, and around the foundation. Seal these with caulk, weatherstripping, or steel wool to prevent pests from getting inside.
- Control Moisture: Many pests are attracted to damp environments. Ensure the shed is well-ventilated and address any leaks or standing water. Use dehumidifiers or moisture absorbers if necessary.
- Landscaping: Keep vegetation, wood piles, and debris away from the shed's perimeter. Trim back any branches or tall grass, as these can provide a bridge for pests to enter.
- Lighting Management: Use yellow or sodium vapor lights outside the shed as they are less attractive to flying insects. Ensure exterior lighting is angled away from the structure.
- Natural Repellents: Use natural deterrents, such as cedar blocks or sachets filled with peppermint or clove oil, to repel certain pests.
- Regular Inspections: Conduct routine inspections for signs of pests, such as droppings, chewed items, or nests, and address any issues immediately.
- Professional Pest Control: If you have a persistent pest problem, consider consulting a professional pest control service for treatments that are safe and effective for shed environments.
Implementing these methods can significantly reduce the likelihood of pest infestations in your shed.
What is the best way to address uneven shed floors?
Addressing uneven shed floors involves a few options depending on the severity of the issue and your preferences. Here are some potential solutions:
- Shimming: For mild unevenness, shimming can be a quick fix. Use wood or plastic shims to level the floor by inserting them under the low spots until the floor is even.
- Self-Leveling Compound: For concrete floors, a self-leveling compound can be applied to even out the surface. This is a liquid product you pour over the floor that settles into low spots and creates a level surface.
- Plywood Overlay: For severe unevenness on wooden floors, consider adding a layer of plywood on top of the existing floor. Begin by using a level to identify low spots and then cut plywood to fit, ensuring it's properly supported underneath.
- Joist Adjustment: If the unevenness is due to issues with floor joists, you may need to access the subfloor to shim or adjust the joists. This could involve jacking up the low joist and securing it in place.
- Rebuilding the Floor: In cases where the underlying structure is compromised, such as rot or extensive damage, rebuilding the floor might be necessary. This would involve removing the existing floor and constructing a new, level floor.
- Ground Preparation: If the shed is on uneven ground, consider addressing this first by removing the shed temporarily and leveling the ground with gravel or compacted soil before placing the shed back.
- Professional Help: If the unevenness is significant or you're unsure about DIY methods, hiring a professional can ensure the job is done safely and efficiently.
Before beginning any repair work, it's important to assess the root cause of the unevenness and ensure there are no structural issues that need to be addressed first.
What is the recommended treatment for wooden shed floors?
To properly treat and maintain a wooden shed floor, follow these recommended steps:
- Cleaning: Begin by sweeping the floor to remove dirt, leaves, and other debris. If needed, wash the floor with a mild detergent and water to remove any stubborn stains or dirt. Allow the floor to dry completely before proceeding.
- Inspection: Check the floor for any signs of damage, such as rot, mold, or insect infestations. Address any issues you find, which might include replacing damaged boards or treating with an appropriate fungicide or insecticide.
- Sanding: Lightly sand the floor to remove any rough spots or previous treatments that have started to break down. Use a coarse-grit sandpaper for any stubborn areas, followed by a finer grit for a smoother finish.
- Sealing: Apply a wood preservative or sealer to protect the wood from moisture and other elements. Choose a product that is suitable for outdoor use and preferably offers UV protection. Apply it evenly with a brush or roller, following the manufacturer's instructions for drying time and the number of coats needed.
- Painting or Staining (Optional): If you wish to add color or an additional layer of protection, you can either paint or stain the floor once the sealer has fully dried. Make sure to use a product that is designed for exterior use and appropriate for floors with foot traffic.
- Regular Maintenance: Keep the shed floor clean and dry to prevent moisture damage. Check periodically for signs of wear and reapply a wood preservative or sealer every couple of years or as needed depending on the exposure to weather and use.
By following these steps, you can help extend the life of your wooden shed floor and keep it in good condition.
How to remove stains from a shed floor?
Removing stains from a shed floor depends on the type of flooring material and the nature of the stain. Here are some general steps and suggestions for various types of floors and stains:
Concrete Floors
- Oil Stains: Absorb: Sprinkle cat litter, cornstarch, or baking soda over the stain to absorb excess oil. Let it sit for several hours or overnight, then sweep it up. Clean: Apply a mixture of warm water and a few drops of dish soap to the area. Scrub with a stiff brush and rinse with clean water. Tough Stains: If stains persist, use a commercial concrete cleaner, degreaser, or create a paste with baking soda and water. Let it sit for some time before scrubbing and rinsing.
- Rust Stains: Lemon Juice or Vinegar: Apply lemon juice or white vinegar directly to the rust stain. Allow it to sit for about 10-15 minutes. Scrub with a stiff brush, then rinse. Commercial Rust Removers: For stubborn stains, consider specialized rust removers intended for concrete.
- Mold or Mildew: Bleach Solution: Mix one part bleach with four parts water. Apply the solution, scrub with a brush, and rinse thoroughly with clean water (ensure proper ventilation when using bleach).
Wooden Floors
- General Stains: Mild Soap and Water: Use a soft brush or cloth with mild dish soap mixed with water. Avoid excessive water to prevent wood damage. Commercial Wood Cleaner: Consider using wood-specific cleaning products according to the manufacturer’s instructions.
- Mold or Mildew: Vinegar Solution: Mix equal parts water and white vinegar. Apply with a soft cloth and scrub gently.
Vinyl or Composite Floors
- General Stains: Soap and Water: Clean using a mixture of warm water and mild dish detergent. Use a mop or soft cloth to scrub gently. Non-Abrasive Cleaners: Consider using a non-abrasive all-purpose cleaner for tougher stains.
- Scuff Marks: Eraser: Rub a pencil eraser over the scuff mark. Baking Soda Paste: Create a paste with baking soda and water. Rub gently on the scuff mark with a soft cloth.
General Tips
- Always test cleaning solutions on a small, inconspicuous area first to ensure no damage.
- For all floors, ensure proper ventilation, especially when using chemical cleaners.
- Wear protection such as gloves and masks if using harsh chemicals.
By identifying the type of stain and flooring, you can choose the most effective and safest cleaning method.
How to prevent mold in a shed?
Preventing mold in a shed involves controlling moisture and ensuring good ventilation. Here are some steps to help keep mold at bay:
- Ventilation: Ensure your shed is well-ventilated. Install vents at the upper part of the walls or roof to facilitate airflow. Keeping windows or doors open for periods can also help reduce moisture build-up.
- Dehumidification: Use a dehumidifier to reduce moisture levels, especially in humid climates.
- Weatherproofing: Check for leaks and seal any gaps or cracks in the shed's structure. Make sure the roof is sound and that it's water-tight. Consider using weatherproof paint or sealant on outer walls.
- Manage Water Around the Shed: Ensure that the ground around the shed slopes away to prevent water accumulation. Use gutters and downspouts to redirect rainwater away from the shed.
- Insulation: Proper insulation can help regulate the temperature and moisture levels inside the shed, reducing the chances of condensation.
- Keep It Dry: Avoid storing wet items inside the shed. Ensure tools and materials are dry before storage.
- Reduce Indoor Humidity: Avoid activities that produce moisture within the shed, like watering plants or laundry drying.
- Periodic Maintenance: Regularly inspect and maintain your shed. Look for signs of moisture or mold so they can be addressed promptly.
- Use Mold-Resistant Products: Consider using materials treated to resist mold, like mold-resistant paint or drywall, when building or renovating the shed.
- Raise Stored Items: Store items off the ground on shelves or pallets to allow air circulation and prevent moisture absorption.
By implementing these steps, you can significantly reduce the risk of mold developing in your shed.