Best Outdoor Storage Sheds with Floors to Buy in July 2026

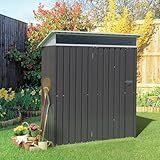
Aoxun 6.2x4 FT Shed Outdoor Storage Shed with Lockable Doors & Slooping Roof Metal Garden Tool Shed for Backyard, Patio, Poolside (Brown)
-
WEATHER-RESISTANT DESIGN ENSURES LONG-LASTING DURABILITY AND STABILITY.
-
MAXIMIZED VENTILATION AND DRAINAGE FOR A BREATHABLY SECURE SPACE.
-
VERSATILE USE: PERFECT FOR STORAGE, PETS, OR GARBAGE ENCLOSURE.


YADSUNY 10x8 FT Outdoor Storage Shed, Metal Garden Tool Shed with Updated Frame Structure and Lockable Doors, Ideal for Backyard Garden Patio Lawn, Grey
-
DURABLE GALVANIZED STEEL PROVIDES ALL-WEATHER PROTECTION YEAR-ROUND.
-
EASY ASSEMBLY: 35% FASTER SETUP WITH A REINFORCED STRUCTURE DESIGN.
-
AMPLE ORGANIZED SPACE WITH LOCKABLE DOOR FOR SECURE STORAGE SOLUTIONS.
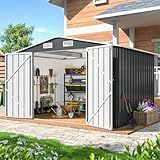
Suncast Outdoor Storage Cabinet Waterproof Resin Vertical Outdoor Storage Shed (54 cu. ft.) for Patio, Garden Tools, Cushions, & Equipment. Weatherproof Plastic Multi-Wall Design, Capacity Made in USA
-
SECURE STORAGE: PADLOCK-READY DESIGN ENSURES YOUR ITEMS STAY SAFE.
-
ALL-WEATHER DURABLE: BUILT TO WITHSTAND ELEMENTS, NO MAINTENANCE REQUIRED.
-
CUSTOMIZABLE SPACE: ADJUSTABLE SHELVES FOR ORGANIZED, EFFICIENT STORAGE.
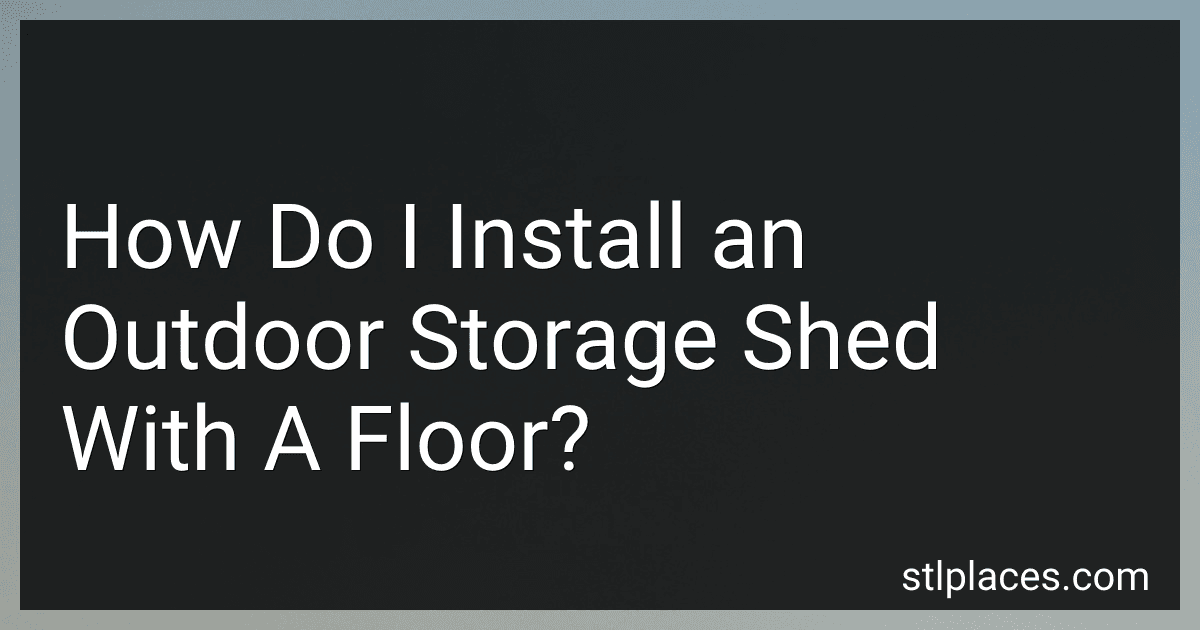
DAUSOLA 10x10 FT Outdoor Storage Shed, Metal Garden Tool Shed with Updated Frame Structure, Lockable Doors and Windows, Ideal for Backyard Garden Patio Lawn, Grey
-
DURABLE ALL-WEATHER PROTECTION: GALVANIZED STEEL BODY, RUST AND UV-RESISTANT.
-
EASY ASSEMBLY: 35% EASIER ASSEMBLY FOR STABILITY AND PRACTICALITY.
-
SPACIOUS ORGANIZATION: AMPLE STORAGE FOR TOOLS WITH DETAILED DESIGN FEATURES.

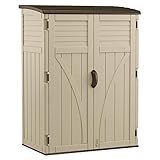
Aoxun 10 x 12FT Outdoor Storage Shed with Double Hinged Large Door Utility Garden Shed with Lockable Door & Sloped Roof Metal Sheds Outdoor Storage for Garden, Backyard, Patio and Backyard, Brown
-
MAXIMIZE STORAGE: STORE ALL ESSENTIALS WITH GENEROUS SPACE AND SMART RACKS!
-
WEATHERPROOF DESIGN: SLOPED ROOF AND VENTILATION ENSURE PROTECTION AND AIRFLOW.
-
VERSATILE USE: IDEAL FOR TOOLS, TOYS, AND OUTDOOR GEAR-PERFECT FOR ANY SPACE!

Vongrasig 5 x 3 x 6 FT Outdoor Storage Shed, Metal Tool Shed Clearance Garden Steel Shed with Side Window and Lockable Door Waterproof Tool Shed for Backyard Patio, Lawn (Gray)
-
WEATHER-RESISTANT DESIGN: DURABLE STEEL PREVENTS RUST AND ROT YEAR-ROUND.
-
BRIGHT, INVITING SPACE: SIDE WINDOW AND VENTS ENSURE A WELL-LIT, COMFY SHED.
-
VERSATILE STORAGE SOLUTION: PERFECT FOR TOOLS, PETS, AND OUTDOOR ORGANIZATION.
Vongrasig 5 x 3 x 6 FT Outdoor Storage Shed Clearance, Metal Garden Shed with Large Window and Lockable Door, Anti-Corrosion Waterproof Tool Shed for Backyard Patio, Lawn (Dark Gray)
- ROBUST STEEL DESIGN ENSURES YEAR-ROUND WEATHER RESISTANCE AND DURABILITY.
- BRIGHT WINDOW AND VENTS CREATE A COMFORTABLE, WELL-LIT STORAGE SPACE.
- VERSATILE USE: IDEAL FOR TOOLS, GARDEN SUPPLIES, OR EVEN AS A PET HOUSE.
To install an outdoor storage shed with a floor, start by selecting a suitable location that is level and easily accessible. Clear the area of any debris, rocks, or vegetation that might interfere with the construction. Next, you need to prepare the foundation; a flat concrete slab, compacted gravel, or pressure-treated wood beams are common choices. Ensure that the surface is level and properly graded to prevent water pooling under the shed.
Once the foundation is ready, assemble the floor frame according to the manufacturer's instructions, making sure it is square and level. Secure it to the foundation using appropriate anchors. Begin assembling the shed walls by positioning them onto the floor frame, following the instructions carefully and attaching them securely. Install the roof by fastening the trusses and attaching the roof panels, ensuring they are properly aligned and sealed to protect against the weather.
Finally, install the doors and windows, ensuring they are aligned properly and open and close smoothly. Apply any finishing touches, such as trim or paint, to enhance the shed's appearance and protect it from the elements. It may be helpful to have another person assist with the assembly to ensure accuracy and safety throughout the process.
What tools are needed to install a shed?
Installing a shed typically requires a variety of tools to ensure that the structure is stable, level, and durable. Here is a list of common tools you might need for shed installation:
- Measuring Tools: Tape measure Carpenter’s square or framing square Level
- Marking Tools: Pencil or chalk Marking line or string
- Digging and Landscaping Tools (if a foundation is required): Shovel or spade Post hole digger Rake
- Foundation Tools (for concrete or wooden foundations): Wheelbarrow Concrete mixer (if using concrete) Trowel Tamper or compactor (for gravel foundations)
- Cutting Tools: Handsaw or circular saw Utility knife
- Fastening Tools: Hammer Screwdriver set Power drill and drill bits Screw gun Wrench or socket set
- Framing and Assembly Tools: Nail gun (optional for faster assembly) Clamps
- Roofing Tools: Ladder Roofing nails or screws Staple gun (for roofing felt)
- Safety Equipment: Safety glasses Gloves Hard hat
- Miscellaneous: C-clamps Adjustable wrench Pry bar
Depending on the shed design, additional tools may be necessary, such as those required for specific roofing, siding, or anchoring systems. It's important to carefully review the shed installation instructions or guide for any specific tool requirements to ensure a smooth building process.
What is the standard size for an outdoor shed?
The standard size for an outdoor shed can vary depending on its intended use, location, and the space available in your yard. However, several common sizes are typically used:
- Small Sheds: These are usually around 6x8 feet or 8x8 feet. They are suitable for storing a few garden tools, bicycles, or a lawnmower.
- Medium Sheds: Sizes such as 10x10 feet, 10x12 feet, or 10x14 feet are popular. They provide more storage space and may accommodate larger equipment like snow blowers or riding mowers.
- Large Sheds: These can be 12x16 feet, 12x20 feet, or even larger. They offer enough room for a workshop, multiple large pieces of equipment, or more extensive storage needs.
When choosing a shed size, consider the items you plan to store, any additional space you might need for future acquisitions, local zoning restrictions, and how much yard space you can dedicate to the shed.
What is the best foundation for a garden shed?
The best foundation for a garden shed depends on several factors, including the size and weight of the shed, the type of soil, the climate, and your budget. Here are some common options:
- Concrete Slab: This is one of the most durable and low-maintenance options. It's best for larger sheds and provides a strong, stable base. However, it can be more expensive and labor-intensive to install.
- Gravel with a Wood Frame: Ideal for smaller sheds, this option provides good drainage and is relatively easy to install. It involves constructing a wooden frame and filling it with gravel to create a level surface.
- Concrete Blocks or Pavers: These are a good option for small to medium-sized sheds and are easy to install. They provide decent drainage and can keep the shed above ground level, which helps prevent moisture issues.
- Timber Skids (Pressure-Treated Lumber): This is a traditional method that's relatively easy and inexpensive. It consists of laying timber beams directly on the ground or on a gravel bed to support the shed.
- Plastic Base: These are pre-formed plastic grids that can be filled with gravel. They are lightweight, easy to install, and provide excellent drainage. They are suitable for smaller sheds and areas where the ground conditions aren't ideal.
- Pier Foundation: This involves using concrete piers or posts buried in the ground. It’s a good option if you have uneven terrain or want to lift the shed off the ground to allow airflow and prevent moisture buildup.
Before deciding on a foundation type, consider local building codes and any regulations related to outbuildings. Proper site preparation, such as leveling and clearing the area, is essential regardless of the foundation type you choose.
How do I extend the life of my shed?
Extending the life of your shed involves regular maintenance, protective measures, and making smart choices in initial construction and location. Here are some tips to help prolong the lifespan of your shed:
- Foundation and Location: Ensure your shed is built on a proper foundation that provides stability and prevents water from pooling underneath. Consider concrete slabs, gravel, or treated wooden bases. Choose a location with good drainage and away from low spots where water collects.
- Regular Inspections: Conduct periodic inspections to check for any signs of wear, damage, or water ingress. Look for cracks, holes, or areas where pests might enter.
- Roof Maintenance: Inspect and maintain the roof regularly. Replace damaged shingles or panels and clear debris to prevent water from pooling.
- Protective Coatings: Apply protective coatings or paint to wooden sheds to guard against moisture and UV damage. Regularly repaint or reseal as needed.
- Ventilation: Ensure your shed is properly ventilated to prevent moisture buildup and mold growth. Install vents or use breathable materials.
- Waterproofing: Check for and repair any leaks promptly. Use weather stripping on doors and windows to prevent water ingress.
- Pest Control: Keep the area around the shed clear of debris and vegetation that can attract pests. Use pest deterrents and seal potential entry points.
- Regular Cleaning: Keep the shed clean and uncluttered. Regularly sweep, mop, and declutter to prevent conditions that promote decay or attract pests.
- Repair Damage Promptly: Address any structural damage immediately to prevent it from worsening. This includes fixing leaks, replacing broken parts, and securing loose panels.
- Guttering and Drainage: Install gutters and downspouts to direct water away from the shed. Ensure they are clear of leaves and debris.
- Avoid Moisture Traps: Store items inside that can absorb moisture off the ground and ensure they do not touch the walls.
- Seasonal Care: Prepare your shed for different seasons. For example, remove snow buildup from the roof in winter and clear leaves in the fall.
These practices will help ensure your shed remains in good condition for as long as possible.
What is the benefit of a pre-fabricated shed?
Pre-fabricated sheds offer several benefits, making them an attractive option for many homeowners and businesses. Here are some of the primary advantages:
- Ease of Installation: Pre-fabricated sheds come with all the necessary parts and instructions, simplifying the assembly process. Many can be assembled by homeowners without professional assistance.
- Time-Saving: Because the components are pre-made, construction time is significantly reduced compared to building a shed from scratch. This means you can have a functional shed much sooner.
- Cost-Effective: Pre-fabricated sheds are often more affordable than custom-built options. They are manufactured in large quantities, allowing for cost savings that are passed on to the customer.
- Variety of Styles and Sizes: Manufacturers offer a wide range of styles, sizes, and materials, making it easier for buyers to find an option that suits their aesthetic preferences and functional needs.
- Quality Control: Pre-fabricated sheds are constructed in controlled factory environments, which can lead to higher quality and consistency in materials and construction techniques compared to on-site builds.
- Portability: Many pre-fabricated sheds are designed to be portable, allowing them to be relocated if needed, which is not always possible with traditional construction.
- Low Maintenance: Depending on the materials used, pre-fabricated sheds can require less maintenance. For example, metal or plastic options are often more weather-resistant and durable than wooden sheds.
- Environmentally Friendly Options: Many manufacturers offer eco-friendly materials and designs, such as recycled materials or energy-efficient insulation, which can be a consideration for environmentally conscious consumers.
- Predictable Costs: With a pre-fabricated shed, costs are typically fixed once you've made your selection, reducing the likelihood of unforeseen expenses due to changes in material prices or construction delays.
Overall, pre-fabricated sheds provide convenience, cost savings, and a variety of choices, making them a practical solution for many storage and organizational needs.