
Best Outdoor Shower Kits to Buy in July 2026
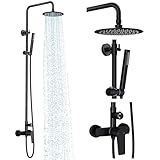
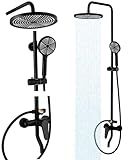
Rainsworth Outdoor Shower Kit Matte Black - Single Handle Brass Valve, 8 Inch Rain Shower Head and Handheld Spray Shower Fixture Combo, 304 Stainless Steel Wall Mount
-
VERSATILE FIT: ADJUSTABLE 5.5-6.3 INCH HOLE DISTANCE FOR EASY INSTALLATION.
-
BUILT TO LAST: DURABLE 304 STAINLESS STEEL & BRASS, RUST-RESISTANT DESIGN.
-
FAMILY-FRIENDLY: ADJUSTABLE HEIGHT FOR COMFORT, NO EXTRA DRILLING NEEDED.


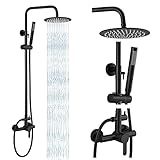
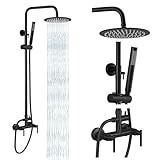
gotonovo Outdoor Shower Fixtures SUS304 Stainless Steel Rain Shower Kit Faucet High Pressure Wall Mount 2 Dual Function 8 Inch Showerhead and Handheld Spray Combo, Single Handle, Matte Black
- DURABLE SUS STAINLESS STEEL: RUST-RESISTANT, STYLISH MATTE BLACK FINISH.
- VERSATILE FUNCTIONALITY: SWITCH BETWEEN TOP SHOWER AND HANDHELD SPRAY.
- HASSLE-FREE INSTALLATION: SURFACE MOUNT WITH ALL HARDWARE INCLUDED.
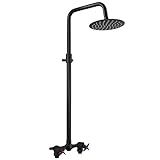
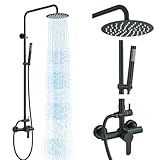
Aolemi Outdoor Shower Kit - Double Handle Exposed Shower with 8 Inch Rainfall Shower Head - Adjustable Height - Matte Black
- DURABLE BRASS & STAINLESS STEEL WITHSTAND CORROSION FOR LASTING USE.
- 8 SHOWER HEAD BOOSTS PRESSURE FOR A REFRESHING RAIN-LIKE EXPERIENCE.
- ADJUSTABLE HEIGHT & EASY INSTALLATION MAKE CUSTOM SETUP EFFORTLESS!
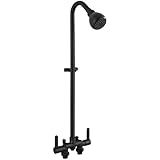
Aolemi Outdoor Shower Fixtures Kit Faucet System 3 Inch Center with Showerhead 2 Handle Exposed Shower with Brass Mix Valve Matte Black
- DURABLE ABS & BRASS BUILD: ENSURES RELIABILITY IN ANY OUTDOOR SETTING.
- ROTATABLE SHOWERHEAD: ENJOY OPTIMAL SPRAY PERFORMANCE, EVEN ON LOW PRESSURE.
- HASSLE-FREE INSTALLATION: ALL ACCESSORIES INCLUDED FOR EASY SETUP ANYTIME.
RALANDA Outdoor Shower Fixture,3 Functions Handle Tub Rainfall Shower Faucet Sets with Dial Thermometer Brass Valve, Exposed Shower System with 10'' Rainfall Shower Head Adjustable (Matte Black)
-
DURABLE STAINLESS STEEL: MATTE BLACK FINISH RESISTS RUST, PEELING, AND DISCOLORATION.
-
3 FUNCTIONAL SHOWER MODES: ENJOY VERSATILE CLEANING WITH HANDHELD AND TOP SHOWER OPTIONS.
-
SAFETY FIRST DESIGN: DIAL THERMOMETER PREVENTS BURNS; ADJUSTABLE HEIGHT FOR ALL USERS.
gotonovo Outdoor Shower Fixtures SUS304 Stainless Steel Rain Shower Kit Faucet High Pressure Wall Mount 2 Dual Function 8 Inch Showerhead and Handheld Spray Combo, Double Lever Handle, Matte Black
- DURABLE SUS304 STAINLESS STEEL RESISTS RUST AND DISCOLORATION.
- VERSATILE DUAL-FUNCTION: SWITCH BETWEEN TOP SHOWER AND HANDHELD.
- EASY RETROFIT INSTALLATION WITH ALL HARDWARE INCLUDED-SIMPLE SETUP!
MOSSON Shower System Matte Black Outdoor Shower Fixtures with 8" Rain Shower Head Handheld Sprayer Single Handle 304 Stainless Steel Wall Mounted Shower Shower Faucet Combo for Bathroom or Backyard
- DURABLE 304 STAINLESS STEEL RESISTS TARNISH AND CORROSION EFFECTIVELY.
- VERSATILE DUAL FUNCTION WITH RAIN SHOWER HEAD AND HANDY SPRAYER!
- ADJUSTABLE HEIGHT FITS VARIOUS USER NEEDS; EASY INSTALLATION GUARANTEED!
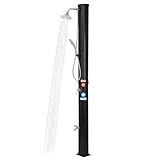
9.3 Gallon Solar Heated Outdoor Shower, 7.2FT Height, 360°Rotating Rainfall + 6FT Handheld Shower + Foot Faucet, Freestanding Black Poolside Shower with Hot & Cold Water Adjustment
- 9.3 GALLONS OF WATER - ENJOY HOT OR COLD SHOWERS WITH AMPLE CAPACITY.
- DURABLE CONSTRUCTION - SCRATCH-RESISTANT FOR LONG-LASTING OUTDOOR USE.
- SOLAR HEATED WATER - ECO-FRIENDLY HEATING RAISES TEMP UP TO 140℉.

Aolemi Outdoor Shower Faucet Matte Black SUS304 Shower Fixture Combo Set Stainless Steel 8 inch Rainfall Shower Head Kit Single Handle High Pressure Hand Spray Wall Mount 2 Dual Function Single Handle
- DURABLE PREMIUM 304 STAINLESS STEEL: ANTI-OXIDATION, ANTI-SCRATCH.
- VERSATILE DUAL FUNCTIONS: EASILY SWITCH BETWEEN HAND AND TOP SHOWERHEAD.
- ADJUSTABLE HEIGHT: CUSTOMIZE FROM 33.4 TO 51 FOR OPTIMAL COMFORT.
The time it takes to install an outdoor shower can vary based on several factors including the complexity of the design, the availability of plumbing, and if the shower is installed by a professional or as a DIY project. A basic setup connected to an existing water line might take just a few hours for someone experienced with plumbing and construction. If the installation requires extensive plumbing work, concrete pads, or custom fixtures, it could take a day or two. Additionally, complications or lack of experience may extend the timeframe. It’s essential to account for time spent on planning, gathering materials, and addressing unforeseen challenges during the installation process.
How to connect plumbing for an outdoor shower?
Connecting plumbing for an outdoor shower involves several steps and requires a basic understanding of plumbing. Here's a general guide to help you get started. Remember that local plumbing codes and regulations should always be followed, and it's often a good idea to consult with or hire a professional plumber.
Materials Needed
- Outdoor shower fixture
- PEX or PVC pipes
- Pipe fittings (elbows, tees, connectors)
- Shutoff valves
- Hose bib
- Pipe insulation
- Pipe clamps or brackets
- Teflon tape or pipe sealant
- Screwdriver
- Wrench
- Pipe cutter
- Tape measure
- Drill and appropriate bits
Steps
- Plan the Installation Location: Choose a location with good drainage and sunlight for drying. Water Source: Identify the nearest water supply connection. This can be from an existing outdoor faucet, a hose bib, or directly from the house’s water supply line.
- Lay Out the Plumbing Lines Determine the path of the plumbing lines from the water source to the shower. Avoid areas prone to freezing if you're in a climate that requires it. Measure and cut your PEX or PVC pipes to the necessary lengths.
- Shut Off Water Supply Turn off the main water supply to your home to prevent leaks while connecting the new lines.
- Install Shutoff Valves Install shutoff valves near the connection point to the main water line. This allows you to shut off water only to the outdoor shower if needed without affecting the rest of your home.
- Connect the Water Supply Connect your pipe to the water supply line. Use Teflon tape or pipe sealant to prevent leaks at joints. Ensure that hot and cold water lines (if both are needed) are connected properly. This usually involves installing a mixing valve.
- Run Pipes to the Shower Location Secure the pipes to avoid movement using clamps or brackets, ensuring they are properly supported. Use elbows to navigate corners and add tees if connecting more than one fixture.
- Connect the Shower Fixture Attach the piping to the outdoor shower fixture. Follow the manufacturer's instructions for any specific installation requirements.
- Test for Leaks Turn on the water supply and check for leaks at all joints and connections. Tighten connections or reapply sealant as needed.
- Insulate Pipes If you live in a freezing climate, insulate the pipes to prevent freezing. Use pipe insulation and protective covers.
- Finalize Installation Once all connections are secure and leak-free, fix the shower fixture to a stable structure like a wall or a post. Check for correct water temperature mixing if applicable.
Safety and Code Compliance
- Permits: Check if permits are required in your area for installing an outdoor shower.
- Regulations: Make sure your installation complies with local building codes, especially concerning drainage and backflow prevention.
- Professional Help: If in doubt, hire a professional plumber to ensure safe and code-compliant installation.
By following these steps, you should be able to successfully connect plumbing for an outdoor shower.
What is the best material for an outdoor shower?
When selecting materials for an outdoor shower, it's important to consider durability, resistance to weather elements, maintenance, and aesthetics. Here are some of the best materials for different parts of an outdoor shower:
- Shower Structure and Walls: Cedar or Teak Wood: Both cedar and teak are naturally resistant to water damage and decay, making them excellent choices for outdoor showers. They also provide a warm, natural look. Regular maintenance like sealing or oiling can extend their lifespan. Composite Decking: Made from a combination of wood and plastic, composite materials are highly durable, water-resistant, and require less maintenance than natural wood. Stainless Steel: Provides a modern aesthetic and is highly resistant to rust and corrosion. Stone or Tile: Natural stone or non-slip outdoor-rated tiles can create a luxurious look and are highly durable.
- Flooring: Decking Tiles: Snap-together tiles made from wood or composite materials offer easy installation and good drainage. Concrete or Stone Slabs: Durable and easy to clean, concrete or stone floors can be designed for proper drainage and offer a solid foundation. Pebble Flooring: Provides a natural look and excellent drainage, but may require more maintenance to prevent mold and mildew growth.
- Plumbing Fixtures: Brass or Stainless Steel Fixtures: Both materials are rust-resistant and durable, suitable for various weather conditions. Stainless steel, in particular, offers a sleek and modern appearance.
- Roofing: Open or Louvered Roof: If you want some coverage for privacy and protection from elements, consider a pergola-style or louvered roof made from wood or metal that allows light and air through while protecting from rain.
- Finishing Touches: Waterproof and UV-Resistant Paints and Stains: Using high-quality, outdoor-rated paints and stains can help protect wooden components from moisture and UV damage.
When choosing materials, also consider the climate of your area, as this can impact the longevity and performance of different materials.
How to incorporate plants around an outdoor shower?
Incorporating plants around an outdoor shower can create a natural, relaxing environment. Here are some ideas to enhance your outdoor shower with greenery:
- Choose the Right Plants: Tropical Plants: Consider palms, ferns, or banana plants for a lush, tropical feel. Scented Plants: Lavender or jasmine can add a pleasant fragrance. Grasses and Bamboo: These can provide privacy and a natural screen. Succulents: Ideal for drier climates, these require minimal care.
- Planting Arrangements: Hedge or Privacy Screen: Use tall plants or hedges to create privacy around the shower area. Vertical Garden: Install a vertical planter or wall garden for space-saving greenery. Surrounding Beds: Plant a garden bed around the base of the shower for a verdant border.
- Pots and Containers: Use large pots or containers to introduce plants that might not be native to the area. Consider wheeled containers or lightweight materials for easy movement and care.
- Ground Cover: Use moss, creeping thyme, or clover around the shower area for a soft, lush ground cover.
- Climbing Plants: Install a trellis or lattice for climbing plants like ivy or bougainvillea to grow on, adding vertical interest and privacy.
- Maintenance Considerations: Ensure good drainage around the shower area to prevent waterlogging. Choose plants suited to the sun and shade conditions of your shower location. Consider using native plants for easier maintenance and better adaptability.
- Decorative Elements: Incorporate natural stones or pebbles among plants to enhance the aesthetic. Use driftwood or rustic elements as accents within the plant arrangement.
By carefully selecting and arranging plants, you can create a natural oasis around your outdoor shower that's both beautiful and functional.
How to build a DIY outdoor shower enclosure?
Building a DIY outdoor shower enclosure can be a practical and refreshing addition to your home, especially if you enjoy spending time outdoors or live in a beachy or warm climate. Here is a straightforward guide to help you create a simple outdoor shower enclosure:
Materials Needed:
- Pressure-treated wood or cedar - resistant to moisture and rot
- Concrete mix or pavers - for the shower base
- Shower fixtures - outdoor-rated showerhead, valve, and plumbing
- Screws and nails - galvanized or stainless steel
- Hinges and latch - for the door
- Post hole digger or auger
- Gravel - for drainage at the base
- Waterproof sealer (optional) - to protect the wood
- PVC or garden hose (optional) - if you are not connecting directly to plumbing
- Shovel
Tools Needed:
- Drill
- Saw - circular or miter saw for cutting wood
- Level
- Tape measure
- Wrench - for plumbing work
Steps:
- Choose the Location: Ensure access to water. Consider privacy-pick a spot not easily visible from nearby homes or streets. Ensure there's good drainage.
- Prepare the Ground: Level the area for the shower. Add a gravel base for drainage; this helps prevent standing water.
- Install the Posts: Use a post hole digger or auger to dig holes for the corner posts of your enclosure. Each hole should be about 18-24 inches deep. Set the posts in the holes, using concrete to secure them. Ensure they are plumb and level. Let the concrete cure as directed (usually 24-48 hours).
- Construct the Frame: Attach top and bottom horizontal beams to form the frame of the enclosure. This adds stability to the structure.
- Add Privacy Walls: Attach vertical boards or slats between the posts. You can use a staggered pattern or leave small gaps for airflow, depending on your privacy needs. Ensure boards are evenly spaced and securely attached.
- Plumb the Shower: Install the shower head and fixtures. Connect to a water source, either using plumbing or a simple garden hose hookup for a more temporary solution. Test for leaks and ensure everything is functioning correctly.
- Build the Door: Use remaining wood to build a simple door. Hang the door using durable hinges and attach a latch for securing.
- Finish the Enclosure: Apply a waterproof sealer to protect the wood if desired. Consider adding a small mat or pavers for stepping out of the shower.
- Test Your Shower: Run the water to ensure proper drainage and check all fixtures for leaks. Make adjustments as necessary to improve comfort and function.
Maintenance Tips:
- Regularly check for any signs of wear, rot, or leaks.
- Reapply waterproof sealer as needed to extend the life of the wood.
- Clean regularly to prevent buildup of soap scum or algae.
Building an outdoor shower enclosure can add convenience and value to your home. Always ensure any plumbing connections comply with local codes and regulations.