Best Electric Dirt Bike Accessories to Buy in July 2026
Lamicall Bike Phone Holder, Motorcycle Mount - Motorcycle Phone Holder, Handlebar Cell Phone Clamp, Scooter Phone Clip Gifts for iPhone 17 Air Pro Max, 16 15 Plus, S20, 4.7 to 6.8" Smartphones
- SECURE GRIP: KEEPS YOUR PHONE SAFE ON BUMPY RIDES.
- SHOCKPROOF DESIGN: PROTECTS AGAINST SCRATCHES AND VIBRATIONS.
- UNIVERSAL FIT: COMPATIBLE WITH MOST PHONES 4.7 TO 6.8.


BATFOX Dirt Bike ATV Goggles Motorcycle Gear Riding Motocross Dirtbike 4-Wheeler MX DH Accessories Goggles Glasses for Men Women Youth UV400 Protection Dust-proof Anti-Slip Strap
- IMPACT-RESISTANT DESIGN: ENHANCED PC LENSES FOR MAXIMUM PROTECTION.
- LIGHTWEIGHT & ADJUSTABLE: ONLY 3.52OZ AND A PERFECT FIT FOR EVERYONE.
- VERSATILE USAGE: IDEAL FOR VARIOUS OUTDOOR SPORTS AND ACTIVITIES.
Funparts Electric Dirt Bike Bag Front Frame Bag Universal for Sur Ron Surron LBX Tuttio Soleil 01 E-Ride Pro SS/S Rawrr Mantis,Fit for ID Phone Key Garage Door Opener Black
- PERFECT FIT FOR SUR RON, TUTTIO SOLEIL, AND MANTIS E-BIKES!
- WATERPROOF AND DURABLE-KEEP YOUR ESSENTIALS SAFE IN ANY WEATHER!
- EASY VELCRO INSTALLATION ENSURES A SECURE RIDE WITHOUT HASSLE!
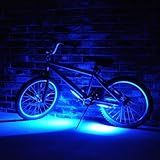
Brightz GoBrightz LED Bike Frame Light, Blue - Cool Underglow Bike Light for Riding at Night Bicycle Scooter Stroller Stocking Stuffers for Boys Girls Teens Ages 6 7 8 9 10 11 12
-
ENHANCE VISIBILITY: BRIGHT LED LIGHTS IMPROVE NIGHTTIME SAFETY WHILE RIDING.
-
CUSTOMIZABLE MODES: ENJOY 4 LIGHT MODES FOR SAFETY AND FUN NIGHT RIDES.
-
GREAT GIFT IDEA: PERFECT FOR RIDERS OF ALL AGES, IDEAL FOR ANY OCCASION!

ODI Downhill Number Plate, Ag, Black
- SLEEK CURVED DESIGN HIDES CABLES FOR A CLEAN LOOK.
- LOW PROFILE ENSURES UNOBSTRUCTED VISIBILITY WHILE RIDING.
- QUICK INSTALL/REMOVAL WITH ZIP TIES; DECAL ENHANCES STYLE.
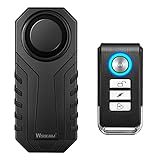
Wsdcam 113dB Bike Alarm Wireless Vibration Motion Sensor Waterproof Motorcycle Alarm with Remote
-
VERSATILE FOR BIKES, E-BIKES, & SCOOTERS - ALL IN ONE ALARM!
-
ADJUSTABLE VIBRATION SENSITIVITY & VOLUME FOR TAILORED SECURITY!
-
LOCATE YOUR VEHICLE EASILY WITH 3 DISTINCTIVE ALERT TONES!
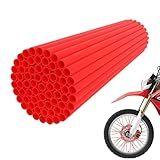
JFG RACING Bike Spoke Covers,Universal 72Pcs Spoke Skins Wheel Wraps for 8"-21" Rims for Ebike E Dirt Pit Bike Motorcycle Bicycle Wheelchair Decoration-Red
-
UNIVERSAL FIT FOR 8-21 RIMS-IDEAL FOR VARIOUS BIKES & MOTORCYCLES!
-
VIBRANT COLORS TRANSFORM YOUR RIDE WITH EYE-CATCHING STYLE!
-
DURABLE PVC SHIELDS SPOKES FROM DIRT & VIBRATION FOR LONGER LIFE!
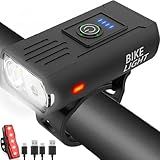
Victoper Bike Light, High Lumens Super Bright Bicycle Lights, 6+4 Modes USB Rechargeable Bike Headlight & Tail Light Set, Waterproof Safety Bike Front & Rear Light for Valentine's Day Gifts
-
UNMATCHED BRIGHTNESS: ILLUMINATE YOUR PATH WITH HIGH-LUMEN LED SAFETY LIGHTS.
-
VERSATILE MODES: SELECT FROM 10 CUSTOMIZABLE LIGHTING MODES FOR SAFETY.
-
ALL-WEATHER DURABILITY: SHOCKPROOF AND WATERPROOF FOR ULTIMATE OUTDOOR RELIABILITY.
To adjust the brakes on an electric dirt bike for adults, first locate the brake lever on the handlebars. If the brakes feel loose or are not responding as they should, you may need to tighten the brake cable. To do this, locate the pinch bolt that holds the cable in place near the brake lever. Use a wrench to loosen the pinch bolt, then pull the cable tighter and re-tighten the bolt.
Next, check the brake pads for wear. If they look worn down, you may need to replace them with new pads. To do this, remove the wheel and brake caliper, then take out the old pads and replace them with the new ones.
Finally, test the brakes to make sure they are working properly. Squeeze the brake lever and make sure the bike comes to a smooth stop. If the brakes still feel loose or unresponsive, you may need to repeat the above steps or take the bike to a professional for further adjustments.
How do I adjust the brake fluid level on an electric dirt bike?
To adjust the brake fluid level on an electric dirt bike, follow these steps:
- Locate the brake fluid reservoir on the bike. This is usually located near the brake lever or brake caliper.
- Check the level of brake fluid in the reservoir. It should be between the minimum and maximum markings on the side of the reservoir. If the level is below the minimum marking, you will need to add more brake fluid.
- To add brake fluid, remove the reservoir cap and carefully pour in the appropriate type of brake fluid recommended by the manufacturer. Be sure not to overfill the reservoir.
- Once you have added the necessary brake fluid, replace the reservoir cap and tighten it securely.
- Test the brakes by squeezing the brake lever or pedal a few times to make sure they are working properly. If there are any issues, such as sponginess or a lack of brake response, you may need to bleed the brake system or consult a professional mechanic for further assistance.
- Regularly check and maintain the brake fluid level on your electric dirt bike to ensure safe and efficient braking performance.
How do I adjust the brake calipers on an electric dirt bike?
To adjust the brake calipers on an electric dirt bike, follow these steps:
- Start by locating the brake calipers on your electric dirt bike. They are typically located near the wheel hub.
- Loosen the bolts that secure the brake calipers in place using a wrench. This will allow you to move the calipers freely.
- Next, squeeze the brake lever on the handlebars to activate the brakes. This will position the calipers correctly against the brake pads.
- While holding the brake lever, tighten the bolts on the brake calipers to secure them in place. Make sure they are aligned properly with the brake pads.
- Test the brakes by riding your electric dirt bike and squeezing the brake lever to ensure they are functioning correctly. Adjust the calipers as needed to improve braking performance.
- If you are still experiencing issues with the brakes, you may need to bleed the brake lines or check for any air bubbles in the system. This process may require additional tools and expertise.
It is always recommended to consult the user manual for your specific electric dirt bike model for detailed instructions on adjusting the brake calipers. If you are unsure about performing the adjustments yourself, it is best to take your electric dirt bike to a professional mechanic for assistance.
How do I adjust the brake lever free play on an electric dirt bike?
Adjusting the brake lever free play on an electric dirt bike is a relatively simple process that can help improve the performance of your bike's brakes. Here is a step-by-step guide on how to adjust the brake lever free play:
- Locate the brake lever adjuster: The brake lever adjuster is typically located near the brake lever on the handlebars. It is usually a small knob or screw that can be turned to adjust the free play of the brake lever.
- Determine the current free play: Before making any adjustments, squeeze the brake lever and note how much free play it has. Free play is the amount of movement before the brake engages.
- Adjust the free play: To increase the free play, turn the adjuster knob or screw counterclockwise. To decrease the free play, turn it clockwise. Make small adjustments and test the brake lever each time to ensure it feels right.
- Test the brakes: After adjusting the free play, test the brakes by squeezing the brake lever. The brakes should engage smoothly and respond quickly.
- Fine-tune if necessary: If the brakes feel too tight or too loose, continue to make small adjustments until you find the right balance for your riding style.
- Tighten the adjuster: Once you are satisfied with the free play adjustment, tighten the adjuster knob or screw to secure the setting.
- Repeat for the other brake lever: If your bike has two brake levers (front and rear), repeat the same process for the other brake lever.
By following these steps, you should be able to adjust the brake lever free play on your electric dirt bike and improve the overall performance of your brakes.
How do I adjust the brake cables on an electric dirt bike?
Adjusting the brake cables on an electric dirt bike is a simple process that can be done with a few basic tools. Here's how you can adjust the brake cables on your electric dirt bike:
- Locate the brake cables: Start by identifying the brake cables on your electric dirt bike. There are usually two brake cables - one for the front brake and one for the rear brake.
- Loosen the locknuts: Use a wrench to loosen the locknuts on the brake cables. This will allow you to adjust the tension on the cables.
- Adjust the tension: To adjust the tension on the brake cables, turn the adjuster screws located on the brake levers. Turn the adjuster screws clockwise to tighten the cables or counterclockwise to loosen them. Make sure both cables have the same tension.
- Test the brakes: After adjusting the tension on the brake cables, test the brakes to make sure they are working properly. Squeeze the brake levers to see if the brakes engage smoothly without any delays.
- Tighten the locknuts: Once you are satisfied with the tension on the brake cables, tighten the locknuts using a wrench to secure the cables in place.
- Repeat the process for the other brake cable: If necessary, repeat the same process for the other brake cable to ensure both brakes are properly adjusted.
- Double-check: Before riding your electric dirt bike, double-check the brake cables to make sure they are securely fastened and the brakes are functioning correctly.
Following these steps will help you adjust the brake cables on your electric dirt bike and ensure safe and efficient braking performance.
How do I ensure that the brakes on an electric dirt bike are adjusted safely and securely?
To ensure that the brakes on an electric dirt bike are adjusted safely and securely, follow these steps:
- Check the brake pads: Make sure that the brake pads are in good condition and have enough thickness. Replace them if they are worn out.
- Adjust the brake lever: Ensure that the brake lever is positioned comfortably for your hand size and strength. The lever should not be too loose or too tight.
- Adjust the brake cable tension: The brake cable should have just the right amount of tension. If it is too loose, the brakes will feel spongy, and if it is too tight, the brakes may not fully disengage.
- Test the brakes: After making adjustments, test the brakes by riding the bike at low speed and applying the brakes gently. Make sure the brakes engage smoothly and evenly on both wheels.
- Test the emergency brake function: Check that the emergency brake (if available on your electric dirt bike) is working properly by applying it while riding at speed.
- Double-check for any unusual sounds or feelings: If you notice any unusual sounds or feelings while testing the brakes, stop riding immediately and check for any potential issues.
- If you are unsure about adjusting the brakes yourself, seek the help of a professional bike mechanic who can ensure that the brakes are adjusted correctly and safely.
What are the advantages of having properly adjusted brakes on an electric dirt bike?
- Safety: Properly adjusted brakes ensure that the electric dirt bike can come to a complete stop quickly and efficiently, reducing the risk of accidents and injuries.
- Control: Well-adjusted brakes provide the rider with greater control over the speed and movement of the electric dirt bike, allowing for more precise handling on various terrains.
- Performance: Adjusted brakes can improve the overall performance of the electric dirt bike, enabling faster acceleration, smoother deceleration, and better handling in challenging conditions.
- Durability: Properly adjusted brakes help to reduce wear and tear on the braking system components, increasing their longevity and reducing the need for costly repairs or replacements.
- Comfort: A well-maintained braking system provides a smoother and more comfortable riding experience, allowing the rider to focus on enjoying the ride without distractions or concerns about safety.