
Best Headlamps for Optimal Brightness to Buy in July 2026
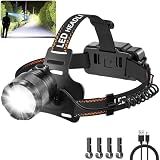
Staaricc Super Bright Headlamp Rechargeable High Lumen/Head lamp for Adults
- ULTRA-BRIGHT WITH 4 MODES: ILLUMINATE ANY SCENE EFFORTLESSLY!
- VERSATILE FOCUS ADJUSTMENT: SWITCH FROM FLOODLIGHT TO SPOTLIGHT EASILY.
- DURABLE & WATERPROOF DESIGN: PERFECT FOR ALL YOUR OUTDOOR ADVENTURES!


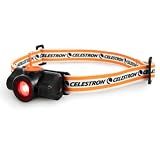
Celestron – Night Vision Headlamp – Multiple Light Modes – Includes SOS Setting – Ideal for Astronomy and Camping – 100 Hours of Usage – 45° Adjustable Angle
-
PRESERVE NIGHT VISION: NAVIGATE SAFELY WITH RED-ONLY LED LIGHT.
-
HANDS-FREE SETUP: ADJUSTABLE HEADLAMP FOR EASY STARGAZING & TASKS.
-
LONG BATTERY LIFE: ENJOY 100 HOURS OF USE WITH STANDARD AAA BATTERIES.
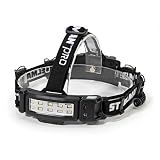
Steelman Slim Profile Rechargeable LED Motion-Activated Headlamp, 250-Lumen, 3 Brightness Settings, 20-Meter Range, Water-Resistant
-
VERSATILE BRIGHTNESS: 3 SETTINGS OFFER 250, 120, OR 50 LUMENS FOR ANY TASK.
-
LONG-LASTING POWER: UP TO 9 HOURS OF RUNTIME FOR EXTENDED ILLUMINATION NEEDS.
-
MOTION SENSOR CONTROL: ACTIVATE LIGHT MODES HANDS-FREE WITH BUILT-IN SENSOR.
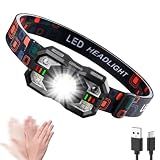
EVERhasauty Headlamp Rechargeable, 1200 Lumen Super Bright LED Headlight Motion Sensor, 10 Mode Waterproof Lightweight Headlamp Flashlight with Red Light, for Hiking Running Fishing Cycling Camping
-
1200 LUMENS BRIGHTNESS, LASTING 5-12 HOURS FOR ALL NEEDS!
-
10 VERSATILE MODES WITH MOTION SENSOR FOR ULTIMATE CONVENIENCE!
-
LIGHTWEIGHT, WATERPROOF & ADJUSTABLE FOR COMFORT IN ANY ADVENTURE!
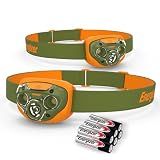
Energizer LED Headlamp PRO (2-Pack), IPX4 Water Resistant Head Light
- VERSATILE USE: PERFECT FOR INDOOR, OUTDOOR, AND EMERGENCY LIGHTING.
- BRIGHT & POWERFUL: ACHIEVE 260 LUMENS WITH AN 80-METER BEAM DISTANCE.
- CUSTOMIZABLE BRIGHTNESS: DIMMING CONTROL FROM 10% TO 100% INTENSITY.
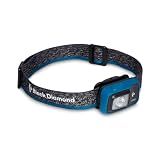
BLACK DIAMOND Astro 300 Headlamp, AAA Powered, Dimmable, Waterproof, Azul
-
POWERFUL 300 LUMENS: BRIGHT, RELIABLE LIGHT FOR ALL OUTDOOR ADVENTURES.
-
COMPACT & LIGHTWEIGHT: EASY TO CARRY, PERFECT FOR ACTIVE LIFESTYLES.
-
VERSATILE MODES: CUSTOMIZE BRIGHTNESS WITH MULTIPLE LIGHTING OPTIONS.
To adjust the brightness settings on a headlamp, begin by locating the control button or switch. This is usually situated on the headlamp housing or may be integrated into the strap.
Once the control button is located, turn on the headlamp by pressing and holding the button or flipping the switch. Most headlamps have multiple brightness settings that you can cycle through.
To adjust the brightness level, press the control button briefly and repeatedly until you find the desired brightness. Some headlamps may have separate buttons for increasing and decreasing brightness levels.
Keep in mind that headlamps usually have different modes, such as low, medium, high, and sometimes even a blinking or strobe mode. The exact number of brightness settings can vary depending on the headlamp model.
Experiment with the various brightness levels to find the one that suits your needs. Consider factors such as battery life, visibility requirements, and personal preference while adjusting the brightness settings.
When you are done using the headlamp, turn it off by pressing and holding the control button or flipping the switch until the light goes off completely.
Remember to check the user manual or instructions provided with your specific headlamp model for any additional details or specific instructions on adjusting brightness settings.
How to adjust the brightness settings on a rechargeable headlamp?
The process to adjust the brightness settings on a rechargeable headlamp can vary depending on the specific model or brand, but here are a few general steps you can follow:
- Read the user manual: Refer to the instruction manual that came with your rechargeable headlamp. It should provide detailed instructions on how to adjust various settings, including brightness.
- Locate the control buttons: Most rechargeable headlamps have control buttons or switches located on the headlamp itself. Look for buttons labeled with symbols such as "+" (plus) and "-" (minus) or icons representing brightness.
- Understand the brightness levels: Some headlamps offer multiple brightness levels, while others may have a continuous dimming feature. Read the instructions to familiarize yourself with how the brightness settings are categorized or adjusted in your specific headlamp.
- Adjust the brightness: Use the designated buttons or switches to increase or decrease the brightness. Press the "+" button to increase brightness or the "-" button to decrease brightness. Some headlamps may require you to press and hold the button to adjust brightness continuously.
- Test and check: After adjusting the brightness level, test your headlamp in a dark or low-light environment to verify if the brightness has been adjusted according to your preference.
Remember, if you can't find the specific instructions or face any difficulties, referring to the user manual for your rechargeable headlamp model is always the safest way to make the adjustments correctly.
What is the battery life impact of higher brightness settings?
Higher brightness settings can significantly impact battery life. Turning up the brightness on a device, such as a smartphone or laptop, requires more energy to power the display. The brighter the screen, the more power it consumes. This results in a faster drainage of the device's battery.
Brightness settings have a direct correlation with power consumption. For example, a device set to maximum brightness will consume much more power compared to a device set to minimum brightness. Generally, lowering the brightness level can help prolong the battery life of a device.
It is worth noting that battery life impact may vary based on the specific device, display technology, and various other factors. OLED displays usually consume less power at lower brightness levels compared to LCD displays, as they do not rely on a backlight. However, regardless of the type of display, higher brightness settings will consume more battery power.
What is the purpose of a red light mode on a headlamp's brightness settings?
The purpose of a red light mode on a headlamp's brightness settings is to provide a low-intensity, dim, and softer red light that is less likely to disrupt night vision. Red light preserves one's ability to see in the dark while minimizing the impact on the pupils' dilation. This makes it an ideal setting for activities such as reading maps, stargazing, navigating in the dark, or maintaining night vision without compromising one's ability to adapt to dimly-lit environments. Additionally, red light is often less intrusive to others in dark settings, making it suitable for group activities where maintaining visibility without causing glare is important.
How to adjust the brightness settings on a headlamp with a motion sensor?
To adjust the brightness settings on a headlamp with a motion sensor, please follow these steps:
- Turn on the headlamp by finding the power button or switch. This can usually be located on the front or side of the lamp, or on the strap itself.
- Activate the motion sensor by waving your hand in front of the sensor, or by pressing a specific button or switch designated for the motion sensor.
- Once the motion sensor is activated, the headlamp will likely cycle through different brightness levels automatically. It may start with the lowest brightness and gradually increase to the highest.
- If you want to adjust the brightness manually rather than relying on the motion sensor, pause the cycling of brightness levels by covering the motion sensor with your hand or pressing the designated button or switch again. This will lock the headlamp at the current brightness level.
- To increase the brightness, look for buttons or switches that are specifically labeled for brightness control. Press or toggle these buttons or switches to cycle through different brightness levels until you reach the desired intensity.
- If there are no specific buttons or switches for brightness control, double-check the manual or manufacturer's instructions for any hidden functions or gestures that can adjust the brightness settings.
- After adjusting the brightness settings, test the headlamp by moving around or waving your hand in front of the motion sensor to ensure it maintains the desired brightness level.
Remember, the specific steps may vary depending on the headlamp model, so it's always best to consult the user manual or manufacturer's instructions for detailed guidance.
How to toggle between brightness settings on a headlamp?
The process for toggling between brightness settings on a headlamp may vary depending on the specific make and model. However, common methods to adjust the brightness settings include:
- Single-button operation: Many headlamps have a single button that controls both power and brightness settings. Click the button once to turn on the headlamp at the default brightness level. Pressing and holding the button typically allows you to cycle through different brightness levels. Once you reach the desired brightness, release the button to confirm the selection.
- Multiple buttons/modes: Some headlamps feature multiple buttons or modes specifically designed for adjusting brightness settings. The buttons may be labeled with icons representing different brightness levels. Typically, you press the designated button for each brightness level to toggle between them.
- Rotating dial or switch: Certain headlamps have a rotating dial or switch on the body or headband. Rotating the dial or switching between specific positions on the switch will adjust the brightness level. Look for markings or indicators to identify the different brightness options.
- Programmable headlamps: Advanced headlamp models may have programmable features that allow you to customize brightness settings. To toggle between different brightness levels, refer to the instruction manual to understand the specific programming options available.
It's important to consult the user manual or instructions provided with your headlamp to understand the specific method for toggling between brightness settings, as it may differ based on the brand and model you are using.