Best Robot Vacuum Cleaning Accessories to Buy in July 2026
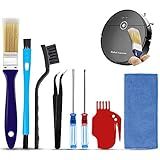
Midukit Vacuum Attachments Accessories for Robot Vacuum Cleaner,Cleaning Brush roll Cleaning Tool Replacement Parts, Part kit Tool for Vacuums Cleaner Replacement Include Vacuum Cleaning Cloth
- COMPREHENSIVE KIT: INCLUDES ALL TOOLS FOR PERFECT VACUUM MAINTENANCE.
- EFFECTIVE HAIR REMOVAL: EASILY REMOVES HAIR FROM ROLLERS AND DUST BOXES.
- USER-FRIENDLY DESIGN: SIMPLE INSTRUCTIONS ENSURE HASSLE-FREE CLEANING.


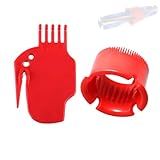
YurMemo Bearings Circular Brush Bristle Beater Brush Cleaning Tools Kit for Vacuum Cleaning Robot Sweeper Robot
-
COMPATIBLE WITH 500-700 SERIES ROBOT VACUUMS FOR VERSATILE USE
-
EFFICIENTLY REMOVES DUST & PET HAIR FOR OPTIMAL PERFORMANCE
-
INCLUDES 2 ESSENTIAL TOOLS FOR HASSLE-FREE MAINTENANCE
2 Packs Universal Robot Vacuum Brush Cleaning Tool Handheld Vacuum Cleaner Brush Kit Compatible with j7,i7,s9,i4,i3,694 Series Robot Vacuum
- FITS MOST ROBOT VACUUMS: UNIVERSAL COMPATIBILITY WITH TOP BRANDS/MODELS.
- DURABLE & LONG-LASTING: PREMIUM MATERIALS ENSURE EXTENDED USE AND RELIABILITY.
- EFFORTLESS CLEANING: DEEP CLEANS HAIR, DUST, AND DEBRIS WITH EASE.
Universal Cleaning Brush Kit for j7,i7,s9,i4,500,600,700,800,900 Series Robot Vacuum, Cleaning Tool for Roll Brush,Filter
- UNIVERSAL FIT: WORKS WITH VARIOUS ROBOT VACUUM MODELS FOR VERSATILITY.
- COMPREHENSIVE KIT: TOOLS FOR EVERY CLEANING NEED IN ONE PACKAGE!
- BOOSTS EFFICIENCY: PREVENT CLOGS AND ENHANCE SUCTION PERFORMANCE EASILY.
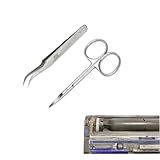
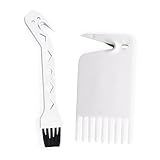
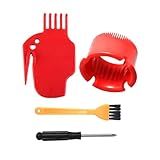
Cleaning Tool Kits, Hair Removal Tools for Vacuums Wheels (Long Hair, Pet Hair Wrapping)
- EFFORTLESSLY REMOVE TANGLED HAIR FROM BRUSHROLLS AND WHEELS.
- SCISSORS AND TWEEZERS MAKE TOUGH TANGLES EASY TO MANAGE.
- KEEP YOUR VACUUM CLEAN FOR OPTIMAL PERFORMANCE AND LONGEVITY.
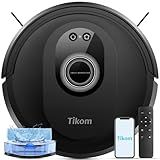
Tikom Robot Vacuum and Mop Combo, 5000Pa Robotic Vacuum Cleaner, 150 Min Max, App & Remote Control, Ideal for Hard Floor, Carpet, Pet Hair, Self-Charge(G8000 Max)
-
5000PA SUCTION POWER: EFFORTLESSLY REMOVES PET HAIR AND DUST FROM ALL FLOORS.
-
VACUUM & MOP TOGETHER: REDUCE CLEANING TIME BY 50% WITH DUAL FUNCTIONALITY.
-
SMART NAVIGATION & DESIGN: ULTRA-SLIM FOR TIGHT SPOTS; AVOIDS OBSTACLES INTELLIGENTLY.
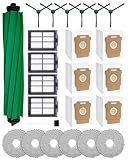
24 Pcs Accessories Kit for iRobot Roomba Plus 405 Combo/505 Combo/507 Combo Robot Vacuum Cleaner: 1 Main Brush, 6 Dust Bags, 6 Mop Pads, 4 Filters, 6 Side Brushes and 1Cleaning Brush(400/500 Series)
-
COMPATIBLE WITH ROOMBA 400/500 SERIES FOR SEAMLESS CLEANING.
-
ANTI-TANGLE BRUSH REDUCES PET HAIR ISSUES ON CARPETS AND FLOORS.
-
WASHABLE HEPA FILTERS FOR EASY MAINTENANCE AND LONG-LASTING USE.
To clean robot vacuum sensors, the first step is to turn off the vacuum and unplug it from the power source to avoid any accidents. Next, locate the sensors on the vacuum, usually located near the front of the unit. Use a soft, dry cloth to gently wipe away any dust, dirt, or debris that may be blocking the sensor. Be careful not to apply too much pressure, as this could damage the sensor. If the sensors are still dirty, you can use a small amount of rubbing alcohol on a cotton swab to carefully clean the sensor. Make sure to let the sensor dry completely before turning the vacuum back on. Regularly cleaning the sensors will help ensure that your robot vacuum operates efficiently and effectively.
How to clean robot vacuum sensors effectively?
- Turn off your robot vacuum and unplug it from the charging dock.
- Locate the sensors on your robot vacuum. They are usually located on the underside or around the bumper.
- Use a soft, clean cloth or a cotton swab to gently wipe away any dust, dirt, or debris from the sensors. Be careful not to use too much force as this can damage the sensors.
- If the sensors are particularly dirty, you can use a small amount of rubbing alcohol on a cotton swab to help dissolve and remove stubborn grime.
- Once you have cleaned the sensors, allow them to dry completely before turning the vacuum back on.
- Regular cleaning of your robot vacuum's sensors will help ensure it continues to function properly and navigate around your home effectively. It is recommended to clean the sensors every 1-2 weeks or as needed.
How to troubleshoot sensor-related problems in a robot vacuum?
- Check the sensors: Make sure all sensors on the robot vacuum are clean and free of any dust or debris. Use a soft, dry cloth to gently wipe the sensors clean.
- Reset the robot vacuum: Turn off the robot vacuum and unplug it from the power source for a few minutes. This can help reset the sensors and resolve any temporary issues.
- Check for obstacles: Make sure there are no obstacles blocking the sensors or the path of the robot vacuum. Remove any objects that may be blocking the sensors.
- Check the battery: Low battery levels can sometimes cause sensor-related issues. Make sure the robot vacuum is fully charged and try running it again.
- Update the software: Check if there are any software updates available for your robot vacuum. Updating the software can sometimes resolve sensor-related problems.
- Contact customer support: If you have tried all the above steps and are still experiencing sensor-related issues, contact the manufacturer's customer support for further assistance or to arrange for repairs.
What is the purpose of cleaning robot vacuum sensors?
The purpose of cleaning robot vacuum sensors is to ensure that they remain clear and free from any dirt, dust, or debris that could impact the vacuum's ability to navigate and operate effectively. Dirty sensors can prevent the vacuum from properly detecting obstacles, edges, and other key navigation points, leading to inefficient cleaning and potential damage to the vacuum or surrounding objects. Regularly cleaning the sensors can help maintain the vacuum's performance and prolong its lifespan.
What is the recommended frequency for cleaning robot vacuum sensors?
It is recommended to clean robot vacuum sensors at least once a week to ensure optimal performance. Additionally, sensors should be cleaned more frequently if the vacuum is used frequently or if the sensors become dirty.