
Best Electric Dirt Bike Motors to Buy in July 2026
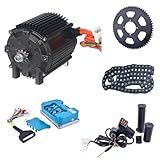
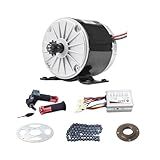
Kunray 72V 5000W Electric Brushless DC Motor Kit Temperature Sensing Motor Electric Go Kart Motor 6800RPM High Speed Motor 100A 24 Mosfet Controller for Razor Dirt Bike, Electric Motorcycles(72V5000W)
-
HIGH POWER & TORQUE: 5000W MOTOR DELIVERS PEAK TORQUE OF 35N.M FOR SUPERIOR PERFORMANCE.
-
DURABLE DESIGN: IP54 RATED WITH CLASS F INSULATION ENSURES RELIABLE USE IN TOUGH CONDITIONS.
-
ADVANCED COOLING: UNIQUE HEAT DISSIPATION FEATURES MAXIMIZE LIFESPAN AND EFFICIENCY.


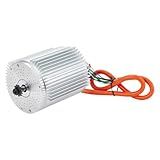
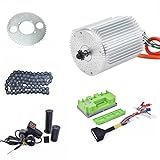
Electric Brushless DC Motor 72V 5000W Electric Scooter Motor Peak 6800rpm Electric Motor for Go Kart Razor Upgrade Kit Motorcycle and More
- 5000W POWER & 90% EFFICIENCY - MAXIMIZE RANGE AND ENERGY SAVINGS!
- SMART TEMP PROTECTION - PREVENTS OVERHEATING FOR SAFER, LONGER USE!
- IP54 PROTECTION - DURABLE DESIGN FOR ALL OUTDOOR CONDITIONS!
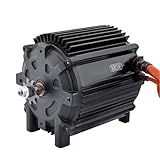
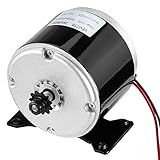
Kunray Electric DC Motor 48V 2000W Motor, Electric Scooter Brushless Motor Max Speed 5700rpm, Electric Dirt Bike Motor Engine, Go Kart Electric Motor with Temperature Sensing
-
POWERFUL 2000W MOTOR: SUPPORTS UP TO 200KG WITH 4300 RPM SPEED.
-
EASY INTEGRATION: DIRECT PLUG INTO FARDRIVER OR KELLY CONTROLLERS.
-
DURABLE AND EFFICIENT: HIGH-QUALITY COPPER COIL FOR FAST COOLING.
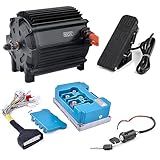
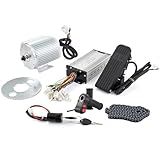
72V Motor Kit 5000W Electric Dirt Bike Motor 6800RPM-Electric Motor for Go Kart 100A with Fardriver Controller, Electric Motor Kit for Bicycle 8.5N.M for Razor Upgrade Kit Pedal Throttle
-
POWERFUL 5000W MOTOR: UNLEASH PEAK PERFORMANCE WITH 10,000W OUTPUT!
-
SMART PROTECTION FEATURES: DURABLE, INSULATED, AND HEAT-RESISTANT DESIGN.
-
EASY INSTALLATION KIT: VERSATILE COMPATIBILITY FOR GO-KARTS AND ATVS.
24V Brushed Electric Motor Kit 3000RPM High Speed Brush DC Motor Controller 350W Electric Bike Scooter Motor with Brushed Controller for Dirt Bike Crazy Cart Mini Motorcycle Upgrade and Conversion
- HIGH PERFORMANCE: 350W MOTOR WITH 78% EFFICIENCY FOR ROBUST POWER.
- RELIABLE CONTROL: EQUIPPED WITH A RUGGED, SAFE SPEED CONTROLLER.
- USER-FRIENDLY THROTTLE: REAL-TIME BATTERY DISPLAY FOR EASY MONITORING.
Vevitts Small Brushed Permanent Magnet Electric Motor for E Scooter Drive Speed Control 24V 350W 3000RPM
- DURABLE ALUMINUM BODY WITH LOW NOISE FOR LONGER-LASTING PERFORMANCE.
- HIGH-SPEED 3000RPM MOTOR: PERFECT FOR VARIOUS DIY APPLICATIONS.
- VERSATILE REVERSIBLE DESIGN SUITABLE FOR MULTIPLE ELECTRIC VEHICLES.
72V 3000W Brushless Motor Kit Max 6700RPM Temperature Sensing Electric DC Motor with 80A 72V Fardriver Controller for Go Kart Electric Motor, Electric Scooter Motorcycle DIY Part(3KW no Bracket)
- POWERFUL 3000W BRUSHLESS MOTOR FOR ULTIMATE PERFORMANCE!
- TEMPERATURE SENSING PREVENTS OVERHEATING FOR LONGEVITY!
- ALL-IN-ONE KIT: EASY UPGRADE WITH ESSENTIAL COMPONENTS INCLUDED!
36V Electric Brushless DC Motor Kits 1000W BLDC Mid Motor 3100RPM 27.7A with 30A Speed Controller Handlebar Twist Grip Throttle Go Kart Motor Kit
-
COMPACT & POWERFUL MOTOR: 1000W EFFICIENCY FOR MAX PERFORMANCE!
-
VERSATILE INSTALL: COMPATIBLE WITH GO-KARTS, SCOOTERS, AND MORE!
-
180° ROTATION & SPEED OPTIONS: TAILOR YOUR RIDE WITH 3-SPEED CONTROL!
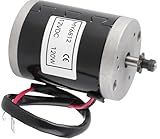
Ktsxxops Brushed Motor, MY6812 12V 120W High Speed Electric Scooter Motor with 9 Tooth, Brush Motor DC for Electric Folding Scooters, Mini Dirt Bike Part Replacement
- HIGH EFFICIENCY: 120W MOTOR WITH > 68% EFFICIENCY BOOSTS PERFORMANCE!
- VERSATILE USE: PERFECT FOR SCOOTERS, BIKES, AND ELECTRIC VEHICLES.
- HASSLE-FREE INSTALLATION: SIMPLE SETUP SAVES YOU TIME AND EFFORT!
To install a new motor on an electric dirt bike for adults, you will first need to gather all the necessary tools and equipment. Make sure to carefully read the manufacturer's instructions for installing the motor and follow them closely to avoid damaging the bike.
Start by removing the old motor from the bike, taking note of how it was connected and positioned. Next, carefully attach the new motor to the bike according to the manufacturer's instructions. Make sure all connections are secure and the motor is properly aligned.
Once the new motor is installed, double-check all connections and make any necessary adjustments. Test the bike to ensure the motor is functioning properly before riding it.
If you encounter any issues during the installation process, refer to the manufacturer's instructions or seek assistance from a professional mechanic. It's important to properly install the new motor to ensure the safety and performance of the electric dirt bike for adults.
How to install a motor controller for the new electric motor?
Installing a motor controller for a new electric motor can vary depending on the specific motor and controller you have. However, here are some general steps to help you get started:
- Ensure the power supply is turned off before starting any installation work.
- Identify the terminals on both the motor and the motor controller. The motor controller should have terminals for power input, motor output, and control signals.
- Connect the power supply cables to the input terminals of the motor controller. Make sure to follow the manufacturer's instructions for the correct wiring configuration.
- Connect the motor cables to the output terminals of the motor controller. Pay attention to the motor's wiring diagram to ensure the correct connection.
- Connect any control signal cables to the appropriate terminals on the motor controller. This may include signal cables for speed control, direction control, or any other control functions.
- Secure the connections with appropriate connectors and fasteners to ensure a stable and safe installation.
- Double-check all connections to ensure they are secure and correctly wired.
- Once all connections are made, turn on the power supply and test the motor controller to ensure it is functioning correctly.
- If the motor is operating properly, secure the motor controller in place using mounting brackets or screws.
- Follow any additional instructions provided by the manufacturer for calibration or programming of the motor controller, if necessary.
Remember to always refer to the specific motor controller manufacturer's instructions and guidelines for installation to ensure the proper and safe operation of your motor. If you are not comfortable with electrical work, it is recommended to seek the assistance of a professional electrician or technician.
What is the correct wiring sequence for the motor controller?
The correct wiring sequence for a motor controller typically involves connecting the power supply to the positive and negative terminals of the controller, then connecting the motor to the output terminals of the controller. It is important to follow the manufacturer's instructions and consult the wiring diagram provided with the motor controller to ensure correct installation and operation.
How to properly ground the electrical components on the dirt bike?
- Locate a suitable grounding point on the bike: Look for a clean, unpainted metal surface on the frame or engine that can serve as a grounding point.
- Clean the grounding point: Use a wire brush or sandpaper to clean any rust, paint, or debris from the chosen grounding point to ensure a good connection.
- Prepare the ground wire: Cut a length of wire that is long enough to reach from the electrical component to the grounding point. Strip about 1/2 inch of insulation from each end of the wire.
- Attach the ground wire to the component: Connect one end of the ground wire to the grounding terminal on the electrical component. This may involve using a screw, bolt, or attaching a terminal connector.
- Attach the ground wire to the grounding point: Attach the other end of the ground wire to the chosen grounding point on the bike. Again, this may involve using a screw, bolt, or terminal connector to secure the connection.
- Test the grounding connection: Once the ground wire is securely attached, turn on the bike and test the electrical component to ensure it is functioning properly. If everything is working as it should, the grounding connection is successful.
- Secure the ground wire: Use zip ties or electrical tape to secure the ground wire along the frame or other secure locations to prevent it from getting caught or damaged while riding.