
Best DIY Gaming Desk Essentials to Buy in July 2026
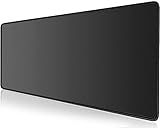
KTRIO Large Gaming Mouse Pad Desk Mat, Superior Micro-Weave Cloth for Precise Mouse Control, Non-Slip Rubber Base, Stitched Edges, Water-Resistant, for Gamer, Office & Home, 31.5" x 11.8" inches
- X-LARGE SPACE: AMPLE ROOM FOR KEYBOARD, MOUSE, AND ACCESSORIES.
- DURABLE & LONG-LASTING: ANTI-FRAY EDGES ENSURE A LASTING PERFORMANCE.
- NON-SLIP GRIP: STAYS IN PLACE FOR FOCUSED GAMING OR WORK SESSIONS.


Japanese Mouse Pad, Large Japanese Desk Mat, XL Anime Gaming Keyboard Mat, Non-Slip Rubber Base, Big Extended Desk Protector for Home Office, 31.5”x11.8”
- ULTRA-SMOOTH SURFACE FOR EFFORTLESS MOUSE MOVEMENT AND CONTROL.
- XL SIZE (31.5 X 11.8) FITS ALL YOUR ESSENTIALS AND OFFERS SPACE.
- WATERPROOF AND EASY TO CLEAN FOR HASSLE-FREE USE AND LONGEVITY.
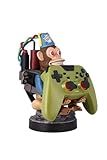
Exquisite Gaming: Call of Duty: Monkeybomb - Original Mobile Phone & Gaming Controller Holder, Device Stand, Cable Guys, Licensed Figure
- VAPORIZE YOUR CLUTTER: THIS EYE-CATCHING DISPLAY HOLDS YOUR ESSENTIALS!
- STURDY & STYLISH: DURABLE PVC DESIGN THAT WON'T TIP OVER EASILY.
- PERFECT FOR GAMERS: A MUST-HAVE COLLECTIBLE FOR CALL OF DUTY FANS!
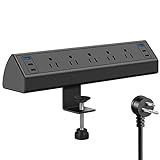
Jgstkcity Desk Clamp Power Strip USB C,40W Total Fast Charging Station,4 PD 20W USB C Ports,Desk Edge Mount Surge Protector,5 Outlets,Fit 1.96" Tabletop Edge,ETL Listed
- SECURE EDGE MOUNTING: CLAMPS EASILY TO DESKS FOR STABLE, TIDY SETUP.
- FAST CHARGING: EQUIPPED WITH 4 PD 20W USB-C AND 2 USB-A PORTS.
- HOME SAFETY FEATURES: 1200J SURGE PROTECTION PROTECTS DEVICES EFFECTIVELY.
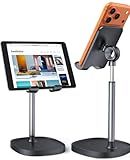
LISEN Cell Phone Stand Phone Holder for Desk Office Decor, Office Desk Accessories Gifts Women PC Gaming Essentials iPhone Stand Gadgets Men Fit OtterBox Case Switch iPad Air Tablet 4-10 in
- ADJUSTABLE HEIGHT & ANGLE: CUSTOMIZABLE FOR OPTIMAL COMFORT AND POSTURE.
- STABLE & SLEEK DESIGN: FITS CASES AND PREVENTS CABLE TANGLES EFFECTIVELY.
- ANTI-SLIP PROTECTION: ENSURES DEVICE SAFETY WITH STABLE, SILICONE BASE.
![Lamicall Cell Phone Stand for Desk - [360° Rotation] Sturdy Adjustable Desktop Phone Holder, Foldable Mobile Stand, Office Desk Accessories Gifts for iPhone 17 16 15 14 Pro Max, Galaxy S25, Cellphone](https://cdn.blogweb.me/1/41_MFNPQ_2h_AL_SL_160_86dde99cd3.jpg)
Lamicall Cell Phone Stand for Desk - [360° Rotation] Sturdy Adjustable Desktop Phone Holder, Foldable Mobile Stand, Office Desk Accessories Gifts for iPhone 17 16 15 14 Pro Max, Galaxy S25, Cellphone
- 360° ROTATABLE PIVOT FOR FLEXIBLE VIEWING ANGLES ANYTIME!
- STURDY BASE WITH ANTI-SLIP PADS ENSURES ROCK-SOLID STABILITY!
- MULTI-ANGLE ADJUSTMENT FOR PERFECT POSITIONING IN ANY ACTIVITY!
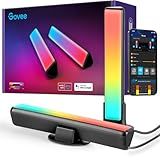
Govee Smart LED Light Bars, Work with Alexa and Google Assistant, RGBICWW WiFi TV Backlights with Scene and Music Modes for Gaming, Pictures, PC, Room Decoration
- CREATE YOUR OWN LIGHT EFFECTS WITH 16 MILLION RGBICWW COLORS!
- SYNCS WITH MUSIC FOR AN IMMERSIVE AUDIO-VISUAL EXPERIENCE.
- VOICE CONTROL VIA ALEXA/GOOGLE ASSISTANT FOR HANDS-FREE CONVENIENCE.
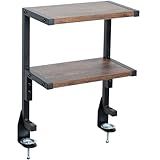
VIVO Clamp-on 13 inch Above or Below Desk 2-Tier Shelving Unit for Table Accessories, Gaming Devices, and More, Storage Tray, Desktop Organizer, Rustic Vintage Brown, STAND-SHELF2C-N
- EASY INSTALLATION: TOOL-FREE SETUP WITH DUAL C-CLAMPS-INSTALL IN MINUTES!
- VERSATILE DESIGN: MOUNT ABOVE OR BELOW THE DESK FOR ULTIMATE STORAGE.
- CUSTOMIZABLE SHELVES: HEIGHT ADJUSTABLE FOR PERSONALIZED ORGANIZATION NEEDS.
To make a DIY gaming desk, you will first need to decide on the size and shape of the desk you want. Measure and cut your materials accordingly, keeping in mind the dimensions of your gaming setup and ensuring enough space for your monitor, keyboard, and mouse.
Next, assemble the frame of the desk using wooden planks or metal pipes, depending on your preference. Make sure to securely attach the legs and supports to create a stable base for your desk.
Once the frame is built, you can add a tabletop surface using plywood, MDF, or another sturdy material. You may choose to paint or stain the surface to match your gaming room decor.
Consider adding additional features such as cable management systems, cup holders, or built-in shelves for storage. Finally, place your gaming equipment on the desk and enjoy your custom-made gaming setup.
How to customize your DIY gaming desk for multiple monitors?
- Determine the size and arrangement of your monitors: Measure the size of your monitors and decide how you want them positioned on your desk - whether in a straight line, stacked on top of each other, or angled.
- Choose a desk with enough space: Make sure your desk is large enough to accommodate multiple monitors. Look for a desk with ample surface area and possibly a built-in monitor stand for easy setup.
- Mount your monitors: Consider using a monitor mount or stand to free up desk space and to create a more streamlined look. Make sure the mount is sturdy enough to hold all of your monitors securely.
- Organize cables: Keep cables tidy and out of sight by using cable management solutions such as cable clips, zip ties, or a cable raceway. This will not only improve the aesthetics of your gaming setup but also reduce the risk of tripping over wires.
- Position your peripherals: Arrange your keyboard, mouse, and other accessories in a comfortable and ergonomic layout. Consider investing in a monitor riser or keyboard tray to optimize desk space and improve your posture while gaming.
- Personalize your setup: Add personal touches to your gaming desk, such as LED light strips, custom decals, or a mouse pad with a unique design. These small details can enhance the visual appeal of your gaming setup and make it feel more personalized.
- Consider dual-purpose furniture: If space is limited, opt for a gaming desk with built-in storage compartments or shelves to store your gaming accessories when not in use. This will help keep your desk clutter-free and maximize your workspace.
- Test your setup: Once you have customized your gaming desk for multiple monitors, test the setup to ensure everything is working properly. Adjust the monitor angles, brightness, and contrast settings as needed to create an optimal gaming experience.
How to add storage space to your DIY gaming desk?
There are several ways to add storage space to your DIY gaming desk:
- Install shelves or floating shelves above or alongside your desk to store items such as games, controllers, and other accessories.
- Add a drawer unit or filing cabinet underneath the desk to store smaller items or papers.
- Attach pegboard or a corkboard to the wall above your desk to hang and organize items such as headphones, cables, or other gaming gear.
- Incorporate a wall-mounted or freestanding bookshelf next to your desk to store larger items such as game consoles or peripherals.
- Utilize storage boxes, bins, or baskets on or around the desk to keep items organized and out of sight.
- Consider adding a keyboard tray or sliding drawer to the desk for additional storage space for small items.
- Use cable management solutions such as cable clips or cable trays to keep cords and wires organized and out of the way.
By incorporating these storage solutions into your DIY gaming desk setup, you can create a more organized and efficient gaming space.
What is the ideal height for a DIY gaming desk?
The ideal height for a DIY gaming desk will vary depending on the height of the person using it and their seating arrangement. However, a general guideline is to have the desk height be about 28-30 inches tall for most adults. This allows for comfortable arm and wrist positioning while gaming. It's important to also consider the height of the chair you will be using with the desk, as well as any additional accessories or monitors that will be placed on the desk. Ultimately, the best height for a DIY gaming desk is one that allows for proper ergonomics and comfort for the individual using it.
What is the best material to use for a DIY gaming desk?
The best material to use for a DIY gaming desk would be a sturdy and durable material such as MDF (medium-density fiberboard), plywood, or solid wood. These materials are strong enough to support the weight of your gaming setup and are easy to work with for DIY projects. Additionally, you can customize the size, shape, and design of the desk to fit your specific needs and gaming setup.
What is the average cost of materials for a DIY gaming desk?
The average cost of materials for a DIY gaming desk can vary depending on the type of materials used, size of the desk, and location. On average, the cost of materials can range from $50 to $200. This can include materials such as wood or metal for the desk frame, a table top surface, mounting brackets, screws, and any additional accessories such as cable management systems or LED lighting. It is important to research and plan out the design of the desk in order to accurately estimate the cost of materials needed for the project.
How to create a DIY gaming desk that can easily be disassembled?
To create a DIY gaming desk that can easily be disassembled, you can follow these steps:
- Choose a sturdy and lightweight material for the desk, such as plywood or MDF.
- Measure and cut the material to the desired size and shape for the desk surface.
- Cut and assemble the legs of the desk using strong and easily detachable connectors, such as metal brackets or screws.
- Attach the legs to the desk surface using the connectors, making sure they are secure but can be easily removed.
- Add any additional features you may want, such as cable management systems, monitor mounts, or storage shelves.
- Optional: Add a layer of paint or laminate to protect the surface of the desk.
- To disassemble the desk, simply remove the connectors holding the legs to the desk surface and carefully pack up the pieces for storage or transportation.
By following these steps, you can create a DIY gaming desk that is both durable and easy to disassemble for moving or storage.