
Best Monitor Mounts and Arms to Buy in July 2026
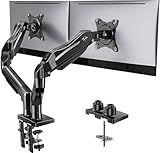
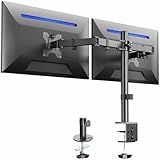
HUANUO FlowLift™ Dual Monitor Stand, Fully Adjustable Gaming Monitor Desk Mount for 13–32″ Computer Screens, Full Motion VESA 75x75/100x100 with C-Clamp & Grommet Base, Each Arm Holds 4.4 to 19.8 lbs
-
MAXIMIZE YOUR WORKSPACE: ELEVATE MONITORS AND DECLUTTER YOUR DESK EASILY.
-
STURDY DUAL C-CLAMP: SECURE SETUP TO PREVENT WOBBLING OR SLIPPING ISSUES.
-
FULL-MOTION ADJUSTABILITY: COMFORTABLY CUSTOMIZE SCREEN POSITIONS FOR ANY TASK.


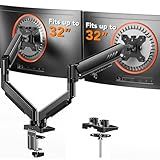
ErGear Dual Monitor Arm, Full Adjustable Monitor Mount for 13–32″ Screens, Fast Install Computer Monitor Stand with Tool-Free VESA Mount, Max Load 19.8 lbs, Max VESA 100x100mm
- SUPPORTS WIDE SCREENS UP TO 32: VERSATILE FOR FLAT OR CURVED MONITORS!
- TOOL-FREE SETUP: QUICK 3-STEP INSTALLATION, NO TOOLS NEEDED!
- DYNAMIC ADJUSTMENTS: CUSTOMIZE HEIGHT AND ANGLES FOR ULTIMATE COMFORT!
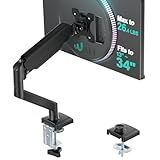
WALI Single Monitor Mount for 13-34 inch Screens, Adjustable Gas Spring Single Monitors Arm, Regular Screen up to 32 inch, 26.4lbs, Computer Monitor Stand for Desk, VESA 75/100mm (GSMP001N), Black
- UNIVERSAL COMPATIBILITY: FITS 13 TO 34 SCREENS, MAX LOAD 26.4 LBS.
- FULL ADJUSTABILITY: EASILY SWIVEL, TILT, AND ROTATE FOR OPTIMAL VIEWING.
- ERGONOMIC DESIGN: REDUCES STRAIN WITH CUSTOMIZED POSITIONING UP TO 19.3.
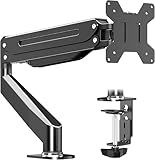
Suptek Monitor Mount Gas Spring Monitor Arm Desk Mount Fully Adjustable Fits 17 20 22 23 24 26 27 32 35 inch Monitors Weight Capacity up to 24.25 lbs
- UNIVERSAL FIT: SUPPORTS SCREENS UP TO 35'' AND 24.25 LBS EASILY.
- ENHANCED FLEXIBILITY: ADJUSTABLE GAS SPRING ARM FOR OPTIMAL POSTURE.
- SPACE SAVER: CONVENIENT C-CLAMP OR GROMMET MOUNT OPTIONS AVAILABLE.
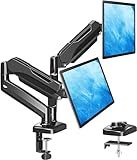
VIVO Dual Monitor Desk Mount, Holds 2 Computer Screens up to 30 inches and 22lbs Each, Heavy Duty Fully Adjustable Steel Stand with C-Clamp and Grommet, Black, STAND-V002
- FITS 13-30 SCREENS: SUPPORTS UP TO 22LBS PER MONITOR, VESA COMPATIBLE.
- FULL MOTION FLEXIBILITY: TILT, SWIVEL, AND ROTATE FOR OPTIMAL VIEWING ANGLE.
- EASY SETUP: QUICK INSTALLATION WITH DETACHABLE VESA PLATES AND GUIDANCE.

WALI Dual Monitor Stand for 13-32 inch Computer Screens, Dual Monitor Arms for 2 Monitors Holds up to 22 lbs, Height Adjustable Gas Spring Dual Monitors Mount, VESA 75x75/100x100mm (GSMP002N), Black
- UNIVERSAL COMPATIBILITY: FITS 13-32 FLAT/CURVED SCREENS, MAX 22 LBS.
- DYNAMIC ADJUSTMENTS: SWIVEL, TILT, AND ROTATE FOR IDEAL VIEWING ANGLES.
- FLEXIBLE MOUNTING: C-CLAMP OR HOLE BASE FOR EASY, STABLE INSTALLATION.
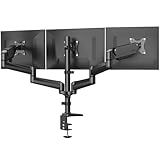
HUANUO Triple Monitor Mount for 17 to 32 inch Screens, Adjustment Gaming Triple Monitor Stand with Swivel, Tilt, Rotation, Clamp & Grommet Kit
-
MAXIMIZE DESK SPACE: ELEVATE 3 MONITORS FOR A CLUTTER-FREE WORKSPACE.
-
OPTIMAL VIEWING: EASILY ADJUST FOR THE BEST ANGLE IN LANDSCAPE OR PORTRAIT.
-
FLEXIBLE INSTALLATION: CHOOSE BETWEEN C-CLAMP OR GROMMET MOUNT OPTIONS.
MOUNTUP Dual Monitor Stand for Desk, Monitor Arms for 2 Monitors 32 27 24 22 Inches, Height Adjustable Double Monitor Mount, VESA Mount with C-Clamp & Grommet Base, Holds 4.4-17.6lbs
-
ERGONOMIC DESIGN: REDUCE NECK AND BACK STRAIN WITH ADJUSTABLE MONITORS.
-
FLEXIBLE POSITIONING: CUSTOMIZE YOUR WORKSPACE WITH FULL MOTION FEATURES.
-
SPACE SAVER: DECLUTTER YOUR DESK WITH OUR PREMIUM CABLE MANAGEMENT DESIGN.
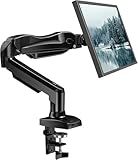
HUANUO FlowLift™ Single Monitor Mount, 13 to 32 Inch Monitor Arm, Adjustable Monitor Stand, Vesa Mount with Clamp and Grommet Base - Fits 4.4 to 19.8lbs LCD Computer Monitors
-
VERSATILE COMPATIBILITY: FITS 13-32 MONITORS, SUPPORTING VARIOUS VESA PATTERNS.
-
EFFORTLESS ADJUSTMENTS: EASILY TILT, SWIVEL, AND ROTATE FOR OPTIMAL VIEWING ANGLES.
-
QUICK INSTALLATION: SET UP IN 3 MINUTES WITH ALL HARDWARE INCLUDED!
Mounting a gaming monitor on a wall or adjustable arm can help enhance your gaming experience and free up desk space. Here's a step-by-step guide on how to do it:
- Choose the right wall or arm: Make sure the wall or arm you plan to mount the monitor on is sturdy enough to support the weight. Consider the monitor's size and weight requirements when selecting a wall or arm mount.
- Gather the necessary tools: You will likely need a power drill, screwdriver, stud finder, level, measuring tape, and the appropriate screws for your monitor and mount.
- Find the best location: Decide where you want to mount the monitor, taking into account factors like viewing angles and visibility. Ensure the monitor will be at a comfortable eye level when seated.
- Locate wall studs: If you're mounting the monitor directly to the wall, use a stud finder to locate the wall studs. These offer the most secure mounting point. Mark the stud locations using a pencil or masking tape.
- Attach the wall mount: Hold the wall mount against the wall, aligning it with the stud marks. Ensure it is level and use a pencil to mark where the mounting holes need to be. Drill pilot holes using a drill bit slightly smaller than the screw size. Attach the wall mount using the appropriate screws.
- Attach the monitor mount: Depending on the type of mount you have, follow the manufacturer's instructions for attaching the monitor mount to the back of your gaming monitor. This generally involves securing the mount with screws into the VESA mounting holes on the monitor.
- Mount the monitor: With the wall mount and monitor mount securely in place, carefully lift the monitor and align it with the mount. Ensure it is properly hooked onto the mount, following any lock-in mechanisms provided. Double-check that all connections are secure.
- Test and adjust: Once mounted, power on the monitor and test it from various angles and positions to ensure proper visibility and tilt adjustments. If needed, make any necessary adjustments using the mount's adjustment mechanisms.
Remember to refer to the specific instructions provided by the manufacturer for your particular wall mount and gaming monitor, as steps may vary slightly. Safety is crucial, so if you are unsure about any step or if the monitor is too heavy, consider seeking assistance or consulting a professional.
How to run cables neatly when mounting a gaming monitor on the wall?
When mounting a gaming monitor on the wall, it's important to run cables neatly to ensure aesthetics and prevent any potential damage. Here's a step-by-step guide to help you achieve that:
- Plan Ahead: Before mounting the gaming monitor, take some time to plan the layout of the cables. Determine the positions of power outlets, video inputs, and any other necessary connections.
- Gather the Right Tools: You'll need a few tools to help with cable management, such as cable ties, cable clips, cable management sleeves, and adhesive cable mounts. These can be easily found at hardware or electronics stores.
- Measure and Position: Measure the distance between the gaming monitor and the power outlet and any other inputs, making sure to account for any obstructions along the way. Position the monitor accordingly on the wall.
- Disconnect: If your gaming monitor is already connected to your computer or any other device, disconnect all the cables before mounting it on the wall. It's easier to manage cables when they're not connected to any devices.
- Route the Cables: Start by routing the power cable from the gaming monitor towards the power outlet. Use adhesive cable mounts to secure the cable along the wall, making sure it stays flush against the surface. This will prevent any dangling cables and give a clean look.
- Manage Other Cables: Now, route your other cables such as video cables (HDMI, DisplayPort, VGA, etc.) and audio cables (if necessary). Use cable clips or cable ties to bundle the cables together. You can also consider using a cable management sleeve, which will keep the cables in a single neat bundle.
- Cable Concealment: If you prefer a completely hidden cable setup, you may want to consider running your cables through the wall. This will require drilling holes in the wall, passing the cables through, and patching up the holes afterward. It's recommended to consult a professional if you're uncertain about this step.
- Test and Adjust: Once all the cables are neatly organized and routed, connect them back to the gaming monitor and any other devices. Make sure everything is functioning correctly before finalizing the cable management.
Remember, cable management is a personal preference, and there are various methods you can use. The key is to keep the cables organized, hidden, and well-secured to maintain an aesthetically pleasing setup while avoiding any tripping hazards or potential damage.
How to properly attach a mounting bracket to a gaming monitor?
To properly attach a mounting bracket to a gaming monitor, follow these steps:
- Check your gaming monitor's VESA mount compatibility: Ensure that your monitor has VESA mount compatibility. Most modern monitors have standard VESA mount patterns, which allow for easy attachment of mounting brackets.
- Select a mounting bracket: Choose a mounting bracket that is compatible with both your gaming monitor's VESA mount pattern and the weight of your monitor. Consider the size and weight capacity of the bracket to ensure a proper fit.
- Gather necessary tools and hardware: Make sure you have all the tools required for installation, such as a screwdriver or Allen wrench, and any included hardware from the mounting bracket.
- Position your monitor face down: Carefully place your gaming monitor face down on a soft surface, such as a blanket or towel, to avoid scratching the screen.
- Remove the existing stand or bracket: If your monitor already has a stand or bracket attached, you will need to remove it first. Look for screws or levers on the back of the monitor that hold the stand or bracket in place. Use the appropriate tools to detach and remove it.
- Attach the mounting plate: Take the mounting plate from your bracket and align it with the VESA mounting holes on the back of your monitor. The plate should fit securely over the holes. Use the included screws to attach the plate to the monitor. Ensure that the screws are tightened securely but not overly tightened.
- Install the bracket arm or wall mount: Depending on the type of mounting bracket you have, you will either attach a bracket arm or directly mount it on a wall. Follow the specific instructions provided with your mounting bracket to properly install this part.
- Test the stability: Once you have attached the bracket and arm, make sure the gaming monitor is stable and securely fixed. Gently shake the monitor to confirm that it does not wobble or feel loose.
- Mount the monitor: Depending on the bracket type, you will either hang the monitor on the bracket arm or slide it onto the wall mount. Ensure that the monitor is seated properly and aligned with the bracket or wall mount.
- Secure the monitor: Finally, use any additional included hardware, such as screws or locking mechanisms, to secure the monitor in place. Ensure that it is held firmly and cannot be easily dislodged.
Following these steps should allow you to properly attach a mounting bracket to your gaming monitor, providing a secure and stable setup for your gaming needs.
What is the proper way to adjust the height of a monitor on an adjustable arm?
Adjusting the height of a monitor on an adjustable arm can vary slightly depending on the specific arm model, but here are some general steps to follow:
- Identify the adjustment mechanism: Look for the various knobs, levers, or screws on the arm that control the height adjustment.
- Loosen the locking mechanism: Depending on the arm, this may involve loosening a knob, releasing a latch, or turning a screw counterclockwise. This will allow the arm to move up and down more easily.
- Adjust the height: Once the locking mechanism is loosened, hold the monitor with one hand and use the other hand to move or slide the arm up or down along its track. Keep adjusting until you reach the desired height for your comfort and ergonomic needs.
- Tighten the locking mechanism: After setting the monitor to the desired height, tighten the locking mechanism by turning the knob, closing the latch, or tightening the screw in a clockwise direction. This will secure the arm and prevent it from moving unintentionally.
- Test the stability: Shake or gently move the monitor to ensure it is securely locked in place. If it wobbles excessively, readjust and tighten the locking mechanism accordingly.
- Fine-tune adjustments: Some adjustable arms also provide tilt, swivel, or rotation features. If desired, make any necessary adjustments for optimal viewing angles and alignment with your workspace.
Note: It's always recommended to consult the instruction manual that comes with your specific monitor arm, as the adjustment methods may slightly differ.
How to ensure the monitor is securely attached to the wall mount or adjustable arm?
- Read the manufacturer's instructions: Before attempting to attach the monitor to a wall mount or adjustable arm, carefully read and follow the instructions provided by the manufacturer. These instructions will provide specific guidelines on how to safely and securely attach the monitor.
- Check the weight and compatibility: Ensure that the wall mount or adjustable arm is suitable for the weight and size of your monitor. Exceeding the weight limit or using an incompatible mount can lead to instability and potential damage to your monitor.
- Use proper mounting hardware: The package should include the necessary mounting hardware, such as screws, brackets, and bolts. Double-check that you have the correct hardware for your monitor and ensure that they are securely fastened during installation.
- Find a suitable wall or surface: Choose a location for mounting the monitor that is stable and can support the weight. It should have a solid wall or surface that is capable of securely holding the mount or arm. Avoid mounting on weak or brittle surfaces as they may cause the monitor to fall.
- Locate wall studs or use wall anchors: If you are attaching the mount directly to a wall, it is essential to locate wall studs using a stud finder. Wall studs provide the necessary stability for securely mounting the monitor. If studs are not available, use appropriate wall anchors that can support the weight of the monitor.
- Double-check the stability: Once you have attached the monitor to the wall mount or adjustable arm, make sure it is securely in place. Give it a gentle tug to test its stability. Also, check for any signs of wobbling or looseness. If there is any doubt about its stability, consult the manufacturer's instructions or seek professional assistance.
- Regularly inspect and maintain: After mounting the monitor, periodically inspect the attachments to ensure they remain secure. Over time, screws may loosen or brackets may shift. Regularly check for any signs of instability and tighten any necessary components.
Remember, if you are unsure or uncomfortable with the installation process, it is recommended to seek professional help to ensure the monitor is securely attached to the wall mount or adjustable arm.
What is the correct angle for tilting a gaming monitor on an adjustable arm?
The correct angle for tilting a gaming monitor on an adjustable arm depends on personal preference and comfort. However, a general recommendation is to have the top of the monitor slightly tilted towards the user, typically around 10-20 degrees. This allows for better visibility and reduces strain on the neck. Ultimately, it is important to adjust the angle to a position that feels comfortable and ergonomic for the user.
How to prevent the monitor from sagging on an adjustable arm?
To prevent the monitor from sagging on an adjustable arm, you can follow these steps:
- Check the weight limit: Ensure that the monitor's weight is within the weight limit specified by the adjustable arm. Monitor arms usually have a weight range they can support. Exceeding this limit may cause sagging or damage.
- Tighten the joints: Use the provided tools to tighten the joints and connections on the adjustable arm. Make sure all screws, knobs, or levers are properly tightened, allowing the arm to hold its position securely.
- Adjust the tension: Many adjustable arms have tension adjustment features. Locate the tension adjustment screw or knob and adjust it to increase the resistance. This will help prevent the monitor from sagging and keep it in your desired position.
- Counterbalance the weight: If your monitor still sags despite tightening and adjusting the tension, counterbalance the weight. This can be done by attaching a counterweight (e.g., a heavy object or an adjustable counterbalance arm accessory) to the arm's opposite end. The counterweight should be equal to or greater than the weight of the monitor to prevent sagging.
- Realign the arm and monitor: Sometimes, an improper alignment of the arm can cause sagging. Ensure that the arm is correctly installed, aligned vertically, and has secure attachment points. Adjust the position of the arm and the monitor until it is balanced and does not sag.
- Avoid over-extension: Be mindful of extending the adjustable arm beyond its recommended reach. Overextending the arm can cause increased pressure on the joints, leading to sagging over time. Keep the arm within its specified limits to maintain stability.
By following these steps, you can prevent or minimize monitor sagging on an adjustable arm, enhancing your ergonomic setup and ensuring optimal viewing comfort.