
Best Electric Scooter Repair Kits for Kids to Buy in July 2026
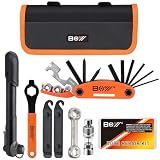
Bicycle Repair Bag With Tire Pump, Portable Tool Kit for Camping Travel - Bike Glueless Patches, Maintenance Essentials All in One Safety Kit
- ALL-IN-ONE KIT MAKES BIKE REPAIRS QUICK AND EASY-PERFECT FOR EMERGENCIES!
- UNIQUE GLUELESS PATCHES ENSURE FAST, RELIABLE REPAIRS WITHOUT MESS!
- COMPACT TOOLS AND MINI PUMP FIT EASILY FOR ON-THE-GO CYCLING CONVENIENCE!


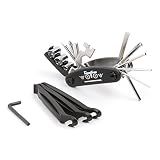
WOTOW Bike Repair Tool Kit, 16 in 1 Bicycle Multitool with Tire Levers Hex Spoke Wrench, Multi Function Accessories Set for Road Mountain Bikes
- DURABLE CHROME-VANADIUM STEEL ENSURES LONG-LASTING PERFORMANCE.
- ALL ESSENTIAL TOOLS FOR CYCLISTS IN ONE COMPACT DESIGN.
- INCLUDES TIRE LEVERS FOR QUICK AND EASY FLAT TIRE REPAIRS.
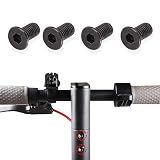
TOMALL Scooter Forehead Head Screw Accessories Stainless Steel Fixed Screw Kit 4 PCS Compatible for Xioami M365 Electric Scooter
- DURABLE, ANTI-CORROSION COATING ENSURES LONG-LASTING PERFORMANCE.
- LIGHTWEIGHT YET STURDY BOLT FOR ENHANCED STRENGTH AND RELIABILITY.
- EASY INSTALLATION WITH CLEAR SCREW THREADS AND SPARE SCREWS INCLUDED.
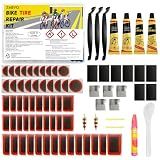
ZMRYO Bike Tire Repair Kit 80 PCS, Flat Tire Repair Kit with 54 Patches, 4 Vulcanizing Glue Tubes, Tire Levers & Valve Core Tools for Bikes, E-Bikes, Scooters & Inner Tube Repairs
-
LONG-LASTING FIXES: USE PRO-GRADE VULCANIZING GLUE FOR DURABLE REPAIRS.
-
QUICK & EASY: GET BACK ON YOUR BIKE IN MINUTES AFTER A FLAT TIRE.
-
ALL-IN-ONE KIT: 80 PIECES INCLUDED FOR ALL YOUR TIRE REPAIR NEEDS.
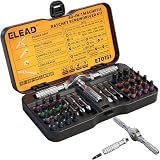
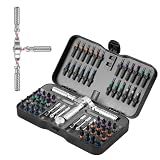
40 in 1 Magnetic Ratchet Screwdriver Set, Multi Bit Magnetic Ratcheting Screwdriver Set with Detachable Ratchet Handle, Repair Tool Kit for Computer Bicycle Furniture DIY
- SAVE EFFORT WITH 80% REDUCED STRAIN AND POWERFUL 50N.M TORQUE.
- ERGONOMIC DESIGN AND DETACHABLE HANDLE FOR ULTIMATE FLEXIBILITY.
- 40-IN-1 SET WITH SECURE MAGNETIC BITS FOR DIVERSE DIY TASKS.
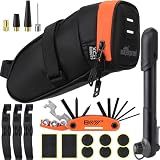
Bicycle Saddle Repair Bag with Tire Patch and Inflate Pump - Portable Travel Emergency Tool Kit, Bike Accessories for Adult Bikes with IPX4 Waterproof
- ALL-IN-ONE KIT: COMPREHENSIVE TOOLS FOR ALL BIKE REPAIRS AND MAINTENANCE.
- EASY PATCH APPLICATION: QUICK FIXES WITH GLUELESS PATCHES FOR EMERGENCIES.
- COMPACT & PORTABLE: LIGHTWEIGHT PUMP AND TOOLS FOR ON-THE-GO REPAIRS.
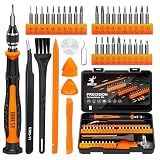
JOREST 40Pcs Small Precision Screwdriver Set (S2 Steel), Magnetic Screwdriver Set with Torx T5 T6 T8, Mini Repair Tool Kit for Macbook, Computer, Laptop, iPhone, PS4 PS5, Xbox, Switch, Glasses, Watch
- COMPREHENSIVE SET: 40 PCS WITH 30 BITS FOR ALL DEVICE TYPES.
- DURABLE & EFFICIENT: S2 STEEL BITS WITH MAGNETIC, LOCKING HANDLE DESIGN.
- PORTABLE TOOLS INCLUDED: SPUDGERS, TWEEZERS, SUCTION CUP AND MORE!

ROCKBROS 16 In 1 Multi-Function Bike Tool Kit - Allen Wrench
-
VERSATILE 16-IN-1 TOOLS FOR BIKES AND HOUSEHOLD REPAIRS!
-
DURABLE STEEL CONSTRUCTION ENSURES LONG-LASTING PERFORMANCE!
-
COMPACT & LIGHTWEIGHT: PERFECT FOR ON-THE-GO FIXES!
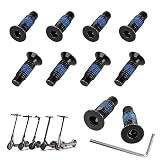
MIMIRACLE Scooter Forehead Head Screw Accessories - Carbon Steel Fixed Screw Kit (10 PCS) Compatible with Xiaomi M365 1s Pro Mi3 Ninebot Max G30/ES Series F Series Electric Scooter
- COMPATIBLE WITH TOP SCOOTER MODELS FOR VERSATILE USE.
- ANTI-DISLODGING DESIGN ENSURES SCREWS STAY SECURELY IN PLACE.
- PREMIUM CARBON STEEL GUARANTEES DURABILITY AND LONG-LASTING STRENGTH.
VMAN Ratchet Screwdriver Set, magnetic Screwdriver sets, S2 Steel Bits, DIY Combination Flexible Shaft, Suitable for Furniture Assembly, Precision Electrical Appliance Repair, Bicycle Tools
- 80% EFFORT-SAVING RATCHETING DESIGN FOR ULTIMATE COMFORT AND EASE.
- VERSATILE 62-PIECE SET WITH BITS FOR ALL HOME AND DIY REPAIR NEEDS.
- DURABLE & RUST-RESISTANT S2 STEEL ENSURES LONG-LASTING PERFORMANCE.
Performing basic repairs on an electric scooter for kids is important to ensure the safety and longevity of the scooter. Some common repairs that may need to be done include fixing a flat tire, replacing a worn-out brake pad, or tightening loose screws. To fix a flat tire, locate the puncture and either patch it using a tire repair kit or replace the inner tube entirely. For a worn-out brake pad, remove the old pad and replace it with a new one, making sure to adjust the tension as needed. Finally, check all screws and bolts on the scooter to ensure they are tight and secure. Regular maintenance and timely repairs can help keep the scooter in good working condition for your child to enjoy.
What is the proper technique for adjusting the height of the seat on an electric scooter?
The proper technique for adjusting the height of the seat on an electric scooter may vary depending on the specific model of scooter, but typically it involves the following steps:
- Locate the adjustment lever or knob on the seat post.
- Loosen the lever or knob by turning it counterclockwise or pulling it out, depending on the design.
- Adjust the height of the seat by either raising or lowering it to your desired position.
- Once the seat is at the desired height, tighten the adjustment lever or knob by turning it clockwise or pushing it back in securely.
- Verify that the seat is securely in place before riding the scooter.
It is important to refer to the manufacturer's instructions for specific guidance on adjusting the seat height of your electric scooter.
What is the best way to clean the frame of an electric scooter?
The best way to clean the frame of an electric scooter is:
- Start by unplugging the scooter to ensure electrical safety.
- Use a soft brush or cloth to remove any loose dirt or debris from the frame.
- Fill a bucket with warm water and a small amount of mild detergent.
- Dip a soft sponge or cloth into the soapy water and gently scrub the frame, paying special attention to any particularly dirty areas.
- Use a hose or a damp cloth to rinse off the soap and dirt from the frame.
- Dry the frame thoroughly with a clean towel or cloth.
- For stubborn stains or grime, you can use a gentle cleaner specifically designed for the material of the frame (aluminum, steel, etc.) following the manufacturer's instructions.
- Finally, apply a coat of wax or protectant to the frame to help prevent future stains and keep it looking new.
What is the correct procedure for adjusting the suspension on an electric scooter?
To adjust the suspension on an electric scooter, follow these steps:
- Locate the suspension adjustments on your scooter. This may be in the form of knobs, screws, or other mechanisms that can be turned or adjusted.
- Determine the current settings of the suspension and assess whether you need to make adjustments. If you are experiencing a bumpy ride or feel like the suspension is too stiff or too soft, you may need to adjust it.
- If you want a softer ride, turn the suspension adjustments counterclockwise to reduce the stiffness. If you want a stiffer ride, turn the adjustments clockwise to increase the stiffness.
- Make small adjustments and test ride your scooter to see how the changes feel. Continue making adjustments until you find the optimal suspension settings for your comfort and riding style.
- It's important to note that different scooters may have different suspension systems and adjustment methods, so always refer to your scooter's user manual for specific instructions on adjusting the suspension. If you are unsure or uncomfortable making adjustments yourself, consider taking your scooter to a professional for assistance.
What is the correct way to adjust the handlebar height on an electric scooter?
The correct way to adjust the handlebar height on an electric scooter varies depending on the specific model and design of the scooter. However, in general, the following steps can be applied:
- Locate the clamp or mechanism that secures the handlebar to the scooter frame. This may be a quick-release lever, a set of bolts, or another type of fastening system.
- Loosen or release the clamp or fastening mechanism. This may require using a hex key, wrench, or other tool to loosen the bolts or screws.
- Adjust the height of the handlebar to your desired position. Make sure that the handlebar is level and secure in the new position.
- Tighten the clamp or fastening mechanism to secure the handlebar in place. Make sure that it is tight enough to prevent any movement or wobbling while riding.
- Test the scooter to ensure that the handlebar is at a comfortable height and the steering is responsive.
Always refer to the user manual or instructions provided by the manufacturer for the specific procedure to adjust the handlebar height on your electric scooter. If you are unsure or uncomfortable making the adjustments yourself, consider seeking assistance from a professional or a knowledgeable individual.
What is the best method for fixing a flat tire on an electric scooter?
The best method for fixing a flat tire on an electric scooter is to follow these steps:
- Turn off the electric scooter and remove the key from the ignition to ensure safety.
- Use a tire lever to remove the wheel from the scooter.
- Locate the puncture or leak in the tire by inspecting the inner tube for any visible damage.
- Remove the inner tube from the tire using a tire lever, taking care not to damage the valve stem.
- Patch the puncture or leak using a tire patch kit or replace the inner tube altogether if necessary.
- Reinsert the inner tube into the tire and carefully reattach the tire to the scooter wheel.
- Inflate the tire to the recommended pressure using a bike pump or air compressor.
- Reattach the wheel to the scooter and ensure it is securely in place before turning the scooter back on.
It is also recommended to regularly check your scooter's tire pressure and tread depth to prevent flat tires in the future.