
Best Digital Photo Frames to Buy in July 2026
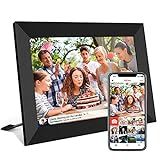
32GB FRAMEO 10.1 Inch Smart WiFi Digital Photo Frame 1280x800 IPS LCD Touch Screen, Auto-Rotate Portrait and Landscape, Built in 32GB Memory, Share Moments Instantly via Frameo App from Anywhere
-
SHARE PHOTOS/VIDEOS EFFORTLESSLY WITH FRAMEO APP FROM ANYWHERE.
-
STUNNING 10.1” IPS HD TOUCH SCREEN FOR CAPTIVATING VISUALS.
-
USER-FRIENDLY SETUP AND CUSTOMIZABLE FEATURES FOR ALL AGES.


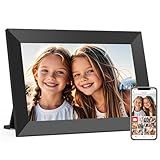
Digital Picture Frame WiFi 10.1 Inch Smart Digital Photo Frame with 1280x800 IPS HD Touch Screen, Auto-Rotate and Slideshow, Easy Setup to Share Photos or Videos Remotely via App from Anywhere
- SURPRISE LOVED ONES WITH PRELOADED MEMORIES FOR SPECIAL OCCASIONS!
- ENJOY STUNNING 1280X800 RESOLUTION ON A VIBRANT 10.1'' SCREEN.
- EFFORTLESSLY SHARE PHOTOS WITH FRIENDS AND FAMILY VIA WI-FI!
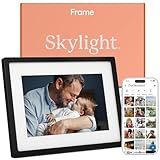
Skylight Frame – WiFi Digital Picture Frame Customer Support, Touch Screen Digital Photo Frame with Easy Setup, Photo Gifts for Parents and Grandparents - 10 Inch Black
- EFFORTLESS SETUP: PLUG IN, CONNECT TO WI-FI, AND START SHARING INSTANTLY!
- UNIQUE PHOTO GIFTS: PERFECT FOR SPECIAL OCCASIONS AND CHERISHED MEMORIES.
- ELEGANT TOUCH-SCREEN: STUNNING DISPLAY WITH CLOUD STORAGE-NO SD CARDS NEEDED!
Euphro 10.1'' Digital Picture Frame with 32GB Storage, Digital Photo Frame with 1280x800 IPS Touch Screen, Share Photos/Videos and Send Best Wishes via Free App
-
INSTANT PHOTO SHARING VIA UHALE APP - STAY CONNECTED PRIVATELY!
-
10.1 IPS TOUCH SCREEN SHOWS YOUR MEMORIES IN VIBRANT DETAIL!
-
32GB STORAGE HOLDS 60,000 PHOTOS - MEMORIES WITHOUT LIMITS!
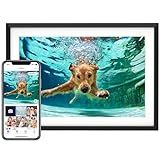
Frameo 10.1 Inch WiFi Digital Picture Frame, Smart Cloud Electronic Photo Frame with HD IPS Touch Screen Slideshow 32GB Memory Auto-Rotate Wall Mount, Share Photos/Videos from Phone by Frameo App
-
INSTANT SHARING & PRIVACY: SEND PHOTOS SAFELY VIA FRAMEO APP TO INVITED USERS.
-
STUNNING HD DISPLAY: 10.1 IPS SCREEN DELIVERS VIBRANT VISUALS, EASY TOUCH CONTROLS.
-
MASSIVE STORAGE: STORE 80,000+ PHOTOS AND ENJOY THE FLEXIBILITY OF MICRO-SD EXPANSION.

Digital Picture Frame, 15.6 Inch Large Frameo Digital Photo Frame WiFi, 32GB, 1920 * 1080 IPS HD Touch Screen, Tabletop&Wall-Mounted, Share Picture Video, Birthday, Wedding, for Mom
- INSTANT SHARING: EASILY SHARE PHOTOS & VIDEOS VIA FRAMEO APP, ANYTIME!
- PERFECT GIFT: HEARTFELT DIGITAL FRAME FOR ANY OCCASION, ELEGANTLY PACKAGED.
- NON-WIFI OPTION: USER-FRIENDLY UPLOADS VIA SD CARD OR USB FOR ALL AGES.

Apofial Digital Picture Frame 10.1 Inch WiFi Digital Photo Frame,1280 * 800 HD IPS Touch Screen Smart Cloud Photo Frame, to Share Photos Or Videos Remotely Via APP Email (Black)
-
EFFORTLESSLY SHARE MEMORIES VIA VPHOTO APP WITH FAMILY & FRIENDS!
-
10.1 HD TOUCH SCREEN DISPLAYS STUNNING PHOTOS & EASY NAVIGATION!
-
STORE 50,000+ PHOTOS; IDEAL FOR SHARING MOMENTS WITHOUT HASSLE!

Digital Picture Frame, 10.1 Inch Picture Frame with 1280*800 HD IPS Touch Screen, Smart Digital Photo Frame Built-in 32GB Memory, Auto-Rotate Easy Setup to Share Photos or Videos via AiMOR APP (Black)
-
INSTANT SHARE WITH AIMOR: CONNECT FAMILY & FRIENDS IN SECONDS!
-
VIBRANT 10.1 TOUCHSCREEN: CRYSTAL-CLEAR VISUALS FROM ANY ANGLE!
-
MASSIVE 32GB STORAGE: KEEP 50,000+ PHOTOS & VIDEOS AT YOUR FINGERTIPS!

Aura Digital Picture Frame - 10.1" HD Mat Display | Wirecutter's Best Digital Frame for Gifting - Send Photos Directly from Your Phone from Anywhere | Quick & Easy Setup Over WiFi - Free App | Black
-
TOP-RATED BY EXPERTS: TRUSTED BY THE NEW YORK TIMES AND OPRAH.
-
QUICK WIFI SETUP: INSTANTLY ADD PHOTOS VIA THE FREE AURA APP.
-
SMART FEATURES: AUTO-ADJUSTING DISPLAY AND UNLIMITED CLOUD STORAGE!
Updating photos on a digital picture frame typically involves a few common methods, although specifics can vary depending on the model. Most digital frames allow you to update photos via USB drives, SD cards, Wi-Fi, or companion apps. If your frame supports USB or SD cards, you can transfer photos from a computer onto the card or USB stick, then insert it into the frame's corresponding port. The frame usually detects new photos automatically and updates its display. If the frame is Wi-Fi enabled, you might be able to upload photos directly through a smartphone app or send them via email to a dedicated address linked to the frame. Always ensure that the photos are in a compatible format and resolution recommended by the manufacturer for optimal display. It's also wise to consult the user manual for any model-specific instructions or troubleshooting tips.
How to connect a digital picture frame to Wi-Fi?
Connecting a digital picture frame to Wi-Fi can vary slightly depending on the brand and model of the frame, but the general steps are usually quite similar. Here’s a typical process you can follow:
- Power on the Frame: Plug the digital picture frame into a power source and turn it on using the power button.
- Access Settings: Use the remote control or touch interface (if applicable) to navigate. Look for a “Settings” or "Menu" option.
- Find Network Settings: Within the settings menu, locate the "Network" or "Wi-Fi" settings section.
- Enable Wi-Fi: Ensure that the Wi-Fi is turned on. Some frames have it disabled by default to save power.
- Scan for Networks: Choose the option to scan or search for available Wi-Fi networks. This will list all the networks in the vicinity.
- Select Your Network: From the list of available networks, select your home Wi-Fi network.
- Enter Password: If your network is password-protected, you’ll need to enter the Wi-Fi password. Some frames use an on-screen keyboard, while others allow you to use the remote control to input text.
- Connect: After entering the password, choose the option to connect or join the network.
- Confirm Connection: Many frames will display a message confirming that they have successfully connected to the Wi-Fi network.
- Test the Connection:
- You can usually test the connection by uploading a new photo or checking if any online features (such as weather, if supported) are working properly.
If you're experiencing difficulties, consult the user manual that came with your digital picture frame for model-specific instructions. Additionally, ensure that you are within a reasonable range of your Wi-Fi router, and check if the Wi-Fi network is functioning properly with other devices.
What is an app-enabled digital picture frame?
An app-enabled digital picture frame is a modern digital device designed to display photos and sometimes videos in a slideshow format, featuring the capability to be controlled and customized using a smartphone or tablet application. Here are some key features:
- App Integration: These frames come with a dedicated app, which can be installed on a smartphone or tablet. The app allows users to upload photos and videos directly to the frame from their devices. This makes managing and updating the display content convenient and user-friendly.
- Wireless Connectivity: They often include Wi-Fi or Bluetooth connectivity, enabling users to send photos directly to the frame from anywhere, as long as both the app and the frame are connected to the internet.
- Cloud Storage: Some models offer cloud storage options, allowing users to store and organize a large number of photos without taking up space on their devices.
- Interactive Features: Users can typically customize slideshows, set transition effects, adjust timing, and even add captions or music. Some frames have motion sensors or touch screens for additional interactivity.
- Remote Management: Family and friends can be granted permission to share content with the frame, making it a great way for loved ones to share memories from afar.
- Social Media & Email Integration: Many app-enabled digital frames can connect directly with social media accounts and email, allowing automatic updates or manual uploads of new photos.
Overall, app-enabled digital picture frames offer a modern and versatile way to display digital images, integrating electronic convenience with personal expression.
What is the cost range for digital picture frames?
The cost of digital picture frames can vary widely based on factors such as size, resolution, brand, features, and connectivity options. As of the latest information, here's a general range you might expect:
- Budget Models: These typically cost between $30 and $70. They usually have smaller screens, lower resolutions, and basic features.
- Mid-Range Models: Expect to pay between $70 and $150 for these models. They often have better display quality, larger screens, and additional features like Wi-Fi connectivity and more internal storage.
- Premium Models: These can range from $150 to $300 or more. Premium digital frames generally offer the best display quality, larger sizes (sometimes up to 15 inches or more), advanced features like touchscreens, cloud storage, video playback, and integration with smart home systems.
Prices can fluctuate based on sales, brand reputation, and specific store. Additionally, new models with additional features may emerge, affecting these price ranges.
What is the average lifespan of a digital picture frame?
The average lifespan of a digital picture frame can vary based on the quality of the product, how often it is used, and environmental factors. However, generally speaking, a good-quality digital picture frame can last anywhere from 3 to 5 years. Premium models may last even longer, especially if they are well-maintained and used with care. Factors such as a high-quality display, durable materials, and proper usage significantly impact lifespan. Always follow the manufacturer’s instructions for best performance and longevity.
How to attach a USB drive to a digital picture frame?
Attaching a USB drive to a digital picture frame is usually a straightforward process. Here’s a step-by-step guide to help you:
- Check Compatibility: Before proceeding, ensure that your digital picture frame has a USB port and supports USB drives. Refer to the user manual for compatible USB formats and file types.
- Prepare the USB Drive: Make sure your USB drive is formatted in a file system supported by the frame (commonly FAT32 or exFAT). Transfer the photos to the USB drive. It's a good idea to organize them into folders if your frame supports folder navigation.
- Insert the USB Drive: Locate the USB port on the digital picture frame. It is often found on the side or the back. Insert the USB drive into the port. Ensure it is securely connected.
- Power On the Frame: Turn on the digital picture frame if it’s not already on. Use the power button, usually located on the frame or remote.
- Select USB Source: Using the frame’s interface (buttons on the frame or a remote control), navigate to the input/source menu. Select the USB option. This allows the frame to read and display images from the USB drive.
- Browse and Display Images: Once the USB is selected, the frame may automatically start a slideshow of the photos. You can usually control the slideshow using frame controls or a remote. Options may include pausing, moving to the next/previous image, or setting slideshow intervals.
- Troubleshooting: If the frame doesn't recognize the USB drive, check the format and the file types of your photos. Reformat the drive if necessary. Ensure that the USB drive is not larger than the maximum size supported by the frame.
- Ejecting the USB Drive: When you are finished, safely eject the USB drive from the frame, if the frame has an option for this. Otherwise, power off the frame before removing the USB drive to prevent data corruption.
By following these steps, you should be able to successfully attach and use a USB drive with your digital picture frame.
How to update firmware on a digital picture frame?
Updating the firmware on a digital picture frame can vary depending on the brand and model of the frame, but generally, the process involves the following steps. It's important to refer to your specific frame's user manual for detailed instructions:
- Check the Current Firmware Version: Before starting, determine the current firmware version on your digital picture frame. This information is typically found in the frame's settings menu.
- Visit the Manufacturer’s Website: Go to the website of the digital picture frame's manufacturer. Look for a 'Support' or 'Downloads' section.
- Download the Latest Firmware: Find the firmware update file for your specific model. Ensure that the firmware version you download is newer than the version currently on your frame.
- Prepare a USB Drive or SD Card: Depending on your picture frame’s design, you may need a USB drive or an SD card to transfer the firmware file. Format the storage device to ensure it’s empty and compatible.
- Transfer the Firmware File: Download the firmware update and transfer it onto the formatted USB drive or SD card. Make sure it is not in a folder unless instructed otherwise by the manufacturer.
- Insert the Storage Device into the Frame: With the picture frame turned off, insert the USB drive or SD card containing the firmware file into the appropriate slot on the frame.
- Start the Update Process: Turn on the digital picture frame. The device should automatically detect the firmware file and prompt you to start the update. Follow the on-screen instructions. If there is no prompt, navigate to the settings menu and look for a firmware update option.
- Wait for the Update to Complete: Do not turn off the frame or remove the storage device during the update process. The frame will usually restart automatically once the update is complete.
- Verify the Update: After the frame restarts, check the firmware version in the settings menu to ensure that the update was successful.
- Troubleshoot if Necessary: If the update fails, recheck that you have the correct firmware file and that it is for your specific model. If issues persist, consult the manufacturer’s support resources.
Always ensure your frame is connected to a stable power source throughout the update process to avoid interruptions.