
Best Outdoor Shower Materials to Buy in July 2026
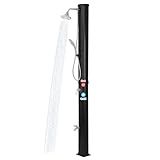
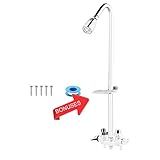
9.3 Gallon Solar Heated Outdoor Shower, 7.2FT Height, 360°Rotating Rainfall + 6FT Handheld Shower + Foot Faucet, Freestanding Black Poolside Shower with Hot & Cold Water Adjustment
- 9.3-GALLON CAPACITY FOR LONG, REFRESHING SHOWERS ANYTIME OUTDOORS.
- DURABLE, CORROSION-RESISTANT MATERIALS ENSURE LONG-LASTING USE.
- EFFORTLESS SOLAR HEATING RAISES WATER TEMP UP TO 140°F EFFORTLESSLY.


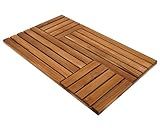
Utoplike Teak Wood Bath Mat, 32 x 20 inch Large Wooden Shower Mat for Bathroom, Non Slip Wood Floor Sturdy Mat for Inside Shower Luxury Spa Home or Outdoor
- ENHANCED NON-SLIP CRISS-CROSS DESIGN FOR ULTIMATE FOOT COMFORT.
- ELEVATE YOUR BATHROOM STYLE WITH ELEGANT TEAK WOOD FINISH.
- DURABLE, EASY-CLEAN, & LOW-MAINTENANCE FOR LONG-LASTING USE.
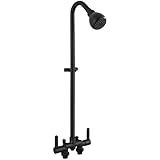
Aolemi Outdoor Shower Fixtures Kit Faucet System 3 Inch Center with Showerhead 2 Handle Exposed Shower with Brass Mix Valve Matte Black
- DURABLE BUILD: ABS HEAD, BRASS VALVE, STAINLESS STEEL PIPE FOR LONGEVITY.
- ROTATABLE DESIGN: HIGH PERFORMANCE HEAD ENSURES GREAT SPRAY AT LOW PRESSURE.
- EASY INSTALL: VERSATILE SETUP WITH ALL ACCESSORIES FOR HASSLE-FREE INSTALLATION.
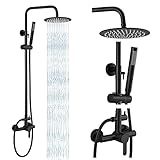
gotonovo Outdoor Shower Fixtures SUS304 Stainless Steel Rain Shower Kit Faucet High Pressure Wall Mount 2 Dual Function 8 Inch Showerhead and Handheld Spray Combo, Single Handle, Matte Black
- DURABLE SUS 304 STEEL: RUST-RESISTANT WITH A STYLISH MATTE BLACK FINISH.
- VERSATILE FUNCTIONALITY: SWITCH EASILY BETWEEN HANDHELD AND RAINFALL SPRAY.
- SIMPLE INSTALLATION: RETROFIT WITHOUT REMODELING; ALL HARDWARE INCLUDED.
Artiwell Outdoor Shower Fixture System,with Rustproof Riser and Riser Extension, Double Handle Utility Shower Faucet with Showerhead and Soap Dish, Polished Chrome
-
STYLISH OUTDOOR DESIGN COMPLEMENTS ANY SPACE, IDEAL FOR POOLS.
-
DURABLE RUSTPROOF STAINLESS STEEL ENSURES LONG-LASTING PERFORMANCE.
-
HIGH-PERFORMANCE SHOWER HEAD MAINTAINS GREAT SPRAY UNDER LOW PRESSURE.
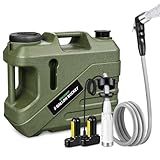
Portable Shower for Camping with 5-Gallon Water Jug, Rechargeable Camping Shower, Food Grade Material Water Containers for Fruit & Vegetables Wash, Integrate Design for Outdoors, Hiking, 2 Batteries
-
PORTABLE & CONVENIENT: ALL-IN-ONE SHOWER KIT FOR EASY OUTDOOR USE!
-
SAFE & DURABLE: FOOD-GRADE MATERIAL ENSURES SAFE WATER STORAGE.
-
LEAK-PROOF DESIGN: FEATURES INNOVATIVE SEALING FOR WORRY-FREE USAGE!

ZROPAW Christmas Lights Outdoor,24 Tubes 864 LED Meteor Shower Lights 12Inch, Waterproof Icicle Light Outdoor Christmas Decorations for Xmas Tree Yard Party, UL Plug, Blue
- BRIGHTEN UP YOUR SPACE WITH 864 LEDS FOR STUNNING DISPLAYS!
- EXTENDABLE DESIGN CONNECTS UP TO 4 LIGHT STRINGS FOR VERSATILE USE!
- IP44 WATERPROOF FOR ALL-WEATHER DURABILITY-PERFECT FOR OUTDOORS!
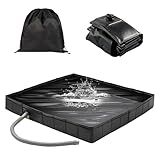
GTian Outdoor Shower Base, 41" x 41" x 10" Portable Shower Pan, Foldable Camping Shower Base for Outdoor, Camping, Beach, Caravan and Portable Shower Stall
-
EASILY TRANSPORTABLE FOLDABLE DESIGN FOR OUTDOOR ADVENTURES.
-
SPACIOUS, DURABLE SHOWER BASE ENSURES COMFORT WHILE CAMPING.
-
EFFICIENT DRAINAGE KEEPS YOUR OUTDOOR SPACE CLEAN AND DRY.
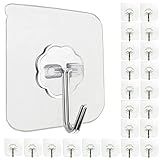
Jwxstore 24 Pack Heavy Duty Self Adhesive Hooks - 33lb Max, Transparent, Waterproof, Sticky Wall Hooks for Keys, Bathroom, Shower, Outdoor, Kitchen, Door, Home Improvement, Utility
- INVISIBLE DESIGN: BLENDS SEAMLESSLY INTO YOUR DÉCOR FOR A STYLISH LOOK.
- STRONG & VERSATILE: HOLDS UP TO 33LBS, PERFECT FOR VARIOUS HANGING NEEDS.
- EASY INSTALLATION: PEEL, STICK, AND HANG-NO TOOLS REQUIRED FOR SETUP!
OYMOV RV Shower Head with Hose - Non-Metallic Outdoor RV Shower Kits Replacement with Pause Function for RVs, Fifth Wheels, Motor Homes, Travel Trailers, Campers, Boats, White
- SAVE WATER EFFORTLESSLY WITH A BUILT-IN VALVE FOR SMART CONSERVATION.
- ENJOY EFFICIENT PRESSURE FOR A REFRESHING SHOWER WHILE USING LESS WATER.
- LIGHTWEIGHT AND STYLISH DESIGN PERFECT FOR ANY RV BATHROOM SETUP.
When selecting materials for outdoor showers, it's important to consider durability, resistance to weather conditions, and aesthetic appeal. Teak wood is a popular choice due to its natural resistance to water and decay, as well as its ability to withstand various weather conditions without losing its shape or strength. Stainless steel, particularly marine-grade, is another excellent option because it resists rust and corrosion, making it ideal for outdoor environments. Tile can also be used, provided it is non-porous and designed to withstand outdoor conditions, such as porcelain or certain stone tiles. For flooring, composite decking materials are favored for their ability to mimic wood appearance while offering enhanced resistance to moisture and insects. Additionally, copper is a material that, although less common, is admired for its unique aesthetic and natural antimicrobial properties, and it develops a patina over time that can appeal to certain design sensibilities. Proper maintenance and installation are crucial to ensure the longevity and performance of these materials in an outdoor setting.
What is the benefit of using glass in outdoor shower designs?
Using glass in outdoor shower designs offers several benefits:
- Aesthetic Appeal: Glass adds a modern and sleek look to outdoor showers. It creates a visually appealing and sophisticated design that can enhance the overall outdoor space.
- Transparency and Openness: Glass allows for an unobstructed view of the surrounding landscape, maintaining an open and airy feel. This can make the outdoor shower experience more enjoyable by connecting users with nature.
- Natural Light: Glass permits natural light to flow freely, creating a brighter and more inviting atmosphere in the shower area. This can reduce the need for artificial lighting during the day.
- Protection from Elements: While maintaining visibility and openness, glass panels can offer protection from wind and, to some extent, rain. This allows for a comfortable shower experience in varying weather conditions.
- Durability: High-quality tempered glass is strong and durable, making it a suitable material for outdoor use. It can withstand various weather conditions if properly maintained.
- Low Maintenance: Glass is relatively easy to clean and maintain. With proper treatment, such as the application of water-repellent coatings, it can resist mineral deposits and soap scum buildup.
- Privacy Options: Frosted, tinted, or patterned glass can be used to provide privacy while still offering the benefits of glass. This makes it versatile for different settings and personal preferences.
- Integration with Other Materials: Glass can be easily integrated with other materials like wood, stone, or metal, allowing for creative and cohesive design possibilities.
Overall, using glass in outdoor showers combines functionality with an elegant appearance, enhancing both the usability and aesthetic of outdoor living spaces.
How to build a cost-effective outdoor shower?
Building a cost-effective outdoor shower can be a fun and rewarding project. Here’s a general guide to help you create one without breaking the bank:
- Plan Your Location: Choose a location near existing water lines to minimize plumbing costs. Near an outdoor spigot or hose connection is ideal. Ensure privacy and consider drainage when selecting your spot.
- Materials and Tools: Hose and Showerhead: Use a garden hose and a simple showerhead or purchase an outdoor shower kit. Support Structure: Use weather-resistant wood like cedar or pressure-treated lumber for the frame. Flooring: Opt for wooden pallets, gravel, or tiles for a non-slip surface. Curtains or Panels: For privacy, use shower curtains, bamboo screens, or fabric panels. Basic tools like a hammer, screwdriver, saw, measuring tape, and shovel.
- Design and Inspiration: Keep the design simple; a basic freestanding structure can be functional and stylish. Look for online tutorials or videos for DIY inspiration tailored to your skill level.
- Construction Steps: Frame: Construct a basic frame for the shower using wood. A simple U-shape or L-shape can provide stability and privacy. Floor: Lay down your chosen floor material, ensuring it's level and allows water drainage. Plumbing: Attach your hose to the water source and connect it to the showerhead. Privacy and Extras: Install shower curtains or bamboo panels. You could add extras like hooks or shelves for soap and towels.
- Ensure Proper Drainage: Make sure water can drain away from the structure, selecting naturally draining materials or installing a simple trench.
- Consider Permits and Codes: Check local regulations regarding outdoor plumbing and structures to ensure compliance.
- Eco-Friendly Options: Consider a solar shower bag or tank for a sustainable heating method. Use reclaimed materials to reduce costs and add character.
By following these steps, you'll be able to create a practical and attractive outdoor shower tailored to your needs and budget.
How do you insulate an outdoor shower for colder climates?
Insulating an outdoor shower for colder climates involves a few key steps to ensure its use throughout colder months and to protect the plumbing from freezing. Here's a basic guide:
- Select Appropriate Materials: Use materials that are suitable for outdoor conditions, such as weather-resistant wood or composite panels for the structure. Ensure these materials can also support insulation.
- Insulate the Walls: Install rigid foam board insulation or spray foam insulation within the walls of the shower structure. Rigid foam boards are moisture-resistant and can be cut to fit, while spray foam can fill irregular spaces more easily.
- Add an Insulated Roof: Consider adding a roof with appropriate insulation, such as fiberglass or foam board, to protect from heat loss from above.
- Protect the Pipes: Insulate Plumbing: Use pipe insulation wrap or foam covers specifically designed for outdoor pipes. Ensure they are secured tightly to prevent moisture ingress. Heat Tape: Apply electric heat tape to pipes as an added precaution, especially if temperatures drop significantly. This will help maintain a minimum temperature to prevent freezing.
- Drainage Considerations: Install a proper drainage system that ensures water does not pool around the base of the shower, as standing water can freeze and damage the structure and plumbing.
- Use a Frost-Free Faucet: Install a frost-free faucet or shower valve that self-drains when the water is shut off to prevent freezing within the valve.
- Wind Protection: Enclose the shower with weather-resistant curtains or panels to protect against the wind, which can significantly affect temperature regulation.
- Heating Options: Consider adding an outdoor-safe heat source, such as a heat lamp or portable heater, to warm the space when it's in use. For more systemic heating, consider installing an electric floor heating mat beneath the shower floor if feasible.
- Regular Maintenance: Regularly check insulation, piping, and the overall structure for any wear or damage. Address any issues promptly to maintain the shower's insulating effectiveness.
By taking these steps, you'll be able to use your outdoor shower more comfortably in colder climates while protecting the plumbing and structure from harsh conditions.
How to adapt indoor shower materials for outdoor use?
Adapting indoor shower materials for outdoor use requires careful consideration to ensure durability and functionality in an open environment. Here are some steps and tips to guide you through the process:
- Material Selection: Tiles: Opt for tiles that are frost-resistant and have a low absorption rate. Porcelain tiles are often a better choice for outdoor use than ceramic ones because they are more durable and less prone to cracking. Stone: Use natural stones like slate, granite, or travertine that are known for their weather resistance. Metal Fixtures: Choose fixtures made of stainless steel, brass, or other corrosion-resistant materials to prevent rusting. Flooring: Consider using non-slip materials such as textured stone or slip-resistant tiles.
- Waterproofing: Ensure that the entire setup is adequately waterproofed to prevent leaks and water damage. Use outdoor-rated waterproof membranes or sealants. Pay special attention to joints and seams to protect them from water intrusion.
- Drainage: Design an efficient drainage system to handle rainwater as well as shower runoff. This may involve grading the area slightly to direct water away from structures. Consider installing a French drain or a linear drain system to enhance water management.
- Weatherproofing: Use weather-resistant barriers to protect materials from extreme weather conditions. Cover exposed areas with water-repellent sealers. Install a roof or a partial covering to shield the shower area from direct sunlight and heavy rain.
- Framing and Structure: Utilize pressure-treated wood or composite materials for framing to resist rot and insect damage. Ensure the structure can withstand wind loads, especially if it’s in an open or elevated area.
- Insulation: In cooler climates, consider insulating pipes to prevent them from freezing during colder months. Use appropriate insulating materials that can withstand outdoor conditions.
- Ventilation and Privacy: Design the shower area to allow for adequate ventilation to prevent mold and mildew while maintaining privacy. You might install screens, trellises, or outdoor-rated curtains for privacy.
- Finishing Touches: Select outdoor-grade paint or finishes for any exposed wood or metal. Incorporate landscaping elements to integrate the shower into your outdoor space seamlessly.
- Maintenance: Regularly clean and inspect the shower for signs of wear or damage. Reapply sealants and protective coatings as needed to maintain the integrity of the materials.
By selecting the right materials and taking these precautions, you can adapt indoor shower components for outdoor use effectively, ensuring a long-lasting and aesthetically pleasing outdoor shower.