
Best Outdoor Sheds With Floors to Buy in July 2026
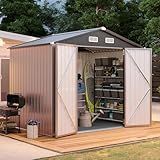
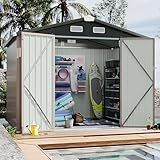
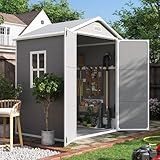
Aoxun 7.4x5.3FT Shed with Floor Galvanized Steel Outdoor Storage Shed Metal Garden Shed with Double Doors, 15mm Moisture-Proof Floor & Ventilation, Sloped Roof for Bike/Generator/Tool Storage (Brown)
- DURABLE BUILD: GALVANIZED STEEL & MOISTURE-RESISTANT FLOOR FOR LASTING STRENGTH.
- EASY ACCESS & SECURITY: DUAL DOORS WITH LOCKS FOR HASSLE-FREE, SAFE STORAGE.
- VERSATILE DESIGN: ANGLED ROOF MAXIMIZES SPACE FOR TOOLS AND OUTDOOR GEAR.


Aoxun 6.2x4 FT Shed Outdoor Storage Shed with Lockable Doors & Slooping Roof Metal Garden Tool Shed for Backyard, Patio, Poolside (Brown)
- DURABLE & WEATHER-RESISTANT: BUILT TO LAST WITH GALVANIZED STEEL.
- VERSATILE DESIGN: IDEAL FOR STORAGE, PETS, OR TRASH ENCLOSURE.
- EASY ASSEMBLY: CLEAR INSTRUCTIONS ENSURE QUICK SETUP AND SUPPORT.
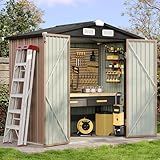
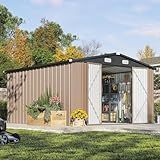
YADSUNY 10x8 FT Outdoor Storage Shed, Metal Garden Tool Shed with Updated Frame Structure and Lockable Doors, Ideal for Backyard Garden Patio Lawn, Grey
- ALL-WEATHER PROTECTION: RUST-RESISTANT GALVANIZED STEEL FOR DURABILITY.
- 35% EASIER ASSEMBLY: REINFORCED DESIGN ENSURES STABILITY AND PRACTICALITY.
- SPACIOUS STORAGE: ORGANIZE TOOLS IN A ROOMY 94.9D X 122.2W SHED.
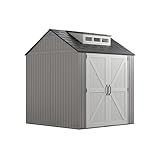
Rubbermaid Resin Outdoor Storage Shed With Floor (7 x 7 Ft) Weather Resistant Gray Organization for Home/Backyard/Garden Tools/Lawn Mower/Bike Storage/Pool Supplies
- SPACIOUS 7X7 SHED FITS RIDING MOWERS AND LARGE GARDEN TOOLS!
- ENHANCED DURABILITY WITH DOUBLE-WALL CONSTRUCTION FOR LASTING USE.
- 180° DOORS AND SUPERIOR VENTILATION FOR EASY ACCESS AND AIRFLOW!
Aoxun 6' x 8' Storage Shed with Base Outdoor Steel Garden Utility Cabinet with Lockable Door Waterproof & Rust-Proof for Yard, Patio, Backyard (Brown, Base Included)
-
EASY ACCESS & VENTILATION: DOUBLE DOORS + SMART VENTS FOR RUST-FREE STORAGE.
-
VERSATILE DESIGN: IDEAL FOR BIKES, TOOLS, AND GENERATORS; FITS ANY YARD.
-
WEATHERPROOF & DURABLE: CRUSH-RESISTANT, WATERPROOF, AND SPACE-OPTIMIZED SHED.
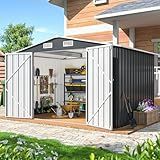
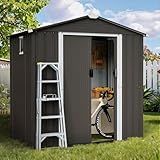
Aoxun 10 x 12FT Outdoor Storage Shed with Double Hinged Large Door Utility Garden Shed with Lockable Door & Sloped Roof Metal Sheds Outdoor Storage for Garden, Backyard, Patio and Backyard, Brown
-
SPACIOUS & ORGANIZED: STORE ALL OUTDOOR ESSENTIALS EFFORTLESSLY!
-
SECURE DESIGN: LOCKABLE DOOR & WATER-SHEDDING ROOF FOR PEACE OF MIND.
-
VERSATILE USE: IDEAL FOR TOOLS, GEAR, AND MORE IN ANY OUTDOOR SPACE!
Shintenchi 6x4 FT Outdoor Storage Shed with Window, Lockable Outdoor Waterproof Tool Storage Sheds,Weather Resistant Tool Storage House Shed for Garden,Backyard,Patio Utility Tool Storage,Dark Gray
-
AMPLE STORAGE: ORGANIZE TOOLS, BIKES, AND MORE IN ONE SPACIOUS SHED!
-
DURABLE DESIGN: RUST-RESISTANT AND WEATHERPROOF FOR LASTING OUTDOOR USE.
-
SECURE ACCESS: LOCKABLE DOORS ENSURE YOUR BELONGINGS STAY SAFE AND SECURE.
Greesum 5X3FT Plastic Outdoor Storage Shed with Floor, Resin Storaged Sheds with Lockable Door, All-Weather Tool Sheds for Garden, Backyard, Patio, Dark Gray (4.7×2.5FT)
- DURABLE RESIN WITHSTANDS UV, MOISTURE, AND TEMPERATURE EXTREMES.
- SECURE LOCKING MECHANISM ENSURES SAFE STORAGE FOR ALL ITEMS.
- SPACIOUS 5X3FT DESIGN KEEPS TOOLS AND BIKES ORGANIZED AND PROTECTED.
UDPATIO Outdoor Resin Storage Shed 6x4.5 FT, Plastic Garden Shed for Bike, Garbage Can, Tool, Outside Sheds with Lockable Door for Backyard, Patio, Lawn, Grey & White
- SPACIOUS 6'X4.5' DESIGN: AMPLE ROOM FOR TOOLS, GEAR, AND MORE!
- DURABLE RESIN MATERIAL: WATERPROOF, RUSTPROOF, AND UV RESISTANT!
- EASY INSTALLATION: QUICK ASSEMBLY WITH CLEAR INSTRUCTIONS INCLUDED!
Choosing an outdoor shed with a floor offers several advantages. Firstly, a floor provides a stable and level surface, which is essential for safely storing tools and equipment. This stability helps prevent items from tipping over or getting damaged. Additionally, a floor can protect the interior of your shed from moisture, dirt, and pests, which can enter from the ground. This is especially important if you will be storing items sensitive to moisture or items that need to remain clean and dry. Moreover, having a floor in your shed can enhance its overall integrity and longevity, as it helps distribute the weight of stored items more evenly and reduces direct contact with the ground, which can lead to deterioration over time. Furthermore, a floor can help with insulation, making the shed more comfortable to use in varying weather conditions. Finally, a floor can simplify yard maintenance, as you won't have to worry about grass or weeds growing inside the shed. Overall, a floor increases the functionality, durability, and versatility of an outdoor shed.
What is a subfloor in a shed?
A subfloor in a shed serves as an underlying layer that provides structural support and a base for the final flooring material. It is typically installed over the shed's foundational floor, which may be made of concrete, wood, or pressure-treated timbers. The subfloor helps:
- Support: It provides additional strength and stability, distributing loads evenly across the shed's foundation.
- Insulation: Some subfloor installations allow for adding insulation, helping to regulate temperature and moisture levels inside the shed.
- Smooth Surface: It creates a flat and even surface for finishing flooring materials, such as tiles, vinyl, or wood, improving the overall appearance and functionality of the shed.
- Moisture Barrier: When properly sealed, a subfloor can prevent moisture from seeping up from the ground, which helps protect stored items and building materials.
- Sound Dampening: Though this is more relevant in residential and commercial buildings, a subfloor can also reduce noise by absorbing sound vibrations.
Materials commonly used for subflooring include plywood, oriented strand board (OSB), or moisture-resistant boards, depending on the need for durability and environmental conditions.
How to waterproof an outdoor shed floor?
Waterproofing an outdoor shed floor is important to protect the contents from moisture and extend the life of the structure. Here are some steps you can follow to waterproof your shed floor:
- Choose the Right Material for the Floor: If you're constructing a new shed, opt for pressure-treated plywood or other treated lumber for the floor, as these materials are better suited for resisting moisture.
- Seal Gaps and Joints: Before applying any waterproofing products, make sure all gaps, joints, and seams in the floor are sealed. Use weather-resistant caulk or expanding foam to fill these areas.
- Apply a Waterproof Membrane or Sealant: Use a waterproof paint or wood sealant specifically designed for exterior wood surfaces. Products such as oil-based sealers, latex, or silicone-based sealants are commonly used. Apply the sealant evenly with a roller or brush, making sure to cover all areas including the edges of the floor. Allow it to dry thoroughly, and apply additional coats as recommended by the manufacturer.
- Install a Vapor Barrier: Place a heavy-duty plastic sheet or vapor barrier beneath the flooring to prevent moisture from the ground from seeping up into the shed. This is especially important if your shed has a dirt or gravel floor.
- Ensure Proper Drainage: Elevate the shed slightly off the ground using treated wood or concrete blocks to improve air circulation and reduce direct contact with moisture. Make sure the ground around the shed slopes away so rainwater can flow away, rather than accumulating around the base.
- Consider Adding a Floor Covering: For extra protection, consider adding a water-resistant floor covering like vinyl or rubber mats to the top of the shed floor.
- Regular Maintenance: Regularly inspect the shed floor for damage or wear, and reapply sealant as needed to ensure continued protection.
Following these steps will help ensure that your outdoor shed floor remains dry and durable throughout its lifespan.
How to choose the right size for an outdoor shed?
Choosing the right size for an outdoor shed involves several considerations to ensure it meets your needs both now and in the future. Here are some steps to help you decide:
- Purpose and Usage: Determine what you will use the shed for. Common uses include storage of tools, garden equipment, bicycles, outdoor furniture, or even as a workspace or hobby area. The intended use will significantly influence the size needed.
- Inventory: List all the items you plan to store. Take note of large items that require more space, such as lawnmowers or bicycles. Make sure to account for future purchases that might need storage.
- Available Space: Measure the area in your yard where you plan to place the shed. Ensure there's enough space for the shed itself and any required setback or space around it. Consider pathways for easy access and ensure it doesn’t obstruct views or function of your outdoor space.
- Size Categories: Small (up to 50 square feet): Suitable for storing garden tools, small equipment, and a few boxes. Medium (50-100 square feet): Ideal for larger garden tools, a bicycle or two, lawnmower, and more extensive gardening equipment. Large (100+ square feet): Provides ample room for a workshop, large equipment, and bulk storage.
- Future Needs: Think ahead about any additional storage needs you may have as your family or garden grows.
- Budget: Larger sheds typically cost more, so balance your needs with your budget. Remember to include costs for any additional foundation or site preparation.
- Local Regulations: Check with your local municipality for zoning laws or building codes, as these can restrict the size of shed you can build or place in your yard. Permits might be required for larger structures.
- Accessibility and Organization: Choose a size that allows for easy organization and access to all items. Consider shelving or hooks to maximize vertical space and keep things tidy.
- Aesthetic and Landscape: Consider how the shed size will fit into your landscape design. A shed that is too large might overwhelm your yard, while one too small might look out of place.
- Construction Type: Prefabricated kits come in standard sizes, while custom-built sheds offer flexibility in dimensions if your needs are specific.
By considering these factors, you can select a shed size that suits both your current needs and potential future use, ensuring it is a functional and harmonious addition to your outdoor space.
What is the benefit of a raised shed floor?
A raised shed floor offers several benefits:
- Moisture Protection: Elevating the shed off the ground helps prevent water from seeping in during heavy rains, reducing the risk of rot and mold, which can damage both the structure and its contents.
- Improved Air Circulation: A gap between the ground and the floor allows for better air circulation, helping to prevent moisture buildup and prolonging the life of the materials.
- Pest Prevention: Raising the floor can deter pests and insects from entering the shed, as there is no direct contact with the ground where many pests reside.
- Level Foundation: A raised floor can provide a stable and level base, especially on uneven terrain, ensuring the shed remains structurally sound and reducing the risk of shifting or settling over time.
- Insulation: A raised floor creates a natural insulating barrier, reducing the impact of ground temperature changes on the shed’s interior and making it more comfortable to use year-round.
- Reduced Maintenance: With better protection against the elements and pests, a raised floor can lead to reduced maintenance needs and a longer lifespan for the shed.
- Easier Access: A raised platform can facilitate easier access to the shed, particularly if combined with a ramp or step, making it more user-friendly for individuals with mobility issues or for moving heavy equipment in and out.
Overall, a raised floor enhances the durability, functionality, and convenience of a shed, making it a desirable feature for many storage and workspace structures.
How to plan a shed layout for efficient use of space?
Planning a shed layout for efficient use of space involves a combination of careful organization, strategic design, and smart storage solutions. Here’s a step-by-step guide to help you achieve an efficient shed layout:
- Assess Your Needs: Inventory Items: Make a list of all the items you intend to store in the shed, including tools, equipment, and seasonal items. Purpose Identification: Determine the primary purpose of your shed. Is it for gardening, tool storage, woodworking, or a combination?
- Measure the Space: Take accurate measurements of the interior dimensions of your shed. Note any structural features (windows, doors, supports) that could affect storage.
- Zoning: Function Zones: Divide the shed into zones based on activities (e.g., gardening area, tool storage, workspace). Frequency Zones: Place frequently used items within easy reach and less frequently used items in harder-to-reach areas.
- Storage Solutions: Vertical Space: Use wall-mounted shelves, pegboards, or hooks to maximize vertical space. Ceiling Storage: If height allows, consider ceiling-mounted racks for lightweight or seasonal items. Shelving Units: Invest in sturdy shelving for storing bulkier items. Adjustable shelves can offer flexibility.
- Efficient Workspaces: Workbenches: If workspace is needed, place workbenches in areas with good natural light and access to power if required. Foldable Tables: Consider a fold-down workbench or table to save space when not in use.
- Organizational Tools: Pegboards: Great for hanging tools and keeping them visible and accessible. Bins and Cabinets: Use clear bins with labels for small parts and fasteners. Lockable cabinets can store hazardous materials safely.
- Pathways and Accessibility: Ensure pathways are clear of obstacles to allow easy movement within the shed. Position heavy items at a reasonable height to avoid injuries from lifting.
- Lighting and Ventilation: Adequate lighting is crucial for safety and functionality. Consider installing battery-powered or solar lights if electricity is unavailable. Ventilation prevents dampness. Install vents or a small window for air circulation.
- Personal Touches: Add a small whiteboard or chalkboard for notes and reminders. Consider aesthetic touches that make the space enjoyable to work in, like a radio or a clock.
- Regular Maintenance: Periodically declutter and reorganize the shed to maintain efficiency. Reassess storage solutions to accommodate new items or changes in usage.
By carefully considering the design and layout based on your specific needs and available space, you can create a highly efficient and functional shed.