
Best Hoverboard Care Tips to Buy in July 2026
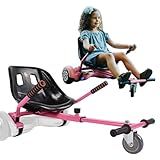
Hoverboard Seat Attachment for 6.5”-10” Hover Board, Buggy Go Kart Conversion Kit, Accessory for Self Balancing Scooter, Hoverboards Go-Cart for Kids or Adults, Pink
-
PERFECT HOLIDAY GIFT: SAFE AND FUN HOVERBOARD CART FOR KIDS!
-
EASY TO CONTROL: 360° STEERING FOR SMOOTH, ENJOYABLE RIDES.
-
QUICK ASSEMBLY: READY TO PLAY IN JUST 5 MINUTES!


CILOYU Front 4 inch Quiet Hoverboard Wheel Hoverboard Seat Attachment Rubber Wheel with Metal Mounting Plate Straps Kit Replacement for Hover board Go Kart Accessories Parts
-
SMOOTH, QUIET RIDE: SOFT RUBBER WHEEL ENSURES SILENT DRIVING EXPERIENCE.
-
EASY SETUP: QUICK INSTALLATION WITH INCLUDED MOUNTING BRACKET AND TOOLS.
-
DURABLE DESIGN: THICK METAL BRACKET AND WEAR-PROOF WHEEL FOR LASTING USE.
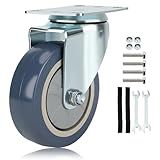
AlveyTech Front 4" Caster Wheel for Hoverboard Go-Kart Kits - Replacement Swivel Assembly, Shockproof Anti-Mark Gray Tire, Fork & Axle, and Durable Metal Alloy Mounting Plate
- SMOOTH, SHOCK-ABSORBING RIDE ON ANY SURFACE WITH QUALITY DESIGN.
- EASY INSTALLATION WITH PRE-DRILLED PLATE AND PREINSTALLED BEARINGS.
- PERFECT FIT FOR HOVERBOARD GO-KARTS, ENHANCING YOUR RIDE EXPERIENCE.
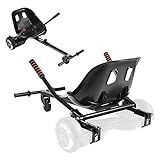
Hishine Hoverboard Seat Attachment for 6.5”-10” Hover Board, Upgrade Design No Need for Velcro Straps, Go Kart Conversion Kit Accessory for Self Balancing Scooter Transform into Go Cart (Black)
-
STURDY DESIGN: ALL-METAL FRAME WITH LOCKING MECHANISM ENSURES DURABILITY.
-
PERFECT GIFT: SAFE HOVERBOARD CART FOR KIDS, GREAT FOR ANY OCCASION!
-
QUICK SETUP: EASY ASSEMBLY IN JUST 5 MINUTES, FITS AGES 2+, MAX 242LBS.
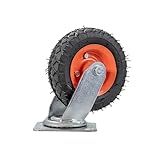
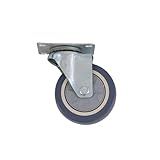
AlveyTech Front Caster Wheel with Fork & Axle - For Hoverboard Go Kart Kits - Shockproof Anti-Mark Tire (Gray) with Durable Metal Alloy Mounting Plate - Hover 1 Replacement Tires (6" Wheel)
- EASY INSTALLATION WITH PRE-DRILLED PLATE AND PREINSTALLED BEARINGS.
- SHOCK-ABSORBING ALLOY PLATE ENSURES SMOOTH MOVEMENT ON ALL SURFACES.
- PERFECT FIT FOR HOVERBOARD GO-KARTS, ENHANCING YOUR RIDE EXPERIENCE.
Maintaining a hoverboard for kids involves several key practices to ensure it remains in good condition and safe to use. Start by regularly inspecting the hoverboard for any physical damage, such as cracks or loose parts, especially focusing on the wheels and the body. Make sure that the tires are free from debris and wear as excessive wear can affect performance and safety. It's also essential to check the battery regularly; ensure it is charged using the charger provided by the manufacturer and to avoid overcharging which can shorten the battery life. Keep the hoverboard clean by wiping it down with a soft, dry cloth to remove dust and dirt. If it becomes wet, dry it thoroughly to prevent any water damage. Follow the manufacturer’s guidelines for any specific maintenance tasks and troubleshooting steps, and store the hoverboard in a cool, dry place when not in use, away from direct sunlight or moisture to preserve its components. Additionally, ensure that firmware updates and software maintenance are performed if applicable, as manufacturers might release updates for improved safety and performance. Lastly, always supervise the hoverboard when it’s being used by children to prevent misuse and accidents.
What is the proper way to balance a hoverboard?
Balancing on a hoverboard can be initially challenging, but with practice, it becomes easier. Here are some tips to help you balance properly:
- Safety Gear: Always wear appropriate safety gear, such as a helmet, knee pads, elbow pads, and wrist guards, to prevent injuries in case of falls.
- Flat Surface Practice: Start practicing on a flat, smooth surface free of obstacles to minimize the risk of falls and help you focus on balancing.
- Proper Stance: Mounting: Position the hoverboard in front of you, and hold onto something stable, like a wall or a friend's shoulder, for support. Place one foot on the hoverboard, keeping it level and steady. Once balanced, lift your other foot and place it on the board. Foot Placement: Keep your feet shoulder-width apart, standing straight and centered over the wheels. Avoid leaning too far forward or backward.
- Balance with Your Core: Engage your core muscles to help maintain stability. Focus on standing straight rather than bending at the waist.
- Weight Distribution: Gently shift your weight to maneuver the hoverboard: Forward/Backward Movement: Lean slightly forward to move forward and lean back to slow down or move backward. Keep movements subtle to maintain control. Turning: Apply gentle pressure with one foot to turn in that direction. For example, press down slightly with your right foot to turn left and vice versa.
- Look Ahead: Keep your head up and eyes forward instead of looking down at your feet. This helps with balance and allows you to anticipate obstacles or changes in terrain.
- Take Your Time: Don’t rush the learning process. Take small, cautious movements until you gain confidence and control.
- Practice Dismounting: Slow down, and stop the board. Step off the board one foot at a time, using the same support if needed.
As you become more comfortable and proficient, you can try different surfaces and more advanced maneuvers but always prioritize safety and practice in a safe environment.
How do I reset a hoverboard?
Resetting a hoverboard, also known as calibrating, is a straightforward process. Follow these steps to reset your hoverboard:
- Turn Off the Hoverboard: Make sure your hoverboard is completely turned off. Press the power button to ensure it is powered down.
- Place on a Level Surface: Put your hoverboard on a flat and level surface. Make sure it is not tilting or leaning to any side, as this position will be used to reset its balance sensors.
- Press and Hold the Power Button: Press and hold the power button for about 5-10 seconds. You will usually hear a sound or see the LED lights flash. This indicates that the reset process has started.
- Wait for the Calibration to Complete: Keep holding the power button until the lights stop flashing or you hear a second sound, whichever your hoverboard indicates. This process might take about 30 seconds.
- Release the Power Button: Once the resetting process is done, release the power button.
- Test the Hoverboard: Turn the hoverboard back on and test it to ensure it is balanced properly. If it is still not functioning correctly, repeat the calibration process.
Note:
- Refer to your hoverboard’s user manual for specific instructions, as the process might slightly vary depending on the brand or model.
- If the hoverboard still faces issues after a reset, there might be internal damages that require professional repair or servicing.
What is the safest way for kids to ride a hoverboard?
Ensuring the safety of kids while riding a hoverboard involves a combination of selecting the right device, using proper equipment, following guidelines, and providing supervision. Here are some steps and tips to increase safety:
- Choose the Right Hoverboard: Select a hoverboard that is age-appropriate, checking the manufacturer's age recommendations. Make sure the hoverboard is UL 2272 certified, which indicates it has passed electronic safety tests.
- Use Protective Gear: Always wear a helmet to protect against head injuries. Use knee pads, elbow pads, and wrist guards to protect against falls. Wear appropriate footwear like closed-toe shoes with good grip.
- Understand the Basics: Teach kids how to properly get on and off the hoverboard without assistance. Ensure they understand how to balance and maneuver, including starting, stopping, and turning.
- Practice in a Safe Area: Begin practicing on a flat, smooth surface away from traffic and obstacles. Avoid riding on uneven, wet, or slippery surfaces.
- Set and Follow Riding Rules: Establish rules about where and how fast they can ride. Prohibit riding near roads, in crowded areas, or after dark.
- Supervise Young Riders: Keep an eye on younger children while they gain experience and confidence. Be ready to assist if they encounter difficulties.
- Limit Riding Time: Avoid prolonged riding sessions, which can lead to fatigue and increase the risk of falls.
- Regular Maintenance: Check the hoverboard regularly for any signs of wear and tear, such as loose parts or battery issues. Ensure the battery is charged properly and follow safety guidelines for charging.
By following these safety measures, you can help ensure that kids have a fun and safe experience while riding hoverboards.
What is the significance of hoverboard LED signals?
Hoverboard LED signals serve several important functions, helping users understand the device's status and operate it safely. Here are some common interpretations of hoverboard LED signals:
- Power Indicator: Many hoverboards have a LED light that displays the power status. A green light typically indicates sufficient battery power, whereas a red or flashing red light often signifies that the battery is low and needs recharging.
- Battery Status: Some hoverboards have multiple LED indicators that give a more detailed view of the battery level. As the battery depletes, the lights may change from green to yellow and finally to red.
- Balance/Safety Mode: LED lights might change color or start blinking if the hoverboard detects an imbalance or if it’s operating outside safe parameters. This could indicate that you need to adjust your position or that there’s an issue with the sensors.
- Error Alerts: Flashing LED lights can also signal errors or malfunctions. The pattern of flashes may correspond to specific issues, such as motor problems, connectivity issues with the gyroscope, or internal faults. It’s advisable to consult the user manual for exact diagnostics.
- Bluetooth Connectivity: If the hoverboard is equipped with Bluetooth and a corresponding app, LED indicators may show connectivity status, letting you know when it’s successfully paired with a device.
- Speed Mode: Some hoverboards have different speed settings, and the LED lights might change color or sequence to reflect the current speed mode, such as beginner, intermediate, or advanced.
- Direction Turn Signals: On some advanced models, LED lights function as turn signals, providing an extra layer of safety by alerting others to your intended direction change.
Understanding these signals is crucial for safe and efficient operation. Always refer to your hoverboard’s specific user manual for precise interpretations, as the colors and blinking patterns can vary by manufacturer.
How do I identify hoverboard charging issues?
Identifying hoverboard charging issues can help ensure that your device operates safely and effectively. Here are some steps to help you identify and troubleshoot potential charging issues:
- Check the Charger and Cable: Inspect for Damage: Look for any visible damage on the charger and cable, including frayed wires or bent connectors. Use a Multimeter: Test the output voltage of the charger with a multimeter to ensure it matches the specifications.
- Examine the Charging Port: Inspect for Debris: Make sure there is no dust, debris, or foreign objects inside the charging port. Check for Loose Connections: Ensure the charging port is not loose or damaged.
- Indicator Lights: Charging Indicator: Observe the lights on the charger and hoverboard. A solid or blinking light typically indicates charging, while no light might indicate an issue. Check for Unusual Behavior: If the indicator changes unexpectedly, it might indicate a problem.
- Battery Issues: Test Battery Life: If the hoverboard doesn’t hold a charge or depletes quickly, it could be a battery issue. Run a Full Cycle: Fully charge and then use the hoverboard until it depletes to see if it charges fully and runs down properly.
- Charging Time: Compare how long it takes to charge with the manufacturer’s guidelines. If it takes significantly longer or shorter, there might be an issue.
- Temperature Considerations: Check Temperature: If the hoverboard or charger becomes excessively hot during charging, it might indicate a problem. Avoid Extreme Conditions: Do not charge in extremely hot or cold environments.
- Try a Different Outlet: Test the charger in a different electrical outlet to rule out the possibility of an outlet issue.
- Safety Precautions: Always use the charger supplied by the manufacturer or a certified replacement to avoid incompatibility issues.
- Consult the Manual: Refer to the hoverboard’s manual for troubleshooting guidelines specific to your model.
- Professional Help: If problems persist, contact the manufacturer or a professional repair service, especially if the hoverboard is under warranty.
By following these steps, you should be able to identify and possibly resolve any charging issues with your hoverboard.
What is a hoverboard's UL certification?
UL certification for hoverboards refers to the safety standards set by Underwriters Laboratories, a global safety science organization. Around 2016, there were widespread concerns about the safety of hoverboards, particularly regarding battery-related fires and other hazards. To address these issues, UL introduced a specific certification process for hoverboards, known as UL 2272.
UL 2272 certification evaluates the electrical and fire safety of self-balancing scooters, commonly referred to as hoverboards. This certification covers the entire electrical drive train system including the battery, charger system, and other critical electrical components. If a hoverboard has UL 2272 certification, it means that it has been tested and meets the established safety standards, significantly reducing risks related to electrical fires and malfunctions. Consumers are encouraged to look for the UL 2272 mark on hoverboards to ensure they are purchasing a safer product.