
Best Digital Picture Frames to Buy in July 2026
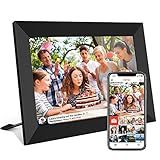
32GB FRAMEO 10.1 Inch Smart WiFi Digital Photo Frame 1280x800 IPS LCD Touch Screen, Auto-Rotate Portrait and Landscape, Built in 32GB Memory, Share Moments Instantly via Frameo App from Anywhere
- SHARE PHOTOS/VIDEOS INSTANTLY WITH LOVED ONES VIA FRAMEO APP.
- STUNNING 10.1” IPS HD TOUCH SCREEN FOR CLEAR, VIBRANT VISUALS.
- EASY SETUP & USER-FRIENDLY DESIGN CATER TO ALL AGES EFFORTLESSLY.


Digital Picture Frame, 15.6 Inch Large Frameo Digital Photo Frame WiFi, 32GB, 1920 * 1080 IPS HD Touch Screen, Tabletop&Wall-Mounted, Share Picture Video, Birthday, Wedding, for Mom
- INSTANT PHOTO SHARING VIA FRAMEO APP-NO LIMIT ON USERS!
- PERFECT GIFT FOR ANY OCCASION-ELEGANT PACKAGING INCLUDED!
- STUNNING 15.6 HD TOUCHSCREEN FOR VIVID MEMORIES!

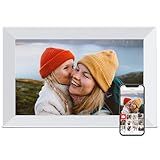
Digital Picture Frame, 10.1'' Frameo Digital Frame Wifi, 32GB Memory, 1280*800 HD Touch Screen Digital Photo Frame, Wall Mountable, Auto-Rotate, Share Instantly, Wedding, Birthday Gifts for Women, Mom
-
INSTANTLY SHARE PHOTOS VIA FRAMEO APP FOR FAMILY MOMENTS ANYWHERE.
-
PERFECT GIFT FOR ALL OCCASIONS-BIRTHDAYS, ANNIVERSARIES, AND MORE!
-
USER-FRIENDLY DESIGN SUPPORTS BOTH WIFI AND NON-WIFI PHOTO TRANSFERS.

Aura Carver HD WiFi Digital Picture Frame, 10.1”, Add Photos with Aura App, Free Unlimited Storage - Wirecutter’s Pick for Best Digital Photo Frame 2022 - Gravel
- SECURELY SHARE PHOTOS WITH LOVED ONES VIA FREE AURA APP, NO FEES!
- QUICK SETUP: SET UP IN MINUTES, INSTANTLY ADD PHOTOS AND VIDEOS.
- GIFT-READY: PRE-LOAD MEMORIES AND MESSAGES IN A PREMIUM BOX.

Skylight Frame – WiFi Digital Picture Frame Customer Support, Touch Screen Digital Photo Frame with Easy Setup, Photo Gifts for Parents and Grandparents - 10 Inch Black
-
EFFORTLESS SETUP: PLUG IN, CONNECT TO WI-FI, AND START SHARING INSTANTLY!
-
PERFECT PHOTO GIFTS: SEND CHERISHED MEMORIES TO LOVED ONES ANYWHERE, ANYTIME.
-
ELEGANT TOUCHSCREEN DESIGN: ENJOY STUNNING VISUALS WITH CLOUD STORAGE FLEXIBILITY!

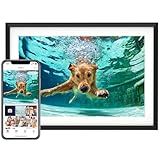
Dragon Touch 10.1'' WIFI Digital Picture Frame - 1280*800 HD IPS Touch Screen Digital Photo Frame Display, Auto-Rotate, Share Photos/Videos Instantly via Free App Best Gifts for Birthday, Wedding, Mom
-
STAY CONNECTED WITH LOVED ONES THROUGH INSTANT PHOTO UPDATES!
-
EASY WIRELESS SHARING WITH FAMILY VIA USER-FRIENDLY MOBILE APP.
-
STUNNING 10.1 DISPLAY FOR BEAUTIFUL MEMORIES IN PORTRAIT OR LANDSCAPE.

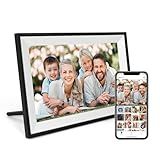
64GB 15.6" Frameo Digital Picture Frame WiFi, Large Electronic Photo Frames 1920 x 1080 IPS FHD Touch Screen, Send Photos from Your Phone from Anywhere, Best Gifts for Parents and Grandparents
-
SHARE PHOTOS & VIDEOS SECURELY WITH THE FRAMEO APP! CONNECT WITH FRIENDS/FAMILY EFFORTLESSLY, NO DISTANCE LIMITS!
-
64GB STORAGE-STORE UP TO 100,000 PHOTOS! EXPANDABLE MEMORY VIA SD/USB FOR ENDLESS MEMORIES!
-
15.6 FULL HD TOUCH SCREEN FOR STUNNING VISUALS! VIVID COLORS AND EASY NAVIGATION BRING YOUR PHOTOS TO LIFE!
Digital Picture Frame, 10.1 inch Frameo Digital Frame WiFi, 1280 * 800 IPS HD Touchscreen, 32GB Storage, Instant Share Pictures Video, Smart Photo Frame Electronic, Gifts for Mom, House Warming
- STUNNING 10.1 HD TOUCH DISPLAY BRINGS MEMORIES TO LIFE VIVIDLY.
- EFFORTLESSLY SHARE PHOTOS VIA THE FRAMEO APP-NO LIMITS!
- PERFECT GIFT FOR ANY OCCASION, READY TO DELIGHT FROM UNBOXING!
Euphro 10.1'' Digital Picture Frame with 32GB Storage, Digital Photo Frame with 1280x800 IPS Touch Screen, Share Photos/Videos and Send Best Wishes via Free App
-
SHARE PHOTOS PRIVATELY VIA THE UHALE APP ON IOS AND ANDROID!
-
VIBRANT 10.1 IPS TOUCH SCREEN DISPLAYS CHERISHED MOMENTS BEAUTIFULLY.
-
STORE 60,000+ PHOTOS WITH 32GB STORAGE AND EXPANDABLE MICRO SD SUPPORT!
Digital Photo Frame 10.1 Inch WiFi Digital Picture Frame IPS HD Touch Screen Smart Cloud Photo Frame with 32GB Storage, Auto-Rotate, Easy Setup to Share Photos or Videos Remotely via AiMOR APP (Black)
-
HEARTFELT GIFTING: PRELOAD PHOTOS FOR A SURPRISE YOUR LOVED ONES WILL CHERISH!
-
STUNNING VISUALS: ENJOY VIBRANT IMAGES WITH 1280*800 RESOLUTION AND IPS TECH.
-
SEAMLESS SHARING: USE THE AIMOR APP TO SEND PHOTOS EFFORTLESSLY-NO FEES!
Digital picture frames generally last several years, with longevity depending on factors such as build quality, usage patterns, and technological advancements. On average, well-made frames can function effectively for about 3 to 10 years. The screen type and resolution, along with the frame's internal components, influence durability. Frequent use may lead to wear, particularly in touchscreen models, while exposure to heat or direct sunlight can impact lifespan. Additionally, advancements in technology may render older frames obsolete, as newer models offer better displays and features. Regular maintenance and proper usage can help extend a digital picture frame's functional life.
What is the ideal resolution for a digital picture frame?
The ideal resolution for a digital picture frame largely depends on the size of the frame and how sharp you want the images to appear. However, here are some general guidelines to consider:
- Small to Medium Frames (7 to 10 inches): A resolution of 800 x 600 pixels to 1280 x 800 pixels is usually sufficient. This offers a good balance between clarity and file size.
- Large Frames (12 inches or more): Aim for a resolution of at least 1920 x 1080 pixels (Full HD) or higher, like 2K (2048 x 1536) or 4K (3840 x 2160) if the frame supports it. Higher resolutions ensure that images look sharp, especially when viewed up close.
- Aspect Ratio: Consider the aspect ratio of the digital frame, which is typically 4:3 or 16:9. Choose a resolution that matches the frame's aspect ratio to avoid image distortion or cropping.
While higher resolutions provide sharper images, they also require larger file sizes and more processing power. It's important to balance resolution with the specific capabilities and requirements of your digital picture frame, such as its internal memory and supported formats.
How to backup photos from a digital picture frame?
Backing up photos from a digital picture frame can vary depending on the model and features of the frame. However, here are some general steps you can follow to back up your photos:
- Check the User Manual: Start by consulting the user manual or manufacturer's website for specific instructions related to your digital picture frame model.
- Retrieve Storage Medium: Memory Card: If your digital picture frame uses a memory card (e.g., SD card), remove it from the frame. Insert it into a card reader connected to your computer. Internal Memory: If the frame has internal memory, connect it to your computer using a USB cable. Your frame should appear as an external storage device.
- Connect via USB Cable: Some digital frames have a mini-USB or micro-USB port. Use the appropriate cable to connect the frame to your computer. Once connected, the frame should show up as an external drive.
- Transfer Photos to Computer: Open the storage device on your computer (such as the memory card or internal memory of the frame). Copy and paste or drag and drop the photo files from the frame's storage to a designated folder on your computer to create a backup.
- Use Cloud Storage: Once the photos are on your computer, you can further back them up to cloud storage services like Google Drive, Dropbox, or iCloud for additional safety.
- Software Solutions: Some digital frames come with proprietary software that can help transfer photos to your computer. Check if your frame's manufacturer offers such software.
- Wireless Transfer: If your digital frame supports Wi-Fi, you might be able to back up photos wirelessly using specific apps or services associated with the frame. Follow instructions for setting up the Wi-Fi transfer if available.
- Consult Technical Support: If you're having trouble, consider reaching out to the manufacturer's support for guidance on backing up photos with your specific model.
Remember to handle memory cards and USB cables carefully to avoid data loss, and make regular backups to minimize the risk of losing your photos.
How to transfer photos to a digital picture frame?
Transferring photos to a digital picture frame can usually be done in a few different ways, depending on the model and features of your frame. Here’s a general guide to help you:
1. USB Drive or SD Card
- Check Compatibility: Ensure your digital frame has ports for a USB drive or SD card.
- Prepare Storage Device: Copy your photos onto a USB drive or SD card from your computer using a file manager (e.g., File Explorer on Windows or Finder on Mac).
- Insert into Frame: Plug the USB drive or insert the SD card into the corresponding slot on the digital photo frame.
- Follow On-Screen Instructions: Most frames will automatically detect the photos on the drive or card. You may need to use the frame's interface to begin the slideshow or copy photos to its internal storage.
2. Wi-Fi Transfer
- Wi-Fi Setup: Ensure your digital frame supports Wi-Fi and connect it to your home Wi-Fi network.
- Use Apps/Software: Some digital frames come with a dedicated app (like those from Nixplay or Pix-Star). Download the app on your smartphone or tablet.
- Transfer Photos: Follow the app instructions to upload photos directly from your mobile device to the frame through the app’s interface.
3. Cloud Services
- Check Frame Compatibility: See if your digital frame supports cloud services like Google Photos, Dropbox, or proprietary cloud services.
- Link Account: Use the frame’s interface to log in and link your cloud photo account.
- Sync Photos: Select the albums or photos you wish to synchronize with your frame.
4. Email Upload
- Email Feature: Some digital frames have a unique email address for receiving photos.
- Email Photos: Send photos as attachments to the email address provided in your frame’s documentation.
- Receive and Display: The frame will receive the email and display the attached photos, usually after a short delay.
5. Bluetooth Transfer
- Bluetooth Connection: Some frames support Bluetooth for transferring photos.
- Pair Devices: Pair your smartphone or computer with the digital frame via Bluetooth following the device-specific pairing instructions.
- Send Photos: Use your device's interface to select and send photos over the Bluetooth connection.
Important Tips:
- File Format: Ensure that the photos are in a compatible format, usually JPEG or PNG.
- Resolution: Check the frame's display resolution and resize images accordingly for optimal display quality.
- Storage Space: Be aware of the internal storage limits of the frame.
- Read Manual: Always consult your specific model’s manual for detailed instructions, as features and steps can vary widely between different brands and models.
Following these steps should help you transfer photos to your digital picture frame with ease.
How to fix a frozen digital picture frame?
If your digital picture frame is frozen, you can try the following steps to fix the issue:
- Restart the Frame: Turn off the digital picture frame by using the power button if available. If there is no response, unplug it from the power source, wait for a minute, and then plug it back in to restart.
- Check the Power Supply: Ensure the power adapter or USB cable is securely connected to both the frame and the power outlet. Consider trying a different outlet or adapter if you suspect the power supply might be problematic.
- Inspect the Memory Card: If the frame uses a memory card, turn off the frame and remove the card. Clean the contacts gently with a soft cloth and then reinsert it. Make sure it's inserted correctly and try turning the frame back on.
- Software Reset: Look for a reset button, which might be hidden in a pinhole on the back or bottom of the frame. Use a paperclip or similar object to press and hold the button for a few seconds if one is present.
- Update Firmware: Check the manufacturer's website for any available firmware updates. Follow the instructions provided to update the firmware, which may resolve any software-related issues.
- Check for File Corruption: If the frame supports USB or memory card inputs, connect the card or device to a computer to check for corrupted files or formats not supported by the frame. Remove any suspicious files and try again.
- Factory Reset: Consult the user manual for instructions on how to perform a factory reset. This step usually resolves software glitches, but be aware it will erase all settings and stored images on the frame.
- Contact Support: If none of the above steps work, contact the manufacturer's support team for further assistance. There may be a specific issue with your model that they can help address.
Before proceeding with any resets, ensure that you back up any important files if possible, as some solutions may lead to data loss.
What is the function of a motion sensor in digital picture frames?
A motion sensor in digital picture frames serves several functions:
- Power Management: The sensor helps conserve energy by activating the display only when motion is detected nearby. This ensures that the frame is not using power unnecessarily when no one is around to view it.
- Automatic Activation: When someone enters the room or walks past the frame, the motion sensor triggers the display to turn on, making the pictures immediately visible without any manual intervention.
- Convenience: It provides a hands-free way to interact with the frame, enhancing user experience by making it responsive to presence without the need for buttons or remote controls.
- Prolonged Device Longevity: By reducing the time the display is active, the frame’s overall lifespan can be extended, as less continuous operation can mean reduced wear and tear on the display.
- Security Feature: In some cases, it may also alert or notify users if unexpected motion is detected, though this is more typical of general motion sensors rather than those specifically integrated into picture frames.
Overall, the motion sensor enhances the functionality of digital picture frames by making them more energy-efficient and user-friendly.
How to set up a digital picture frame?
Setting up a digital picture frame can vary slightly depending on the model and brand, but the general steps are quite similar. Here’s a basic guide to help you set up most digital picture frames:
1. Unboxing and Initial Setup:
- Unpack the Frame: Carefully remove the digital frame and its components from the packaging. Common components include the frame itself, a power adapter, a remote control, and a stand.
- Read the Manual: It's always a good idea to briefly go through the user manual for any specific instructions or requirements related to your model.
2. Powering the Frame:
- Connect to Power: Plug the power adapter into the frame and connect it to an electrical outlet. Turn on the picture frame using the power button, which may be located on the device itself or on a remote control.
3. Inserting a Memory Card or USB Drive:
- Choose Your Storage Device: Many digital frames support SD cards or USB drives for photo storage. Ensure your photos are loaded onto the device. Resize your photos to fit the frame's resolution for optimal display (this is often done on a computer before transferring).
- Insert the Storage Device: Insert the memory card or connect the USB drive to the appropriate slot on the frame.
4. Connecting to Wi-Fi (if applicable):
- Enable Wi-Fi: Some frames have Wi-Fi connectivity. Go to the settings and configure the Wi-Fi by selecting your network and entering the password. This allows for features like cloud storage access or direct uploading of photos from an app.
5. Transferring Photos:
- Using a Memory Card/USB Drive: The frame will typically auto-detect files stored on these devices.
- Using an App: If the frame is Wi-Fi enabled, you might use a specific app to send photos directly from your phone or a cloud service.
- Via Email or Cloud (optional): Some frames support emailing photos directly to the frame or syncing with cloud services like Google Photos or Dropbox.
6. Configuring Display Settings:
- Select Photo Source: Use the frame’s menu to select the photo source (internal memory, SD card, USB drive, etc.).
- Adjust Slideshow Settings: Customize the slideshow speed, transition effects, and display mode (e.g., random, sequential).
- Set Clock and Other Features: Many frames offer additional features like calendar display, alarm, and weather updates (if supported). Configure these settings as desired.
7. Placement:
- Attach the Stand: If your frame has a stand, attach it securely to the back, allowing for the desired viewing angle.
- Wall Mount (optional): Some frames can be mounted on walls. Follow the manufacturer’s instructions for secure mounting.
8. Troubleshooting:
- Consult the manual if the frame doesn’t turn on, doesn’t recognize your photos, or if there are any connectivity issues. Reset the frame if necessary and ensure the software is updated.
Once everything is set up, you should have a functioning digital picture frame that showcases your cherished photos. Always refer to your specific model’s manual for detailed instructions tailored to your device.