
Best Contact Form Plugins to Buy in July 2026

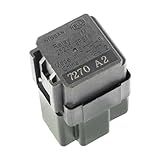
68083380AA 12V 35A Automotive Power Relay SPST 4Pins Miniature Car Relay Standard Plug-in with Plug-in 280 Terminal Form Compatible with 12088567
- DURABLE 12V 35A RELAY ENSURES RELIABLE PERFORMANCE IN YOUR VEHICLE.
- EASY PLUG-IN INSTALLATION FOR QUICK AND HASSLE-FREE REPLACEMENTS.
- VERSATILE RELAY COMPATIBLE WITH CARS, TRUCKS, MOTORCYCLES, AND BOATS.


CB1aH-TR-12V ACB86221 12VDC 70A 4Pins 1 Form A high Contact Capacity Plug-in Type Quick Connect Mini-ISO Automotive Relay with Resistor
- HIGH 70A CAPACITY FOR HEAVY-DUTY APPLICATIONS LIKE COMPRESSORS.
- QUICK CONNECT DESIGN FOR EFFORTLESS INSTALLATION AND REMOVAL.
- DURABLE AG ALLOY CONSTRUCTION ENSURES LONG-LASTING RELIABILITY.

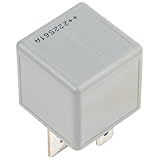
95220-M2000 12VDC 20A 4Pins 1 Form A Quick Connect Plug in Mount Automotive Relays Compatible with JQ126-AER RTT7113 MB183865
- RELIABLE 12VDC RELAY WITH 20A CAPACITY FOR PEAK PERFORMANCE.
- EASY PLUG-IN 4-PIN DESIGN SIMPLIFIES INSTALLATION PROCESS.
- VERSATILE COMPATIBILITY WITH POPULAR AUTOMOTIVE MODELS.
25230-9F915 12VDC 4Pins 1 Form A Quick Connect SPST Plug in Mount Automotive Relays with Resistor
- QUICK 4-PIN CONNECTIONS FOR HASSLE-FREE INSTALLATIONS.
- DURABLE AGSNO ALLOY CONTACTS ENSURE LONG-LASTING RELIABILITY.
- SAFE 12VDC DESIGN WITH A RESISTOR FOR ADDED PROTECTION.
V23134-J56-X408 24VDC 70A 1 Form A 4Pins Quick Connect Automotive Relays Plug-in Maxi ISO Relays SPNO with Resistor
- RELIABLE 24VDC RELAY RATED FOR 70A-PERFECT FOR AUTOMOTIVE NEEDS!
- EASY 4-PIN INSTALLATION ENSURES QUICK CONNECTIONS AND HASSLE-FREE SETUP.
- DURABLE DESIGN WITHSTANDS -40 TO 125°C FOR VERSATILE, LONG-LASTING USE.
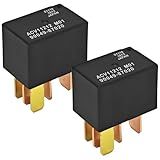
ACV11212 M01 90049-87020 12VDC 20A SPDT Automotive Relay (Pack of 2) - 1 Form C Plug in Socketable Relay for Vehicle Systems
- 20A RATED FOR HEAVY-DUTY AUTOMOTIVE APPLICATIONS
- OPTIMIZED 12VDC COIL FOR LOW POWER CONSUMPTION
- QUICK SWITCHING: 10MS OPERATE, 15MS RELEASE TIME
To add a contact form to your WordPress site, follow these steps:
- Log in to your WordPress dashboard.
- Navigate to the Plugins section on the left-hand menu and click on "Add New".
- In the search box, type "contact form" and you will see a list of available contact form plugins.
- Choose a plugin that suits your needs. Some popular ones include Contact Form 7, WPForms, and Gravity Forms.
- Click the "Install Now" button next to the plugin you have selected, and then click "Activate" to activate the plugin.
- Once the plugin is activated, you can find its settings under the Contact or Forms section in your WordPress dashboard.
- Configure the contact form according to your requirements. Each plugin will have its own settings and customization options. You can usually add or remove form fields, change the design, and set up email notifications for form submissions.
- After customizing the form, create a new page or edit an existing one where you want the contact form to be displayed.
- Look for the form button or icon in the WordPress editor and click on it. This will open a pop-up window where you can select the contact form you want to insert.
- Once you've added the form, save the page or update it.
- Visit your website to see the contact form in action. You may need to adjust the form's layout or styling using CSS if necessary.
- Test the contact form to ensure it is functioning properly. Fill out the fields, submit the form, and check if you receive the email notifications or if the entries are stored in your WordPress dashboard.
That's it! You have successfully added a contact form to your WordPress site. Visitors can now use the form to get in touch with you and send messages directly from your website.
How to customize the fields in a contact form?
To customize the fields in a contact form, you need to have access to the code or settings of your website's contact form. Here's a general step-by-step guide:
- Identify the platform or tool you are using for your contact form. It could be a plugin, a form builder tool, or custom code.
- Access the settings or code editor for your contact form. This can usually be done through the backend of your website or the administration panel of the form tool.
- Determine the fields you want to customize. Common contact form fields include name, email address, phone number, subject, and message. Decide which fields you want to add, modify, or remove.
- Add new fields: If you want to add new fields, look for an option like "Add Field" or a similar button within the form settings. Choose the type of field you want, such as text, email, dropdown, or checkbox, and add it to the form.
- Modify existing fields: To modify existing fields like labels or required status, look for the field settings, usually accessible by clicking on the field or selecting it from a list. Change the label, placeholder text, validation rules, or required status according to your preference.
- Remove fields: If you want to remove fields, find the option to delete or remove fields from the form settings. Be cautious when removing fields as they may contain valuable information.
- Save your changes: Once you have made the necessary customizations to the contact form fields, save the changes and exit the settings or code editor.
- Test the contact form: It's crucial to test the form thoroughly to ensure all the updated fields are functioning correctly. Send test submissions and verify that the form is capturing the data as expected.
Note: The actual steps may vary depending on the platform, plugin, or tool you are using. Make sure to refer to the specific documentation or support resources provided by your contact form provider for detailed instructions.
What is the location of contact form submission data in WordPress?
In WordPress, the location of contact form submission data depends on the contact form plugin being used. By default, WordPress does not have a built-in contact form feature.
However, if you are using a popular contact form plugin like Contact Form 7 or WPForms, the submission data is typically stored in the WordPress database. The exact location of the data will vary based on the database table prefix and the plugin settings.
Contact Form 7 stores submission data in the wp_posts table as a custom post type with the post_type value of "wpcf7_contact_form". You can access the data by querying the wp_posts table.
WPForms, on the other hand, creates a new table in the database to store the submission data. The table name will start with the prefix you have set for your WordPress database, followed by "wpforms_entries" and the form ID. For example, if your database prefix is "wp_", and you have a form with ID 5, the table name will be "wp_wpforms_entries_5". The data within this table can be queried to access the submissions.
To summarize, the exact location of contact form submission data in WordPress depends on the contact form plugin being used and how it handles the storage of form submissions.
What is the purpose of a contact form plugin's spam protection features?
The purpose of a contact form plugin's spam protection features is to prevent automated bots, spammers, and other malicious users from abusing the contact form to send unsolicited or inappropriate messages. These features are designed to verify that the submission is made by a real human user and not by software or automated scripts. By implementing spam protection, contact form plugins help maintain the integrity of the communication channel, filter out unwanted messages, and ensure that the legitimate messages are received by the intended recipients.
What is the benefit of adding a phone number field in a contact form?
Adding a phone number field in a contact form provides several benefits:
- Improved Communication: Including a phone number field allows users to provide an alternate method of communication, ensuring that you can reach out to them through multiple channels. It allows for direct, immediate, and personal communication, which may be preferred for urgent inquiries or time-sensitive matters.
- Convenient and Efficient: When dealing with complex or detailed inquiries, communicating over the phone can be more efficient than lengthy email exchanges. It allows for real-time conversation, enabling prompt clarification, immediate solutions, and faster resolution of issues.
- Enhanced Customer Support: The phone number field enables businesses to offer better customer support by offering a direct line through which users can seek assistance, ask questions, or provide feedback. It helps to establish a more personal and trustworthy relationship between the business and its customers.
- Verification and Authentication: In certain cases, phone numbers can be used to verify and authenticate users, especially for sensitive transactions or accessing restricted areas of a website. This additional layer of security helps to prevent fraudulent activities and ensures the information is being accessed by the intended recipient.
- Improved Lead Generation: Including a phone number field in a contact form offers businesses an opportunity to capture potential leads and qualify prospects. It allows you to gather more contact details for follow-up marketing activities, such as phone calls or SMS campaigns, to nurture leads and potentially convert them into customers.
- Flexibility for Users: Some users may find it more comfortable or convenient to communicate over the phone rather than writing out their queries or concerns. By including a phone number field, you cater to different communication preferences and provide users with options to engage with your business in a way they find most suitable.
Ultimately, including a phone number field in a contact form expands communication channels, improves customer support, assists in lead generation, and offers flexibility to users, thus enhancing overall user experience and business-client interactions.
How to create a contact form in WordPress?
To create a contact form in WordPress, follow these steps:
- Install and activate a contact form plugin: There are several popular plugins available, such as WPForms, Contact Form 7, or Ninja Forms. Choose one and install it from the WordPress plugin repository.
- Configure the plugin: Once the plugin is activated, go to the plugin's settings or the Forms tab in your WordPress dashboard. Here, you can configure various settings like email notifications, form fields, and styling options.
- Create a new form: After configuring the plugin, create a new form by clicking on the "Add New" button. Give your form a name and start customizing it.
- Customize the form fields: Most form plugins provide an intuitive drag-and-drop interface to add fields like name, email, message, etc. You can also customize the field labels and set them as required or optional.
- Configure form settings: Go through the settings of the form to adjust options like confirmation message, redirect URL after submission, and anti-spam measures.
- Add the form to a page: Once your form is ready, save it and copy the shortcode provided by the plugin. Paste this shortcode into the content editor of the page where you want the form to appear.
- Publish the page: Save the page, and your contact form will be live on your WordPress website. Visitors can now fill out the form and submit their details.
- Test the form: Ensure that you test the form by filling in some sample data and submitting it to verify that all the notifications and confirmation messages are working correctly.
Remember to regularly check the form submissions and respond to visitors promptly.
How to translate a contact form into multiple languages?
Translating a contact form into multiple languages can be done by following these general steps:
- Identify the target languages: Determine the languages you want to translate your contact form into. Consider your target audience and the regions they belong to.
- Content extraction: Extract all the text content from your existing contact form, including labels, prompts, instructions, and error messages. Create a document or spreadsheet with these extracted strings.
- Hire a professional translator: Find qualified translators who are fluent in the target languages. You can either work with translation agencies or freelance translators. Provide them with the extracted content and any additional guidelines or context for accurate translations.
- Translate the content: The translators will work on translating each string into their respective languages. Ensure that they maintain the context and tone of the original content for an effective and consistent translation.
- Proofread and revise: Review the translated content carefully for accuracy, clarity, and appropriateness. Make necessary changes or adjustments to improve the quality.
- Update the contact form: Incorporate the translated content back into your contact form. Replace each original string with its respective translation in the appropriate language.
- Check the functionality: Test the contact form thoroughly to ensure that all fields, validations, and error messages function correctly in each translated version.
- Language selection: Implement a language selection feature on your website or contact page, allowing users to choose their preferred language. This can be in the form of a dropdown menu or language flags/icons.
- Localization considerations: Keep in mind any cultural or local preferences when translating your contact form. Certain components, such as date formats or address fields, may need to be adapted to suit the specific requirements of each language.
- Ongoing maintenance: Regularly review and update your translated contact form as needed, ensuring it remains up-to-date and accurate.
Remember, professional translation services are recommended to ensure high-quality translations and accurate communication with your audience in multiple languages.
How to add a contact form to the website's footer in WordPress?
To add a contact form to the website's footer in WordPress, you can follow the steps below:
- Install a contact form plugin: There are several contact form plugins available for WordPress, such as Contact Form 7, WPForms, and Gravity Forms. Choose and install a plugin that suits your needs by going to "Plugins" > "Add New" in your WordPress dashboard.
- Activate the plugin: Once the plugin is installed, activate it by going to the "Plugins" section in your WordPress dashboard and clicking on the "Activate" button next to the contact form plugin you installed.
- Configure the contact form: After activation, you'll typically find a new menu item related to the contact form plugin in your WordPress dashboard. Click on it to configure the settings and create your contact form.
- Create your contact form: Within the contact form plugin settings, you'll usually find a form builder interface where you can customize your contact form. Drag and drop form fields to build your form, and set any required fields or additional options as needed.
- Get the shortcode: Once you have created your contact form, the plugin will provide you with a shortcode. This shortcode needs to be copied.
- Edit the footer: Go to "Appearance" > "Widgets" in your WordPress dashboard. Look for the widget area where the footer is located (usually named "Footer" or "Footer Widgets").
- Add a text widget: Drag and drop a "Text" widget to the footer widget area. Paste the shortcode you copied from the contact form plugin into the "Text" widget.
- Save and preview: Save the changes you made in the widget area, and then preview your website to see the contact form added to the footer.
By following these steps, you should be able to add a contact form to the website's footer in WordPress. Remember that the specific steps may vary slightly depending on the contact form plugin you choose to use.
What is the shortcode to display a contact form in a widget area?
The shortcode to display a contact form in a widget area may vary depending on the plugin you are using for contact forms. However, a commonly used shortcode for displaying a contact form in a widget area is:
[contact-form-7 id="123" title="Contact form 1"]
In this example, you would need to replace "123" with the ID of your contact form and "Contact form 1" with the title of your contact form. This shortcode is specifically for the popular Contact Form 7 plugin.
What is the significance of having a mobile-responsive contact form?
Having a mobile-responsive contact form is significant for several reasons:
- Enhanced user experience: With the majority of internet users accessing websites through mobile devices, it is crucial to provide a seamless and user-friendly experience. A mobile-responsive contact form ensures that visitors can easily navigate and complete the form on their mobile devices without any issues such as zooming or scrolling difficulties.
- Increased engagement and conversions: A contact form is often the gateway for users to get in touch with a business. If users find it challenging to use the form on their mobile devices, they may abandon it and move on. A mobile-responsive form encourages users to engage with the business and increases the chances of successful conversions.
- Improved accessibility: Mobile-responsive design ensures that the contact form is accessible to a wider range of users, including those with disabilities or limitations. It allows everyone, regardless of their device or screen size, to effortlessly submit inquiries or feedback.
- Higher search engine ranking: Search engines, like Google, consider mobile responsiveness as a ranking factor. Websites with mobile-friendly features, such as a responsive contact form, are more likely to rank higher in search results, leading to increased visibility and organic traffic.
- Brand perception and credibility: A well-designed and functional contact form sends a positive message about the professionalism and reliability of a business. By prioritizing mobile responsiveness, a company demonstrates that it values user experience and is dedicated to providing accessible and convenient communication channels.
In summary, a mobile-responsive contact form ensures a smooth user experience, boosts engagement and conversions, increases accessibility, improves search engine rankings, and enhances the brand's credibility.