
Best Backpack Leaf Blower Assembly Guide to Buy in July 2026
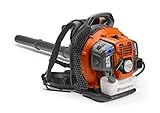
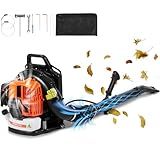
Husqvarna 150BT Gas Leaf Blower, 51-cc 2.16-HP 2-Cycle Backpack Leaf Blower, 765-CFM, 270-MPH, 22-N Powerful Clearing Performance and Ergonomic Harness System, Gifts for Men, 970466901
-
POWERFUL 2.16-HP ENGINE: BLOWS DEBRIS AT 765 CFM, 270 MPH SPEED.
-
ERGONOMIC DESIGN: PADDED HARNESS ENSURES COMFORT DURING EXTENDED USE.
-
EASY START & CONTROL: AIR PURGE SYSTEM AND VARIABLE SPEED THROTTLE FOR EASE.


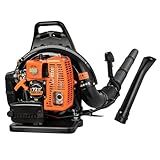
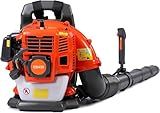
PROYAMA 72CC Gas Backpack Leaf Blower, 2-Cycle 880CFM 275MPH Gas Powered Engine, 2 in 1 Nozzle Low Vibration and Ergonomic Design with Cruise Control for Outdoor GardenYard Cleaning and Snow Removal
-
POWERFUL 72CC ENGINE: 3.7HP TACKLES TOUGH TASKS EFFORTLESSLY YEAR-ROUND.
-
DUAL-TUBE AIRFLOW: 880CFM & 275MPH ADAPTS TO ANY TERRAIN AND DEBRIS.
-
ERGONOMIC DESIGN: COMFORTABLE BACKPACK WITH SHOCK-ABSORBING STRAPS FOR EASE.
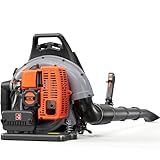
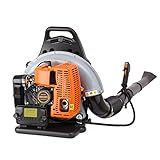
HTK Backpack Blower, 63CC Gas Powered Leaf Blower with 665 CFM & 205 MPH for Commercial Lawn Care, Yard Debris & Snow Removal (Orange)
-
POWERFUL 63CC ENGINE: CRUSH WET LEAVES AND SNOW WITH CONFIDENCE!
-
665 CFM AIR VOLUME: CLEAR HUGE AREAS FASTER, RECLAIM YOUR WEEKENDS!
-
ERGONOMIC DESIGN: REDUCE FATIGUE AND WORK SMARTER WITH COMFORT!
WTHW Backpack Leaf Blower Gas Powered, 65CC 2-Stroke Engine, 850 CFM 205 MPH, 17.5 lb Lightweight Yard Blower for Leaves & Debris (Orange)
-
POWERFUL 2-STROKE ENGINE: 850 CFM AT 205 MPH CLEARS YARD DEBRIS EFFORTLESSLY.
-
LIGHTWEIGHT DESIGN: ONLY 17.5 LB FOR EASIER, STEADIER LARGE-YARD CLEANUP.
-
VERSATILE NOZZLES: FAN FOR BROAD SWEEPING, CONCENTRATOR FOR PRECISE PILES.
VEVOR 63CC Backpack Leaf Blower Gas Powered, 1.89L Tank, Delivers 1110CFM & 220MPH, Perfect for Garden Maintenance, Clearing Leaves & Snow
-
POWER & EFFICIENCY: 63CC ENGINE DELIVERS 220CFM AT 175MPH, 20% MORE FUEL-EFFICIENT.
-
COMFORT & DESIGN: ERGONOMIC STRAPS AND SHOCK ABSORPTION FOR EFFORTLESS USE.
-
VERSATILE FUNCTIONALITY: IDEAL FOR LAWNS, PATIOS, AND EVEN WINTER SNOW REMOVAL.

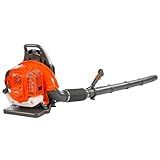
Husqvarna 360BT Gas Leaf Blower, 65.6-cc 3.81-HP 2-Cycle Backpack Leaf Blower with 890-CFM, 232-MPH, 30-N Powerful Clearing Performance and Load-Reducing Harness, Gifts for Men
- POWERFUL 2-CYCLE ENGINE: 65.5-CC ENGINE DELIVERS TOP PERFORMANCE!
- ERGONOMIC COMFORT: VENTILATED HARNESS REDUCES STRAIN FOR EASY USE.
- EASY START & CONTROL: AIR PURGE SYSTEM AND CRUISE CONTROL ENHANCE OPERATION.
Thalorus 52cc Backpack Leaf Blower – Gas Powered 550 CFM 230 MPH High Airflow for Lawn Care, Low-Vibration Harness, Clears Leaves, Debris & Snow (Orange)
-
POWERFUL PERFORMANCE: 550 CFM, 230 MPH-CLEAR A DRIVEWAY IN UNDER 3 MIN!
-
LIGHTWEIGHT COMFORT: JUST 13.6 LBS, REDUCING FATIGUE FOR ALL-DAY USE.
-
LONG-LASTING POWER: 1-LITER TANK-45 MINS OF UNINTERRUPTED BLOWING!
Backpack Gas Powered Leaf Blower, Commercial 2.7kW 850CFM 63CC 4.3HP 2-Stroke Powerful Lightweight Gasoline Grass Lawn Blower w/Harness Air-Cooled & 1.8L Fuel Tank for Yard Lawn Care, Snow Removal
-
POWERFUL 63CC ENGINE: ACHIEVE HIGH EFFICIENCY WITH 6800R/MIN SPEED.
-
LARGE 0.47 GAL FUEL TANK: EXTEND USAGE WITHOUT FREQUENT REFUELING HASSLE.
-
ERGONOMIC DESIGN: BACKPACK STYLE & ADJUSTABLE STRAPS FOR COMFORT DURING USE.
Assembling a backpack leaf blower requires a systematic approach to ensure its proper functionality. Here are the steps to assemble a backpack leaf blower:
- Start by unpacking all the components included in the packaging.
- Locate the blower tube and attach it to the blower unit. There is usually a designated slot or connection point where the tube fits securely. Align and slide the tube into place until it clicks or locks into position.
- Next, identify the straps that are used to secure the backpack blower to your back. Unfold the straps and adjust their length as needed for a comfortable fit.
- Once the straps are adjusted, put on the backpack by sliding your arms through the straps. Ensure that the blower unit is positioned correctly on your back for balance and maneuverability. Adjust the straps further if necessary.
- Locate the throttle trigger, typically located on the handle of the blower unit. Check for any additional components that need to be attached, such as the handle grip or throttle lock.
- Attach any necessary accessories, such as a shoulder pad or back pad, to enhance comfort during use.
- Finally, ensure that all connections are secure and that the blower unit is properly attached to the backpack straps. Look for any loose components or connections and tighten them as needed.
Once you have completed these steps, your backpack leaf blower should be fully assembled and ready for use. Be sure to consult the manufacturer's instructions for any specific details or variations that may apply to your model.
How to connect the straps to the backpack leaf blower?
To connect the straps to the backpack leaf blower, follow these steps:
- Locate the metal or plastic bracket on the backside of the backpack leaf blower where the straps will attach. This bracket is usually located near the top of the blower.
- Orient the backpack leaf blower so that the bracket is facing upward and accessible.
- Take one strap and find the loop or ring on the end of it. This loop or ring will be used to connect the strap to the bracket.
- Insert the loop or ring through the opening in the bracket. Make sure it goes all the way through, creating a secure connection.
- Pull the strap through until it is tight against the bracket. Adjust the length of the strap according to your preference for comfort and fit.
- Repeat steps 3-5 with the second strap, making sure it is attached securely to the other side of the bracket.
- Once both straps are attached and tightened, put on the backpack leaf blower by placing your arms through the straps and securing them on your shoulders.
- Adjust the straps further if needed to ensure a comfortable and secure fit before operating the leaf blower.
Always refer to the specific instructions provided by the manufacturer for your particular model of backpack leaf blower, as the attachment process may vary slightly.
How to assemble a backpack leaf blower?
Assembling a backpack leaf blower typically involves the following steps:
- Unboxing: Remove the leaf blower from its packaging, making sure to keep all the components organized.
- Attach the Blower Tube: Locate the blower tube and align it with the nozzle of the blower. There may be a locking mechanism or a set of screws to secure the tube in place. Follow the instructions or user manual provided by the manufacturer to properly attach the tube.
- Attach the Straps: Put on the backpack and adjust the straps to suit your size and comfort. Most backpack leaf blowers have adjustable shoulder straps and a waist strap. Buckle and tighten them securely so that the weight is evenly distributed across your back.
- Fill the Fuel Tank: If your leaf blower is gas-powered, locate the fuel tank and fill it with the recommended fuel mix specified by the manufacturer. Be careful not to overfill.
- Attach the Battery (If Applicable): If your leaf blower is battery-powered, ensure the battery is charged and secure it in the designated compartment, following the instructions provided by the manufacturer.
- Adjust Handles and Controls: Check for adjustable handle positions and set them according to your preference. Familiarize yourself with the controls, such as the on/off switch, throttle trigger, and choke (if present).
- Check and Adjust Air Filter: Locate the air filter and ensure it is clean and securely fitted in place. Follow the manufacturer's instructions on how to remove, clean, or replace the filter if necessary.
- Test and Adjust: Start the leaf blower and run it briefly to check if it is functioning properly. Adjust any straps, handles, or controls to ensure comfort and ease of use.
Always refer to the specific instructions provided by the manufacturer for your particular backpack leaf blower model, as assembly steps may vary. Additionally, ensure you follow safety precautions mentioned in the user manual and wear appropriate personal protective equipment while operating the leaf blower.
How to connect the throttle control cable to the engine?
To connect the throttle control cable to the engine, follow these steps:
- Locate the throttle body: The throttle body is usually located on the intake manifold of the engine. It is a circular component with a butterfly valve inside.
- Identify the throttle linkage: The throttle linkage is a mechanism that connects the throttle body to the accelerator pedal in the vehicle's cabin. It is usually a metal rod or cable.
- Find the throttle lever: The throttle lever is a metal arm attached to the throttle body. It moves the butterfly valve inside the throttle body to control the airflow to the engine.
- Determine the attachment point: Find the attachment point on the throttle lever where the throttle control cable will connect. This could be a small metal hook or hole.
- Prepare the cable: Make sure the throttle control cable is in good condition without any frayed or damaged sections. If necessary, replace the cable with a new one. Lubricate the cable with a suitable lubricant to ensure smooth operation.
- Insert the cable into its housing: If the throttle control cable has a protective housing, slide the cable into it properly. This housing will provide support and protect the cable from any external damage.
- Attach the cable end to the throttle lever: Insert the cable's end into the attachment point on the throttle lever. It may require some force or bending of the cable to properly fit into the designated area. Ensure a secure connection between the cable and the throttle lever.
- Test the connection: Move the accelerator pedal inside the vehicle while inspecting the throttle lever. The lever should move in response to the pedal's movement, indicating a successful connection. Ensure that the throttle lever returns to its original position when the accelerator pedal is released.
- Adjust the cable tension: If necessary, adjust the tension on the throttle control cable. This can be done by loosening or tightening the cable's adjusting nut or clip at the attachment point. Consult the vehicle's manual for specific adjustment procedures.
- Secure the cable: Once the connection is confirmed and the tension is adjusted to the appropriate level, secure the cable and its housing properly to prevent any interference with other engine components or moving parts.
Note: It is always recommended to refer to the vehicle's specific manual for accurate instructions and specifications on connecting the throttle control cable to the engine.
How to check the tension of the backpack leaf blower's drive belt?
To check the tension of the backpack leaf blower's drive belt, you can follow these steps:
- Start by ensuring the engine is completely turned off and that the blower is cool to touch.
- Locate the drive belt cover, which is usually located on the side or bottom of the blower.
- Remove the screws or clips holding the cover in place using a screwdriver or pliers.
- Once the cover is removed, you should be able to see the drive belt. Inspect it for any signs of wear, cracks, or damage. If the belt appears damaged, it may need to be replaced.
- Using your finger, press down on the middle of the belt with light to moderate pressure. It should have some give but not be too loose. If the belt feels loose or saggy, it may need to be tightened.
- Locate the tension adjustment mechanism. This is usually a bolt or screw that allows you to adjust the tension of the belt.
- Use a wrench or screwdriver to turn the tension adjustment mechanism clockwise to increase tension or counterclockwise to decrease tension. Make small adjustments at a time until the belt feels appropriately tightened.
- Once you have adjusted the tension, check the belt again to ensure it has the right amount of give and isn't too loose or too tight.
- Replace the drive belt cover and secure it with the screws or clips.
By following these steps, you can easily check and adjust the tension of the backpack leaf blower's drive belt.