
Best Gaming Mice for Customizable DPI to Buy in July 2026
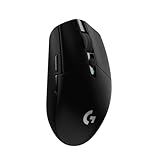
Logitech G305 Lightspeed Wireless Gaming Mouse, Hero Sensor, 12,000 DPI, Lightweight, 6 Programmable Buttons, 250h Battery, On-Board Memory, Compatible with PC, Mac - Black
-
NEXT-GEN HERO SENSOR: 12,000 DPI & 400 IPS FOR UNRIVALED PRECISION.
-
LIGHTSPEED TECH: 1 MS REPORT RATE FOR ULTRA-RESPONSIVE GAMEPLAY.
-
250 HOURS ON 1 AA BATTERY; EXTEND TO 9 MONTHS IN ENDURANCE MODE.


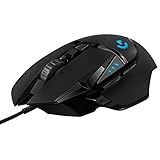
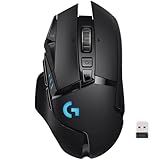
Logitech G502 Hero High Performance Wired Gaming Mouse, Hero 25K Sensor, 25,600 DPI, RGB, Adjustable Weights, 11 Programmable Buttons, On-Board Memory, PC/Mac - Black
-
EXPERIENCE FLAWLESS PRECISION WITH HERO SENSOR'S 25600 DPI TRACKING.
-
CUSTOMIZE GAMEPLAY WITH 11 PROGRAMMABLE BUTTONS FOR ULTIMATE CONTROL.
-
PERSONALIZE YOUR MOUSE'S WEIGHT FOR THE PERFECT GAMING BALANCE.
YUNZII M1 Wireless Gaming Mouse, Tri-Mode 2.4G/BT/Wired Gaming Mouse, PAW3311 Sensor 10000 DPI Rechargeable Wireless Mouse with 5 Programmable Buttons, Customizable via Software for Win & Mac (White)
-
VERSATILE CONNECTIVITY: ENJOY SEAMLESS GAMING WITH 2.4GHZ, BLUETOOTH, AND USB-C.
-
PRECISION CONTROL: 7 ADJUSTABLE DPI SETTINGS FOR UNMATCHED ACCURACY IN ANY TASK.
-
SMART BATTERY & CUSTOMIZATION: LONG-LASTING POWER WITH PROGRAMMABLE BUTTON FUNCTIONS.
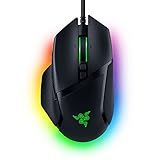
Razer DeathAdder Essential Gaming Mouse: 6400 DPI Optical Sensor - 5 Programmable Buttons - Mechanical Switches - Rubber Side Grips - Classic Black
- ACHIEVE PRECISE CONTROL WITH 6,400 DPI FOR GAMING AND CREATIVITY!
- BUILT TO LAST: DURABLE SWITCHES FOR 10 MILLION CLICKS, 2-YEAR WARRANTY.
- 5 PROGRAMMABLE BUTTONS FOR CUSTOM MACROS AND ENHANCED GAMING PERFORMANCE!
Logitech G502 Lightspeed Wireless Gaming Mouse with Hero 25K Sensor, PowerPlay Compatible, Tunable Weights and Lightsync RGB - Black
-
POWERPLAY CHARGING: KEEP YOUR G502 CHARGED, PLAY ENDLESSLY WITHOUT DOWNTIME.
-
ULTRA-FAST WIRELESS: USED BY PROS; EXPERIENCE LAG-FREE GAMING LIKE NEVER BEFORE.
-
CUSTOMIZABLE CONTROLS: 11 BUTTONS TO TAILOR YOUR GAMING EXPERIENCE EFFORTLESSLY.
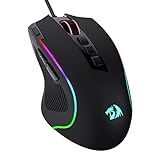
Redragon M612 Predator RGB Gaming Mouse, 8000 DPI Wired Optical Mouse with 11 Programmable Buttons & 5 Backlit Modes, Software Supports DIY Keybinds Rapid Fire Button
-
SWITCH DPI FAST: EASILY TOGGLE BETWEEN 5 DPI LEVELS FOR ALL GAMES.
-
FULLY CUSTOMIZABLE: 11 REPROGRAMMABLE BUTTONS FOR ANY GAMING STYLE.
-
ERGONOMIC COMFORT: DESIGNED TO REDUCE FATIGUE FOR LONG GAMING SESSIONS.
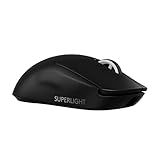
Logitech G PRO X Superlight 2 Wireless Gaming Mouse, 60g Pro-Grade with 5 Programmable Buttons, 44k DPI Sensor, 8kHz Report Rate, USB-C Charging for PC/Mac - Black
- EXPERIENCE ULTRA-FAST 8 KHZ POLLING FOR UNMATCHED GAMING PERFORMANCE.
- ENJOY 95 HOURS OF BATTERY LIFE WITH USB-C FAST CHARGING CONVENIENCE.
- ACHIEVE PRO PRECISION WITH HERO 2 SENSOR AND LIGHTFORCE HYBRID SWITCHES.
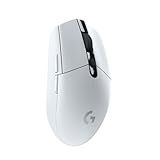
Logitech G305 Lightspeed Wireless Gaming Mouse, Hero Sensor, 12,000 DPI, Lightweight, 6 Programmable Buttons, 250h Battery, On-Board Memory, Compatible with PC, Mac - White
- UNMATCHED 12,000 DPI HERO SENSOR FOR PRECISION AND EFFICIENCY.
- LIGHTNING-FAST 1 MS RESPONSE WITH ADVANCED LIGHTSPEED CONNECTIVITY.
- 250-HOUR BATTERY LIFE FOR UNINTERRUPTED GAMING SESSIONS ON-THE-GO.
Razer Basilisk V3 Customizable Ergonomic Gaming Mouse: Fastest Gaming Mouse Switch - Chroma RGB Lighting - 26K DPI Optical Sensor - 11 Programmable Buttons - HyperScroll Tilt Wheel - Classic Black
- ULTIMATE COMFORT: ICONIC DESIGN WITH THUMB REST FOR OPTIMAL HAND SUPPORT.
- CUSTOM CONTROL: 11 PROGRAMMABLE BUTTONS FOR QUICK ACCESS TO ESSENTIAL ACTIONS.
- PRECISION SCROLLING: HYPERSCROLL WHEEL OFFERS SPEED AND TACTILE CONTROL FOR GAMEPLAY.
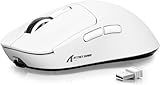
ATTACK SHARK X3 Wireless Gaming Mouse, 49g Ergonomic Computer Mouse, Triple Modes PAW3395 26K DPI Optical Sensor, 200h Battery Life, Programmable Buttons, Gaming Accessories for PC/Laptop/Mac (White)
- ULTRA-LIGHT 49G DESIGN FOR LIGHTNING-FAST GAMING AGILITY.
- 200H BATTERY LIFE ENSURES UNINTERRUPTED GAMING SESSIONS.
- FULLY PROGRAMMABLE BUTTONS AND CUTTING-EDGE COMFORT DESIGN.
To change the DPI (dots per inch) on a gaming mouse, you generally need to follow these steps:
- Install the mouse software: Many gaming mice require you to download and install specific software provided by the manufacturer. Visit their website and locate the appropriate software for your mouse model. Download and install it on your computer.
- Open the software: Once the software is installed, locate and open it on your computer. It typically appears as an icon in the system tray or as a program in the Start menu.
- Connect the mouse: Ensure that your gaming mouse is connected to your computer via USB or any other supported connection. The software should automatically detect your mouse and display its settings.
- Access the DPI settings: Look for a tab or section within the software that allows you to adjust the DPI. The location and appearance of the tab can vary depending on the manufacturer and their software. It is commonly labeled as "DPI Settings," "Sensitivity," or something similar.
- Adjust the DPI: Once you've found the DPI settings, you can usually adjust it by either moving a slider or entering a numerical value. Moving the slider to the right increases the DPI, while moving it to the left decreases it. Some software even allows you to set different DPI levels for different profiles, so you can switch between them while gaming.
- Test and save the settings: To test the new DPI, move the mouse around and see if it feels comfortable to you. If not, you can further adjust the DPI until it suits your preference. Once you're satisfied, look for a "Save" or "Apply" button within the software to save the settings to the mouse's memory. This way, your preferred DPI will be retained even if you switch to a different computer.
It's important to note that these steps are a general guide, and the process may differ depending on the brand and model of your gaming mouse. Make sure to refer to the specific instructions provided by the manufacturer for accurate information on adjusting the DPI for your particular mouse.
How to change the DPI on a gaming mouse?
To change the DPI (dots per inch) on a gaming mouse, you typically need to follow these steps:
- Check if your gaming mouse has dedicated DPI buttons: Many gaming mice have dedicated buttons specifically designed to cycle through different DPI settings. Look for buttons labeled with "+" or "-" symbols, usually located near the left-click button.
- Install mouse software (if required): Some gaming mice come with their own software that allows you to customize settings like DPI. Check your mouse manufacturer's website for any downloadable software that corresponds to your specific mouse model. Install it on your computer.
- Launch the mouse software: Once you have installed the software, open it on your computer. The software usually runs in the background and provides various configuration options for your gaming mouse.
- Locate the DPI settings: Within the mouse software, navigate to the settings or preferences section where you can adjust DPI. Depending on the software, it may be under a tab named "DPI settings", "Sensitivity", or similar.
- Adjust DPI settings: In the DPI settings section, you can usually drag a slider or manually input values to change the DPI sensitivity. Each increment represents a different DPI level. For example, if your mouse has four DPI levels, you may have options like 800 DPI, 1200 DPI, 1600 DPI, and 2400 DPI. Some software may allow saving profiles with different DPI settings.
- Test the new DPI: Apply the new DPI setting and use your mouse to test if the sensitivity feels comfortable for your gaming needs. If it doesn't, repeat the previous step and adjust it until you find the desired DPI level.
Remember, the exact steps can vary based on the mouse model and manufacturer. It is recommended to consult the user manual or seek specific instructions from the manufacturer's website if you encounter any difficulties.
How to adjust DPI on a laser gaming mouse?
The steps to adjust DPI on a laser gaming mouse may vary depending on the brand and model of the mouse. However, here is a general guide on how to adjust DPI on a laser gaming mouse:
- Install Mouse Software: Most gaming mice come with software that allows you to customize settings, including DPI. Install the software that came with your gaming mouse on your computer.
- Open Mouse Software: Once the software is installed, open it on your computer. You may find it in the system tray or in the Programs list.
- Locate DPI Settings: Look for a section or tab in the software that allows you to adjust the DPI settings. Usually, it is labeled as "DPI," "Sensitivity," or "Mouse Settings."
- Adjust DPI Levels: Depending on the software, you may have multiple DPI levels to choose from. DPI (dots per inch) indicates the sensitivity of the mouse. Lower DPI settings provide slower cursor movement, while higher DPI settings offer faster cursor movement. Adjust the DPI levels to your preference.
- Save or Apply Changes: After setting the desired DPI levels, save or apply the changes in the software. This will update the settings on your gaming mouse.
- Test the DPI: Use your gaming mouse to navigate on your computer screen or play games to test the effect of the new DPI settings. If you find the cursor too slow or fast, go back to the software and readjust the DPI levels until you are satisfied.
Note: If your gaming mouse doesn't come with dedicated software, you might be able to adjust the DPI using onboard buttons or switches located on the mouse itself. Refer to the user manual or manufacturer's website for specific instructions for your model.
How to change DPI on a gaming mouse without software?
If your gaming mouse does not come with dedicated software or customization settings, you may still be able to change the DPI using the mouse's hardware buttons, if available. Here are the general steps to follow:
- Locate the DPI button(s): Look for any dedicated buttons on the mouse that are designed to adjust the DPI. These buttons are usually located on the top or bottom of the mouse, near the primary mouse buttons or scroll wheel. The DPI buttons may be marked with labels such as "+", "-", or specific DPI values.
- Identify the different DPI levels: Determine the number of available DPI levels that your mouse supports. Most gaming mice offer multiple DPI settings that can be toggled between.
- Press the DPI button: Press the DPI button to cycle through the different DPI levels. Typically, the DPI will increase with each press, but some mice may alternate between increasing and decreasing DPI.
- Test and adjust: As you cycle through the DPI levels, test the mouse's sensitivity on your computer screen or in a game to find a level that feels comfortable and responsive to your needs. Repeat this process until you find the desired DPI setting.
Note: Keep in mind that changing DPI on a gaming mouse without software means you cannot fine-tune specific DPI values or customize other advanced settings that would typically be available through software.
How to find the right DPI for your gaming style?
Finding the right DPI for your gaming style can significantly improve your accuracy and precision. Here's a step-by-step guide on how to determine the ideal DPI for your gaming needs:
- Understand DPI: DPI (dots per inch) measures how sensitive your mouse is. Higher DPI means faster cursor movement, while lower DPI results in slower movement. Determine whether you prefer fast and quick movements or slower, more controlled maneuvers.
- Start with the default DPI: Most gaming mice have a default DPI setting. Begin with this DPI and use it for a few gaming sessions to get a baseline understanding of your preferences.
- Test different DPI settings: Experiment with various DPI settings to find what works best for you. Start by increasing or decreasing your DPI by small increments (e.g., +/- 100 DPI) and play games that involve different styles of movement and aiming, such as FPS, RPG, or RTS games.
- Find your sweet spot: Pay attention to how each DPI affects your precision, accuracy, and comfort. Take note of the DPI settings where your aim feels smooth, your sensitivity is manageable, and your reactions are efficient.
- Adjust in-game sensitivity: Don't forget to adjust your in-game sensitivity or mouse acceleration to complement your chosen DPI. Finding a balance between DPI and in-game sensitivity is crucial to achieving optimal performance.
- Test your DPI in various games: Different game genres may require different DPI settings. Test your chosen DPI across multiple games to ensure it suits your gaming style universally.
- Allow some adaptation time: It may take a few days to adjust to a new DPI setting fully. Avoid frequently changing your DPI, as lack of consistency can hinder muscle memory development.
- Seek guidance and recommendations: Refer to online resources, forums, or consult with experienced gamers to learn about popular DPI settings for specific games or gaming styles. Take their suggestions as a starting point and adapt them based on your own preferences.
Remember that finding the right DPI is a personal process, and what works for others may not work for you. Take time, experiment, and practice with different settings until you find the DPI that allows you to perform at your best.
How to decrease DPI on a gaming mouse?
To decrease the DPI (dots per inch) on a gaming mouse, you can follow these steps:
- Determine your mouse model: Be aware of the specific gaming mouse model you are using, as the process may vary slightly depending on the manufacturer.
- Install driver software: Many gaming mice come with driver software that allows you to customize settings such as DPI. Install the software provided by the manufacturer, if available, and open it to access the settings.
- Locate DPI settings: Within the driver software, look for settings related to DPI adjustments. It may be labeled as "Sensitivity," "DPI settings," or something similar.
- Decrease DPI: You will typically find a slider or numerical field that allows you to select your preferred DPI value. Move the slider or enter a lower value to decrease the DPI of your mouse. Test the new setting by moving the mouse to check if it feels comfortable.
- Save changes: After adjusting the DPI, save the changes within the driver software. Some mice may have onboard memory, allowing you to save the settings directly to the mouse, while others will save the settings on your computer.
Note: If your gaming mouse does not come with driver software, you can try searching for software alternatives that are compatible with your mouse model. Additionally, some mice may have a physical DPI adjustment button located on the mouse itself. Refer to the manual or manufacturer's website for more information in such cases.
How to choose the right DPI for accurate sniper shots in FPS games?
Choosing the right DPI (dots per inch) for accurate sniper shots in FPS games is a matter of personal preference. Here are some tips to help you decide:
- Start with your mouse's default DPI: Most gaming mice have default DPI settings. Begin with this and get a feel for your aiming accuracy. Take note of whether it feels too sensitive or too slow for you.
- Experiment with the DPI settings: If the default DPI doesn't feel right, most gaming mice come with software that allows you to adjust the DPI. Try increasing or decreasing it gradually until you find a sensitivity that offers comfortable and accurate aiming.
- Consider your playing style: If you are a wrist player and tend to make small and precise movements, a higher DPI may suit you better. On the other hand, if you are an arm player and rely on large sweeping motions, a lower DPI may be more appropriate.
- Take into account your screen resolution: Lower screen resolutions may require higher DPI settings to cover larger distances on the screen. Higher resolutions might require lower DPI settings to ensure more precise aiming.
- Fine-tune your settings: Once you have found a DPI that feels comfortable, spend some time fine-tuning the in-game sensitivity settings to further enhance your accuracy. Test different combinations until you strike the right balance.
- Practice and adjust as needed: Keep in mind that personal preference and playing style vary, so it's crucial to practice and adjust your DPI accordingly. Regularly reassess your settings to ensure optimal sniper accuracy.
Remember, there is no universally perfect DPI for sniper shots; it depends on individual preferences and gameplay styles. Experiment, practice, and find the sensitivity that allows you to comfortably and accurately align your shots.