Best FuelPHP Deployment Tools to Buy in July 2026
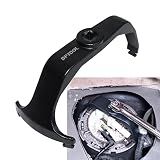
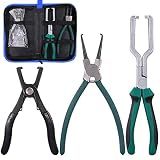
Fuel Tank Lock Ring Tool Fuel Pump Senders Removal Install Tools Compatible with Ford Chrysler Dodge Chevy Replacement for BMW Benz Volvo Jeep Equivalent OEM 6599
-
UNIVERSAL COMPATIBILITY: FITS POPULAR MODELS FROM BENZ, VOLVO, FORD, AND MORE.
-
EFFORTLESS USE: NO HAMMER NEEDED-REMOVE FUEL PUMP RINGS QUICKLY!
-
DURABLE & RELIABLE: BUILT WITH HARD STEEL; RUST-RESISTANT FOR LONG-TERM USE.


MSLANE Fuel Tank Lock Ring Tool Kits, Universal Fuel Pump Removal Tool 4 PCS with 1 Wrench, Adjustable Fuel Pump Lock Ring Senders Removal Install Tools
- UNIVERSAL FIT WITH ADJUSTABLE RANGE FOR VARIOUS FUEL PUMP MODELS.
- EASY REMOVAL AND INSTALLATION WITHOUT DAMAGING THE FUEL PUMP.
- DURABLE CHROME-VANADIUM STEEL ENSURES LONG-LASTING PERFORMANCE.
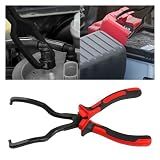
smilfuy Fuel Line Plier, Quick Disconnect Release Removal Tool, Petrol Hose Pipe Clamp Clip with Handle, Universal Fuel Line Clip Removal Plier, Pipe Clip Repair Tool for Most Cars (Red)
-
HIGH-QUALITY CARBON STEEL OFFERS DURABILITY AND LONG SERVICE LIFE.
-
QUICKLY DISCONNECT FUEL LINES WITHOUT DAMAGING CONNECTORS.
-
ERGONOMICALLY DESIGNED HANDLE FOR COMFORT AND EASE OF USE.

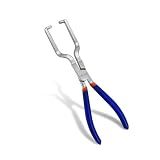
OEMTOOLS 25156 Fuel Pump Module Spanner Wrench For Servicing Retaining Ring, Adjustable Double Contact Grip, Specialty Tool For Removal Or Installation
-
QUICKLY INSTALLS/REMOVES FUEL PUMP RETAINING RINGS HASSLE-FREE!
-
FULLY ADJUSTABLE DESIGN FITS MOST FUEL PUMP RING SIZES EASILY.
-
SECURE GRIP ENSURES RELIABLE PERFORMANCE AND SIMPLE OPERATION.
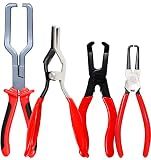
4-in-1 Fuel Line Disconnect Tool: Pliers Set with 80° Pliers, Hose Remover, 9" Fuel Filter Caliper for Auto Maintenance
-
QUICKLY REMOVE HOSES AND CLAMPS WITH ERGONOMIC 4-PIECE PLIERS SET!
-
80° BEND DESIGN EASILY ACCESSES TIGHT SPACES FOR SAFE DISCONNECTS.
-
SPRING-LOADED CALIPERS ENSURE EFFORTLESS ONE-HANDED OPERATION.
Glarks Fuel Line Pliers Set, 9 Inch Fuel Filter Caliper Hose Pipe Clamp Clip and 80 Degree Disconnect Pliers Set for Car Maintenance
- SAVE TIME AND MONEY: COMPLETE TOOL SET BEATS RETAIL PRICES.
- DURABLE CARBON STEEL ENSURES LONG-LASTING, RUST-RESISTANT TOOLS.
- ERGONOMIC DESIGN AND 80° ANGLE ENHANCE EFFICIENCY IN TIGHT SPACES.
Performance Tool W83114 Scissor Fuel Line Disconnect Tool (Sizes: 5/16-Inch and 3/8-Inch), Silver
- EFFORTLESSLY DISCONNECT FUEL LINES WITH EASE FOR QUICK REPAIRS.
- LOW-PROFILE DESIGN: PERFECT FOR TIGHT SPACES AND CHALLENGING ACCESS.
- DURABLE ALLOY STEEL ENSURES LONGEVITY AND DEPENDABLE PERFORMANCE.
TOOLUTION Fuel Line Pliers Disconnect Pliers Fuel Filter Removal Tool
- EFFORTLESSLY DISCONNECT FUEL LINES & CONNECTORS IN TIGHT SPACES.
- DURABLE DESIGN: HEAT-TREATED STEEL ENSURES LONG-LASTING PERFORMANCE.
- ERGONOMIC GRIP REDUCES FATIGUE FOR MECHANICS & DIY ENTHUSIASTS.
FUEL TOOL SHARING SYSTEM
- ENHANCE URGENCY WITH NEW TO ATTRACT EAGER CUSTOMERS QUICKLY!
- PROMOTE EXCLUSIVITY TO CREATE EXCITEMENT FOR FIRST-TIME BUYERS.
- USE BOLD VISUALS TO SHOWCASE INNOVATIVE FEATURES AND BENEFITS!
To deploy FuelPHP on Linode, follow these steps:
- Set up a Linode server: First, create an account on Linode if you haven't already. Create a new Linode instance and choose the desired plan, region, and other configurations.
- SSH into your Linode server: Use an SSH client (such as PuTTY for Windows or Terminal for macOS/Linux) to connect to your Linode server using the provided IP address and login credentials.
- Install necessary dependencies: Update the package lists and install required dependencies, such as Apache or Nginx, PHP, and MySQL.
- Configure the web server: Set up the web server (Apache or Nginx) to point to your FuelPHP application's public folder as the document root.
- Set up the database: Create a new MySQL database and user for your FuelPHP application. Make sure to grant the necessary privileges to the user.
- Clone your FuelPHP application: Navigate to the appropriate directory and clone your FuelPHP application from your version control system (e.g., Git). Ensure that the FuelPHP project structure is intact.
- Configure your FuelPHP application: In the cloned project, copy the app/config/*example*.php files to app/config/*.php and modify the necessary configurations, such as database credentials in the db.php file.
- Install FuelPHP dependencies: Use Composer to install the required FuelPHP dependencies by running the composer install command within your project's root directory.
- Set up necessary permissions: Ensure that the appropriate permissions (read, write, execute) are granted to the necessary files and directories, such as the fuel/app/logs folder.
- Test your FuelPHP application: Open your web browser and navigate to your Linode server's IP address or domain name. You should see your FuelPHP application running.
- Configure any additional settings or modules: Depending on your specific requirements, you may need to configure additional settings or enable certain modules for your FuelPHP application to function correctly.
Please note that this is a simplified overview of the deployment process. Further customization and configuration may be required based on your application's specific needs.
How to install Linode on my server?
To install Linode on your server, you can follow these steps:
- Sign up for a Linode account: Go to the Linode website and sign up for an account by providing the required information.
- Create a Linode instance/server: Once you have signed up and logged into your account, click on the "Create" button to create a new Linode instance. Choose the appropriate package, data center location, and any additional options you may need.
- Configure the Linode instance: Enter the desired settings for your Linode instance, such as selecting the Linux distribution, root password, and disk size. You can also optionally add additional disk space, swap space, or create a backup policy.
- Deploy the Linode instance: After configuring the Linode instance, click on the "Create" button to deploy it. Linode will provision the server with your chosen settings.
- Access the Linode server: Once the Linode instance is deployed, you will be presented with the remote access information. This includes the IP address and SSH login details. You can use an SSH client to connect to your Linode server.
- Configure and secure your Linode server: Once connected to your Linode server via SSH, you can configure it according to your requirements. This may involve setting up firewalls, installing necessary packages, securing SSH access, and configuring any applications or services you want to run.
- Optional: Attach additional services or resources: Linode offers additional services like block storage, object storage, NodeBalancer, and more. You can attach these services to your Linode server as needed.
It is worth noting that the specific steps may vary depending on your server's operating system and setup requirements. It is recommended to refer to the Linode documentation or contact their support if you encounter any issues during the installation process.
What backup solutions are available for a FuelPHP deployment on Linode?
There are several backup solutions available for a FuelPHP deployment on Linode:
- Linode Backups: Linode provides a built-in backup service that takes snapshots of your Linode's disk. You can schedule automatic backups and restore them easily. However, this backup service is limited in terms of customization and retention period.
- Manual Backups: You can manually backup your FuelPHP application and database by creating tar or zip archives of your project code and database dumps. You can then store these backups on Linode's storage or download them to your local machine for safekeeping.
- Third-Party Backup Services: There are several third-party backup services, such as BackupNinja, Bacula, or R1Soft, which can be integrated with Linode to provide more advanced backup and restore functionalities. These solutions often offer features like incremental backups, off-site storage, point-in-time restores, and more.
- Version Control System (VCS) Backups: If you are using a VCS like Git or SVN for your FuelPHP project, you can consider it as a form of backup. By regularly pushing your code to a remote repository, you ensure that your project's code is stored and versioned safely.
It's recommended to create a backup strategy that combines multiple solutions to ensure robustness and redundancy. Regularly test and verify the backups to ensure they can be restored when needed.
What is the process for updating FuelPHP on a Linode server?
To update FuelPHP on a Linode server, you can follow these general steps:
- Connect to your Linode server via SSH using a terminal or SSH client.
- Navigate to the root directory of your FuelPHP project using the cd command. For example: cd /var/www/my-fuelphp-project/
- Backup your existing FuelPHP project files and database. This is a recommended step in case anything goes wrong during the update process. You can create a backup by copying the project directory to another location or by creating a database dump.
- Check the current version of FuelPHP installed in your project. You can usually find the version number in the composer.json or fuel/core/base.php file.
- Run the appropriate Composer command to update your FuelPHP dependencies. Use the following command: composer update This will update all the dependencies defined in your composer.json file, including FuelPHP.
- After the update is complete, check for any breaking changes or deprecations in the FuelPHP documentation or release notes. Make any necessary updates or modifications in your project's code to ensure compatibility.
- Test your FuelPHP application thoroughly to ensure that everything is working as expected after the update.
- If you made changes to the configuration files during the update process, restart the server or relevant services to apply the changes.
- Optionally, cleanup any temporary files or caches that might have been created during the update process.
It's always a good practice to test updates on a development or staging environment before applying them to a production server.