
Best Retrofit Tools for Network Operations in Kotlin to Buy in July 2026

Morimoto Mini D2S 5.0 Lock Ring Tool Compatible with 10mm Socket, Custom Retrofit Tool (1x SP34)
- DURABLE STAMPED STEEL TOOL FOR LASTING PERFORMANCE
- PRECISION FIT: 10MM SOCKET FOR EFFORTLESS USE
- EYE-CATCHING BLUE ANODIZED ALUMINUM LOCK RING


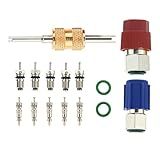
Generic BPV31 Bullet Piercing Retrofit Convert Adapter Kit with Valve Cores Remover Tool, Tap Valve Compatible with 1/4 Inch, 5/16 Inch, 3/8 Inch Pipes
-
VERSATILE COMPATIBILITY: FITS MULTIPLE PIPE SIZES & MODELS FOR EASY UPGRADES.
-
DURABLE MATERIALS: BUILT TO LAST WITH CORROSION-RESISTANT, LONG-LASTING PARTS.
-
QUICK INSTALLATION: HASSLE-FREE SETUP WITH ALL NECESSARY TOOLS INCLUDED.

Inside pipe cutter for pvc pipe, 7-Inch Adjustable Cutting Depth,with Diamond Grit Cutting Wheel and Handle,Damage-Free Cutting for Confined Spaces,for plumbing retrofits,and exhaust system repairs
- PRECISION CUTTING: ACHIEVE ±0.5MM ACCURACY WITHOUT EXTRA TOOLS.
- DAMAGE-FREE DESIGN: CUTS IN TIGHT SPACES WITHOUT HARMING SURFACES.
- DURABLE & VERSATILE: BUILT TO LAST, CUTS PVC, WOOD, MARBLE & MORE!
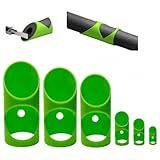
6PCS Pipe Insulation Cutting Guide Set, Foam Pipe Cutter Tool for 15mm–53mm Pipe Insulation, Precision Insulation Cutting Fixture for HVAC Plumbing Home & Commercial Use (Green)
-
MULTI-SIZE CUTTING GUIDES: 6 SIZES ENSURE PERFECT CUTS FOR ALL INSULATION.
-
BUILT-IN ALIGNMENT GROOVE: ACHIEVE ACCURACY AND REDUCE WASTE EFFORTLESSLY.
-
DURABLE ABS CONSTRUCTION: LONG-LASTING, SMOOTH CUTS FOR ANY WORK ENVIRONMENT.

KATA 1-3/8" - 1-3/4" Door Lock Installation Kit with Large Chip-Clearance Slots, Door Lock Hole Saw for Deadbolts and Locksets for Wooden Doors with Guide Template, Carbon Steel, Orange
-
VERSATILE FIT: ADAPTS TO COMMON LOCK SIZES AND DOOR THICKNESSES EASILY.
-
USER-FRIENDLY DESIGN: LARGE CHIP-CLEARANCE SLOTS FOR HASSLE-FREE USE.
-
DURABILITY GUARANTEED: MADE WITH STRONG CARBON STEEL AND REINFORCED PLASTIC.
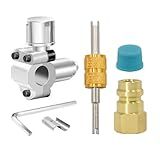
R12 to R134a Conversion Kit, Include R12 R22 to R134A High/Low Fitting Port Retrofit 1/4 SAE to 7/16"-20 UNF Conversion Adapter, R22 R134a Valve Cores, A/C Rubber seals and Valve Core Removal Tool
-
COMPLETE KIT: INCLUDES ALL NECESSARY PARTS FOR QUICK AC CONVERSIONS.
-
HIGH-QUALITY MATERIALS: DURABLE METAL AND PLASTIC ENSURE LONG-LASTING USE.
-
USER-FRIENDLY: EASY INSTALLATION SIMPLIFIES RETROFITTING FOR ANY DIYER.

Zurn ZERK-CPM AquaSense E-Z Flush Retrofit Kit with Metal Cover, Chrome
- TOUCHLESS TECH BOOSTS HYGIENE BY ELIMINATING TOUCH POINTS.
- EASY INSTALLATION ENSURES YEARS OF RELIABLE, TROUBLE-FREE SERVICE.
- VERSATILE DESIGN FITS MULTIPLE BRANDS AND ENHANCES MODERN BATHROOMS.

Xlaserlab X1pro 700W Laser Welding Machine – 6-in-1 Handheld Fiber Laser Welder for Welding, Cutting, Cleaning, Rust Removal, Underwater Welding & CNC Retrofit – Equipped with Auto Wire Feeder
-
6-IN-1 VERSATILITY: COMBINES WELDING, CUTTING, AND CLEANING FUNCTIONS.
-
RELIABLE PERFORMANCE: OPERATES IN EXTREME TEMPS, WITH 10,000+ HOURS LIFESPAN.
-
HEALTH-FOCUSED DESIGN: LOW EMISSIONS AND NOISE FOR A SAFER WORK ENVIRONMENT.
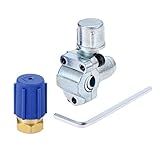
Aupoko A/C Retrofit Valve Kit, Retrofit Valve with Dust Cap Convert, BPV31 Bullet Piercing Tap Valve Line Tap Valve Kit, Fits for HVAC Refrigerant System R12 R22 R502 R134A
- 🌟 WIDE COMPATIBILITY FOR CONVERTING VARIOUS REFRIGERANT SYSTEMS.
- 💎 PREMIUM BRASS & ZINC ALLOY FOR DURABILITY, ENSURING LONG-TERM USE.
- ⚙️ EASY INSTALLATION WITH COMPACT DESIGN FOR HASSLE-FREE OPERATION.
Retrofit is a widely used networking library in Android development, and it provides a convenient way to consume APIs and perform network operations in your Kotlin projects. Here is a brief explanation of how to perform network operations using Retrofit in Kotlin:
- Import the Retrofit library: Add the Retrofit dependency to your project's build.gradle file.
- Define the API interface: Create an interface that represents your API endpoints. Define methods for each network request you want to make, specifying the HTTP method, endpoint URL, request parameters, headers, etc.
- Create a Retrofit client: Instantiate a Retrofit object with the base URL of your API. You can customize the client by adding custom interceptors, converters, etc.
- Create a service instance: Create an instance of your API interface using the Retrofit client. This instance will be used to make network requests.
- Execute network requests: Call the methods defined in your API interface using the service instance. Retrofit automatically handles the network operations, sending the request, and parsing the response. You can handle the response using callbacks or Kotlin coroutines.
- Add converters: Retrofit comes with built-in converters that handle serialization/deserialization of request/response bodies into JSON, XML, or other formats. You can also create custom converters if needed.
- Add error handling: Retrofit provides support for error handling by defining a global error handler or handling specific HTTP error codes. You can also handle errors at the request level.
- Test your API: Use tools like Postman or cURL to manually test your API endpoints and ensure they work as expected.
Overall, Retrofit simplifies the process of making network requests in Kotlin projects. It abstracts away the complexities of network communication, leaving you with a clean and readable codebase.
What is a DELETE request and how to send it using Retrofit in Kotlin?
A DELETE request is an HTTP method used to delete a specified resource on a server. It is often used to delete data or records from a backend database.
In Kotlin, you can send a DELETE request using the Retrofit library by following these steps:
- Add the Retrofit dependency to your build.gradle file:
implementation 'com.squareup.retrofit2:retrofit:2.9.0'
- Create an interface that defines the API endpoints using Retrofit annotations. Include a method for the DELETE request:
interface ApiService {
@DELETE("resource/{id}") // Specify the endpoint path
suspend fun deleteResource(@Path("id") resourceId: String): Response
- Create a Retrofit instance and specify the base URL:
val retrofit = Retrofit.Builder() .baseUrl("http://your-api-base-url.com/") .addConverterFactory(GsonConverterFactory.create()) .build()
val apiService = retrofit.create(ApiService::class.java)
- Invoke the DELETE request using the defined method:
val resourceId = "123" // The ID of the resource you want to delete val response = apiService.deleteResource(resourceId)
Note that Response<ResponseBody> is a generic type that represents the HTTP response from the server. You can customize it based on the expected response structure for your API.
Also, make sure to wrap the DELETE request in a coroutine suspend function as shown in the example above. This allows you to use the suspend modifier and invoke the request from a coroutine scope.
Remember to handle any errors or exceptions that may occur during the DELETE request.
How to convert Retrofit network responses to different data types in Kotlin?
To convert Retrofit network responses to different data types in Kotlin, you can use the converter factory provided by Retrofit. Here's how you can do it:
- Add the required dependencies to your build.gradle file:
implementation 'com.squareup.retrofit2:retrofit:2.x.x' implementation 'com.squareup.retrofit2:converter-gson:2.x.x' // for JSON response implementation 'com.squareup.retrofit2:converter-scalars:2.x.x' // for string response
- Create an instance of Retrofit with the desired converter factory:
val retrofit = Retrofit.Builder() .baseUrl(BASE_URL) .addConverterFactory(GsonConverterFactory.create()) // for JSON response .addConverterFactory(ScalarsConverterFactory.create()) // for string response .build()
- Define an interface with the desired API endpoints and their corresponding return types:
interface MyApiService {
@GET("data")
fun getData(): Call
@GET("data")
fun getDataAsString(): Call<String> // for string response
}
- Create an instance of the API service using the Retrofit instance:
val apiService = retrofit.create(MyApiService::class.java)
- Make the API call and handle the response accordingly:
apiService.getData().enqueue(object : Callback
override fun onFailure(call: Call<DataModel>, t: Throwable) {
    // Handle network failure
}
})
apiService.getDataAsString().enqueue(object : Callback
override fun onFailure(call: Call<String>, t: Throwable) {
    // Handle network failure
}
})
By specifying different return types in the API interface, you can convert Retrofit network responses to different data types in Kotlin.
How to implement authentication and authorization with Retrofit in Kotlin?
To implement authentication and authorization with Retrofit in Kotlin, you can follow these steps:
- Add the necessary dependencies to your project's build.gradle file:
implementation 'com.squareup.retrofit2:retrofit:2.x.x' implementation 'com.squareup.retrofit2:converter-gson:2.x.x' implementation 'com.squareup.okhttp3:okhttp:4.x.x' implementation 'com.squareup.okhttp3:logging-interceptor:4.x.x'
- Create a Retrofit instance with the appropriate configuration. You can define an OkHttpClient instance with an Interceptor to add the authorization header to each request:
val httpClient = OkHttpClient.Builder()
.addInterceptor { chain ->
val request = chain.request().newBuilder()
.addHeader("Authorization", "Bearer
val retrofit = Retrofit.Builder()
.baseUrl("
- Create an interface that defines your API endpoints and annotate the methods with appropriate HTTP annotations (@GET, @POST, etc.) and define method parameters and return types:
interface ApiService {
@GET("endpoint")
suspend fun getData(): Response
- Create an instance of your API interface using the Retrofit instance:
val apiService = retrofit.create(ApiService::class.java)
- You can now make authenticated API calls using the API service instance. For example:
val response = apiService.getData() if (response.isSuccessful) { val data = response.body() // Handle the data } else { val errorBody = response.errorBody() // Handle the error }
Note: This example assumes that you already have an access token. You may need to implement the logic to obtain the access token based on your authentication mechanism.