
Best Gaming Mouse for Programmable Buttons to Buy in July 2026
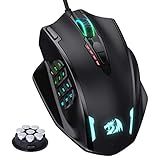
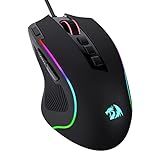
Redragon M908 Impact RGB LED MMO Gaming Mouse with 12 Side Buttons, Optical Wired Ergonomic Mouse with Max 12,400DPI, High Precision, 18 Programmable Macro Shortcuts, Comfort Grip
-
ADJUSTABLE DPI UP TO 12400 FOR PRECISION IN GAMING & WORK.
-
CUSTOMIZE WITH 18 PROGRAMMABLE BUTTONS & 5 MEMORY PROFILES.
-
ERGONOMIC DESIGN ENSURES COMFORT FOR PROLONGED GAMING SESSIONS.


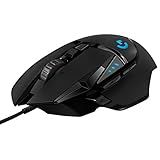
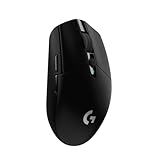
Logitech G502 Hero High Performance Wired Gaming Mouse, Hero 25K Sensor, 25,600 DPI, RGB, Adjustable Weights, 11 Programmable Buttons, On-Board Memory, PC/Mac - Black
- ACHIEVE PINPOINT ACCURACY WITH HERO SENSOR UP TO 25600 DPI.
- FULLY CUSTOMIZABLE WITH 11 BUTTONS AND DUAL-MODE SCROLL WHEEL.
- PERSONALIZE WEIGHTS FOR OPTIMAL BALANCE TAILORED TO YOUR PLAYSTYLE.
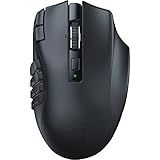
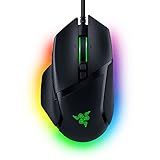
Razer Naga V2 HyperSpeed Wireless MMO Gaming Mouse: 19 Programmable Buttons - HyperScroll Technology - Focus Pro 30K Optical Sensor - Mechanical Mouse Switches Gen-2 - Up to 400 Hr Battery Life
- 19 PROGRAMMABLE BUTTONS: CUSTOM COMMANDS FOR EVERY GAMING STYLE.
- RAZER HYPERSPEED WIRELESS: ULTRA-FAST, LOW-LATENCY GAMING EXPERIENCE.
- FOCUS PRO 30K SENSOR: FLAWLESS TRACKING ON ANY SURFACE, EVEN GLASS.
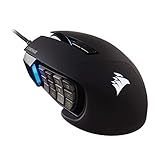
Corsair Scimitar RGB Elite Wired MOBA/MMO Gaming Mouse – 18,000 DPI – 17 Programmable Buttons – iCUE Compatible – PC, Mac, PS5, PS4, Xbox – Black
-
17 PROGRAMMABLE BUTTONS: OPTIMIZE GAMEPLAY WITH COMPLEX MACROS EASILY.
-
ADJUSTABLE SIDE BUTTONS: CUSTOMIZE COMFORT FOR YOUR UNIQUE GRIP STYLE.
-
18,000 DPI SENSOR: ACHIEVE PRECISION TRACKING WITH CUSTOMIZABLE SETTINGS.
Redragon M612 Predator RGB Gaming Mouse, 8000 DPI Wired Optical Mouse with 11 Programmable Buttons & 5 Backlit Modes, Software Supports DIY Keybinds Rapid Fire Button
-
5 DPI LEVELS: EASILY SWITCH BETWEEN 500-4000 DPI FOR OPTIMAL GAMEPLAY.
-
CUSTOMIZABLE BUTTONS: 11 PROGRAMMABLE BUTTONS FOR TAILORED GAMING CONTROL.
-
ERGONOMIC COMFORT: DESIGNED TO REDUCE FATIGUE FOR LONG GAMING SESSIONS.
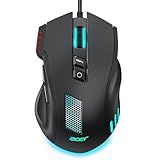
acer Wired Gaming Mouse, 12,800 DPI RGB Ergonomic Computer Mouse with Optical Sensor, 8 Programmable Buttons, 12 Backlit Modes, Software for DIY Keybinds, Rapid Fire, USB Gaming Mice for Laptop, PC
-
12,800 DPI FOR PRECISION CONTROL IN ANY GAMING SCENARIO!
-
FULLY PROGRAMMABLE BUTTONS ENHANCE GAMEPLAY AND WORKFLOW EFFICIENCY!
-
CUSTOMIZABLE RGB LIGHTING EFFECTS FOR A DYNAMIC GAMING EXPERIENCE!
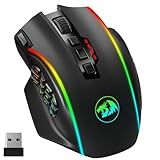
Redragon Wireless Gaming Mouse, MMO Gaming Mouse UP 16,000 DPI, 16 Macro Programmable Buttons, RGB Rechargeable with 12 Side Buttons, 70Hrs for PC Laptop MOBA FPS, M901P-KS
-
16,000 DPI PRECISION: ADJUSTABLE DPI AND POLLING RATE FOR ULTIMATE PERFORMANCE.
-
FULLY CUSTOMIZABLE: 16 BUTTONS AND 5 PROFILES TAILORED TO YOUR GAMEPLAY.
-
WIRELESS FREEDOM: 70+ HOURS OF BATTERY LIFE WITH SEAMLESS WIRED CHARGING.
Logitech G305 Lightspeed Wireless Gaming Mouse, Hero Sensor, 12,000 DPI, Lightweight, 6 Programmable Buttons, 250h Battery, On-Board Memory, Compatible with PC, Mac - Black
-
NEXT-GEN HERO SENSOR: 400 IPS & 12,000 DPI FOR ULTIMATE PRECISION!
-
LIGHTSPEED TECH: 1 MS RESPONSE FOR LAG-FREE, COMPETITIVE GAMING!
-
250-HOUR BATTERY LIFE; EXTEND IT TO 9 MONTHS WITH ENDURANCE MODE!
Razer Basilisk V3 Customizable Ergonomic Gaming Mouse: Fastest Gaming Mouse Switch - Chroma RGB Lighting - 26K DPI Optical Sensor - 11 Programmable Buttons - HyperScroll Tilt Wheel - Classic Black
-
ULTIMATE COMFORT: ERGONOMIC DESIGN SUPPORTS HAND FOR EXTENDED GAMING.
-
CUSTOM CONTROLS: 11 PROGRAMMABLE BUTTONS FOR QUICK ACTION ACCESS.
-
PRECISION TRACKING: 26K DPI SENSOR ENSURES PIXEL-PERFECT ACCURACY.
![UtechSmart Venus Gaming Mouse RGB Wired, 16400 DPI High Precision Laser Programmable MMO Computer Gaming Mice [IGN's Recommendation]](https://cdn.blogweb.me/1/41_R_om_Af_Zz_L_SL_160_489259992c.jpg)
UtechSmart Venus Gaming Mouse RGB Wired, 16400 DPI High Precision Laser Programmable MMO Computer Gaming Mice [IGN's Recommendation]
-
16400 DPI & FAST RESPONSE: PRECISION FOR MMO GAMERS UNLOCKED!
-
FULLY CUSTOMIZABLE BUTTONS: TAILOR YOUR GAMEPLAY WITH 12 SIDE KEYS!
-
ERGONOMIC DESIGN: COMFORT GRIP FOR LONG GAMING SESSIONS, NO SWEAT!
To program buttons on a gaming mouse, you will typically need to use software provided by the mouse manufacturer. Here's a step-by-step walkthrough of the process:
- Install the software: Start by downloading and installing the official software or driver provided by the manufacturer of your gaming mouse. This software is usually available on their website.
- Connect the mouse: Plug your gaming mouse into a USB port on your computer. The software should automatically detect the mouse and establish a connection.
- Open the software: Launch the installed software on your computer. It may have a specific name related to the brand or model of your mouse.
- Identify the buttons: Most gaming mice have additional buttons beyond the standard left-click, right-click, and scroll wheel. Identify the buttons you want to program and take note of their locations. The software may also provide a visual representation of the mouse with labeled buttons.
- Assign actions to buttons: Using the software interface, locate the section or tab that allows you to customize the mouse buttons. This section is usually labeled as "Button Assignment," "Key Mapping," or similar. Select the button you want to customize or assign actions to.
- Choose an action: Once you've selected the desired button, you can assign actions to it. Common options include keyboard keys, mouse clicks, or pre-defined macros. You can also set buttons to perform specific functions within games or launch applications.
- Apply the changes: After assigning actions to your desired button, save or apply the changes through the software. You might need to click on a "Save" or "Apply" button, or your changes may automatically be applied once you close the software.
- Test the button: Test the button you just programmed to ensure it performs the assigned action. Try pressing it in different applications or games to confirm that the desired action is executed as expected.
- Repeat for other buttons: If you want to program additional buttons, simply repeat steps 5 to 8 for each button separately.
Remember, the process may vary depending on the manufacturer and model of your gaming mouse. Make sure to consult the user manual or online support resources provided by the manufacturer if you encounter any issues or need further assistance.
How to create complex button macros with time delays on a gaming mouse?
The steps to create complex button macros with time delays on a gaming mouse may vary depending on the specific mouse software you are using. However, here is a general guideline that should be helpful:
- Install the mouse software: Make sure you have the latest version of the software for your gaming mouse installed on your computer. You can usually download it from the manufacturer's website.
- Launch the software: Open the mouse software and connect your gaming mouse to your computer if it isn't already connected.
- Locate the macro settings: Look for an option or tab that allows you to create or configure macros. It could be named "Button Assignment," "Macro Manager," or something similar.
- Select the button: Choose the button on your gaming mouse that you want to assign the complex macro to. This could be a dedicated macro button or any other standard button on the mouse.
- Start recording: In the macro settings, there should be a "Record" or "Start" button. Click on it to start recording your macro.
- Perform the actions: Once the recording starts, perform the series of actions you want to include in your macro. This may involve pressing multiple buttons, combination inputs, or mouse movements. Make sure to include any necessary time delays between actions.
- Insert time delays: Most mouse software allows you to manually insert time delays between recorded actions. Look for an option like "Delay" or "Wait" and specify the duration of the delay in milliseconds. This will create a pause between actions when the macro is played back.
- Stop recording: After performing all the actions and inserting the desired time delays, click on the "Stop" or "Finish" button to stop recording the macro.
- Test the macro: Test your newly created macro to ensure it functions as intended. Press the assigned button to trigger the macro and verify that it performs the desired actions with the correct time delays.
- Save the macro: Once you are satisfied with the macro, make sure to save it within the mouse software. This will allow you to reuse or modify the macro later.
Remember that the specific steps may differ based on the mouse software and model you use. Therefore, it's always a good idea to refer to the user manual or online documentation provided by the mouse manufacturer for detailed instructions tailored to your device.
What does the DPI button on a gaming mouse do?
The DPI (dots per inch) button on a gaming mouse allows you to adjust the sensitivity or speed of the mouse cursor on the screen. By pressing the DPI button, you can change the DPI settings of your mouse to increase or decrease the sensitivity. Higher DPI settings make the cursor move faster, which can be useful for quick movements and precision in fast-paced gaming situations. Lower DPI settings slow down the cursor and provide more control for accurate targeting in slower-paced games or activities that require precision. The ability to switch DPI settings on-the-fly is particularly helpful in gaming, as it allows gamers to adapt their mouse sensitivity according to their needs and preferences in different gaming scenarios.
How to utilize the extra buttons on a gaming mouse effectively?
Utilizing the extra buttons on a gaming mouse effectively can significantly improve your gaming experience and performance. Here are a few tips on how to do it:
- Customize button functions: Most gaming mice come with software that allows you to customize button functions. Install the software and assign various commands, macros, or keystrokes to the extra buttons based on your preferences and gaming needs. For example, you can assign commonly used actions like reloading, switching weapons, or using special abilities to the extra buttons, making them easily accessible during gameplay.
- Assign shortcuts: You can assign frequently used shortcuts to the extra buttons for quicker access. These shortcuts can be related to in-game actions or even specific applications on your computer. For example, you can assign the extra buttons to open inventory or map menus in a game, or to switch between different applications or tabs on your computer.
- Program macros: Macros are sequences of commands that can be executed with a single button press. Utilize the extra buttons to create and assign macros for complex in-game actions. For example, you can program a macro that executes a specific combination of skills or movements in a game, helping you perform complex actions quickly and effortlessly.
- Set DPI adjustments: Many gaming mice have buttons dedicated to adjusting the DPI (Dots Per Inch) sensitivity on-the-fly. You can assign different DPI levels to these buttons and switch between them as needed during gameplay. This allows you to instantly adjust the mouse sensitivity for better control while sniping, precise aiming, or general movement.
- Voice chat controls: If you use voice chat while gaming, you can assign push-to-talk or mute functions to the extra buttons on your mouse. This keeps your hands on the mouse, allowing you to perform in-game actions while easily communicating with teammates.
Remember, the key to utilizing the extra buttons effectively is to personalize them according to your gaming style and preferences. Experiment, fine-tune, and find the button configurations that work best for you.