
Best Delphi Component Tools to Buy in July 2026
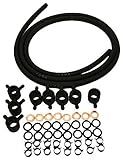
Delphi 7135-264 Fuel Injector Installation Kit
- EASY INSTALL: COMES WITH A COMPLETE INSTALLATION KIT INCLUDED!
- OEM EQUIVALENT: PART MATCHES 7135-264 FOR RELIABLE COMPATIBILITY.
- COMPACT DIMENSIONS: PERFECTLY SIZED FOR EFFICIENT STORAGE AND SHIPPING.


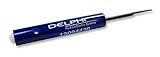
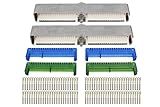
Delphi 12094430 Metri-Pack Terminal Removal Tool Use with 480 & 630 Series
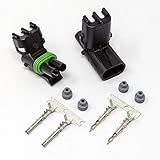
Delphi Packard Weatherpack 2 Pin Terminal Kit 16-14 AWG
-
DURABLE: RESISTANT TO WATER, CHEMICALS, AND DIRT FOR LONG-LASTING USE.
-
STABLE: UNAFFECTED BY VIBRATION OR EXTREME TEMPERATURES, SECURE PERFORMANCE.
-
USER-FRIENDLY: EASY-TO-FOLLOW INSTRUCTIONS FOR QUICK SETUP AND COMPATIBILITY.
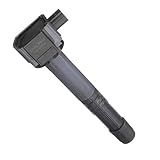
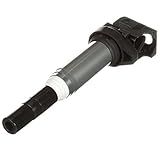
Delphi GN10732 Ignition Coil - Pencil, 1 Pack
- ENGINEERED FOR EFFICIENCY, ENSURING OPTIMAL SPARK PLUG PERFORMANCE.
- REDUCES SHORTS IN IGNITION COILS FOR RELIABLE ENGINE OPERATION.
- DURABLE WIRE COATING ENHANCES LONGEVITY AND PREVENTS FAILURES.
ICT Billet LS Gen 3 ECM Engine Computer Connector Kit Blue Green P59 PCM LS1 LM7 LQ4 L59 Components Compatible with Delphi 2003 and newer GM LS Gen 3 series engines with two 80-terminal WPECM30BG
Delphi GN10571 Pencil Ignition Coil
- OPTIMIZE VOLTAGE WITH PRECISE WINDING TECHNIQUES FOR ENHANCED PERFORMANCE.
- ENGINEERED TO OEM SPECS, ENSURING RELIABILITY AND SUPERIOR COMPATIBILITY.
- DURABLE MATERIALS AND EPOXY TECHNIQUES INCREASE LONGEVITY AND REDUCE FAILURES.
To use an image as a button in Delphi, follow these steps:
- Place a TImage component on your form. This component will be used to display the image.
- Load the desired image into the TImage component. You can do this by setting the "Picture.LoadFromFile" property and providing the path to the image file.
- Place a TButton component on your form. This will be used as the button.
- Select the TButton component and go to the Object Inspector. Look for the "Glyph" property and click on the ellipsis button ("...") next to it.
- In the ImageList editor that appears, click on the "Add" button and choose the TImage component you placed earlier.
- Set the "NumGlyphs" property to 1. This determines how many images are available in the TButton component.
- Optionally, you can set the "ButtonStyle" property to "bsSplit" to achieve a different visual style for the button if desired.
- Customize the behavior and appearance of the button as per your requirements using various properties of the TButton component.
- Write any event handlers you need for the button, such as the "OnClick" event, to define the actions to be performed when the button is clicked.
By following these steps, you can use an image as a button in your Delphi application.
What is the shortcut for assigning an image to a button in Delphi?
The shortcut for assigning an image to a button in Delphi is as follows:
- Select the button control on the form.
- In the Object Inspector, locate the Images property and click on the ellipsis button (...) to open the ImageList Editor.
- In the ImageList Editor, click on the "+" button to add a new image.
- Browse and select the desired image file from your computer.
- Adjust the image properties (such as width, height, transparent color, etc.) if necessary.
- Close the ImageList Editor.
- In the Object Inspector, locate the ImageIndex property of the button control and set it to the index of the desired image within the ImageList (usually starting from 0).
After following these steps, the selected image will be assigned to the button.
How to position an image button on a form in Delphi?
To position an image button on a form in Delphi, you can follow these steps:
- Open the Delphi IDE (Integrated Development Environment) and create a new project or open an existing one.
- Drag and drop a TImage component onto the form. You can find it in the "Standard" section of the component palette.
- Set the properties of the image component. Load an image for the button by setting the Picture property of the TImage component. You can either select an existing image file or load it programmatically using the LoadFromFile method.
- Set the AutoSize property of the TImage component to False if you want to manually adjust its size and position.
- Adjust the position of the image button by setting the Left and Top properties of the TImage component. You can do this in the Object Inspector or programmatically in the form's OnCreate event handler.
Example (programmatic positioning in the form's OnCreate event handler):
procedure TForm1.FormCreate(Sender: TObject); begin Image1.Left := 100; // set the left position Image1.Top := 50; // set the top position end;
- Customize other properties of the TImage component as desired, such as Width, Height, Transparent, etc.
- Optionally, you can add event handlers for the OnClick event of the image button to define the actions to be taken when the button is clicked.
- Run the application to see the image button positioned on the form based on your specified coordinates.
How to align an image button with other components on a form in Delphi?
To align an image button with other components on a form in Delphi, you can use the TAlign property of the image button. Here is a step-by-step guide:
- Drop a TPanel component on your form. This will act as a container for the other components.
- Place the image button component on the panel. You can do this by selecting the image button component from the Component Palette and clicking on the panel.
- Set the TAlign property of the image button to alLeft or alRight, depending on where you want it to be aligned with respect to the other components. For example, if you want the image button to be aligned to the right of the other components, set the TAlign property to alRight.
- Add the other components to the panel, either by dragging them from the Component Palette or by creating them programmatically.
- Set the Align property of the other components to alTop, alBottom, or alClient, depending on how you want them to be aligned with respect to the image button.
- Adjust the width and height of the image button as needed to achieve the desired alignment.
By setting the TAlign property of the image button and the Align property of the other components, you can ensure that the image button is aligned with the other components on the form.