
Best Clipboard Programming Tools to Buy in July 2026
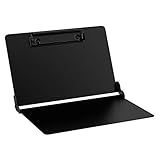
Blackout ISO Clipboard
- FOLDS IN HALF FOR EASY PORTABILITY AND STORAGE.
- DURABLE ALUMINUM HOLDS UP TO 30 SHEETS WITHOUT CREASING.
- LIGHTWEIGHT DESIGN PERFECT FOR ON-THE-GO PROFESSIONALS.


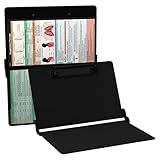
Whitecoat Clipboard® Blackout - Respiratory Edition
- FOLDS IN HALF TO FIT EASILY IN SCRUBS OR POCKET FOR PORTABILITY.
- STURDY ALUMINUM DESIGN ENSURES A RELIABLE WRITING SURFACE ANYWHERE.
- HOLDS 15-30 LETTER-SIZED SHEETS WITHOUT CREASING FOR EASY ACCESS.

Beginning PyQt: A Hands-on Approach to GUI Programming with PyQt6
Beginning PyQt: A Hands-on Approach to GUI Programming
To write an image to the Windows clipboard in Rust, you can make use of the clipboard-win crate along with other relevant libraries. Here are the steps involved:
- Start by adding the necessary dependencies to your Cargo.toml file:
[dependencies] clipboard-win = "0.7.0" image = "0.23.14"
- Import the required libraries in your Rust code:
extern crate clipboard_win; extern crate image;
use clipboard_win::{set_clipboard, ClipboardFormat}; use image::imageops::FilterType; use image::GenericImageView;
- Load the image you want to copy to the clipboard:
let image_path = "path/to/image.png"; // Provide the path to your image file let img = image::open(image_path).expect("Failed to load image");
- Convert the image to a PNG format and resize it if needed:
// Converting, resizing, and resampling the image let resized_img = img.resize(100, 100, FilterType::CatmullRom); let mut png_bytes = Vec::new(); resized_img .write_to(&mut png_bytes, image::ImageOutputFormat::Png) .expect("Failed to write image to PNG");
- Write the PNG bytes to the clipboard:
set_clipboard( ClipboardFormat::Dib, // Clipboard format for images png_bytes, ).expect("Failed to write image to clipboard");
That's it! The image should now be written to the Windows clipboard in Rust.
Note: Make sure to adjust the code based on your requirements, such as the path to your image file and desired image size.
How to ensure thread-safety while interacting with the Windows clipboard for image writing in Rust?
To ensure thread-safety while interacting with the Windows clipboard for image writing in Rust, you can use the clipboard-win crate, which provides a safe interface to interact with the Windows clipboard.
Here are the steps you can follow:
- Add the clipboard-win crate to your Cargo.toml file:
[dependencies] clipboard-win = "1.7.0"
- Import the necessary modules from the clipboard_win crate:
use clipboard_win::{Clipboard, formats::Bitmap}; use widestring::U16CString;
- Create a function to save the image data to the clipboard:
fn save_image_to_clipboard(image_data: &[u8], width: u32, height: u32) -> Result<(), &'static str> { // Initialize the clipboard object let clipboard = Clipboard::new()?;
// Create a Bitmap object from the image data
let bitmap = Bitmap::new(image\_data, width, height)?;

// Set the clipboard content as Bitmap
clipboard.set\_bitmap(&bitmap)?;

Ok(())
}
- Call the save_image_to_clipboard function passing the image data, width, and height:
fn main() { let image_data: Vec = /* ...load your image data */; let width: u32 = /* ...image width */; let height: u32 = /* ...image height */;
if let Err(err) = save\_image\_to\_clipboard(&image\_data, width, height) {
    println!("Error: {}", err);
}
}
By using the clipboard-win crate, you ensure thread-safety as it handles the required synchronization internally for interacting with the Windows clipboard.
What security considerations should be taken into account when writing images to the Windows clipboard in Rust?
When writing images to the Windows clipboard in Rust, several security considerations should be taken into account to ensure the safety and integrity of the operation. Some of these considerations include:
- Validating the input: Ensure that the image data being written to the clipboard is properly validated. Validate the image format and content to prevent potential vulnerabilities, such as buffer overflows or arbitrary code execution.
- Image size limits: Implement size limits on the images being written to the clipboard. This prevents any potential issues with memory allocation or denial-of-service attacks caused by excessively large image data.
- Data sanitization: Sanitize the image data before writing it to the clipboard. Remove any unnecessary or potentially harmful metadata or tags that could be exploited by attackers.
- Encryption during transfer: If the image data contains sensitive or confidential information, consider encrypting it during the transfer to the clipboard. This prevents unauthorized access or interception of the image data.
- Clearing the clipboard: After writing the image to the clipboard, clear it as soon as it is no longer needed. This prevents accidental or unauthorized access to the clipboard data by other applications or users.
- Secure error handling: Implement proper error handling to avoid disclosing sensitive information or internal system details in error messages. Avoid exposing any potential vulnerabilities through error messages during image writing.
- Access control: Ensure that only authorized processes or users are allowed to write images to the clipboard. Implement appropriate access controls and permissions to restrict the write access to trusted sources.
- Regular updates: Keep your Rust libraries and dependencies up to date to benefit from the latest security patches and fixes. Regularly check for updates and security advisories related to the libraries used for clipboard operations.
By following these security considerations, you can enhance the safety and security of your clipboard image writing operations in Rust.
What is the best approach for transferring an image to the Windows clipboard in Rust?
To transfer an image to the Windows clipboard in Rust, you can use the WinAPI bindings provided by the winapi crate. Here is an example of how you can accomplish this:
- First, add the winapi crate as a dependency in your Cargo.toml file:
[dependencies] winapi = "0.3"
- Import the necessary modules in your Rust source file:
use winapi::um::winuser::{OpenClipboard, EmptyClipboard, SetClipboardData, CloseClipboard}; use winapi::um::wingdi::{CreateDIBSection, DeleteObject, GetImageBits, BITMAPINFO, BITMAPINFOHEADER, BI_RGB}; use winapi::shared::windef::HBITMAP; use winapi::shared::minwindef::{UINT, DWORD, WORD, FALSE, TRUE}; use winapi::shared::winerror::S_OK; use winapi::ctypes::c_void;
- Define a function to transfer the image to the clipboard:
fn copy_image_to_clipboard(image_buffer: &[u8], width: u32, height: u32) { unsafe { OpenClipboard(NULL); EmptyClipboard();
    let mut dib\_info: BITMAPINFO = std::mem::zeroed();
    dib\_info.bmiHeader.biSize = std::mem::size\_of::<BITMAPINFOHEADER>() as DWORD;
    dib\_info.bmiHeader.biWidth = width as LONG;
    dib\_info.bmiHeader.biHeight = -(height as LONG);
    dib\_info.bmiHeader.biPlanes = 1;
    dib\_info.bmiHeader.biBitCount = 32;
    dib\_info.bmiHeader.biCompression = BI\_RGB;
    dib\_info.bmiHeader.biSizeImage = ((width \* height \* 4) as DWORD).max(1);

    let image\_bits: \*mut c\_void = std::ptr::null\_mut();
    let image\_bitmap = CreateDIBSection(
        NULL,
        &dib\_info as \*const BITMAPINFO,
        DIB\_RGB\_COLORS,
        &image\_bits as \*const \*mut c\_void,
        NULL,
        0
    );

    let image\_bits\_ptr = image\_bits.cast::<u32>();
    for y in 0..height {
        for x in 0..width {
            let pixel\_offset = (y \* width + x) as isize;
            let pixel = &image\_buffer\[(pixel\_offset \* 4) as usize..(pixel\_offset \* 4 + 4) as usize\];
            \*image\_bits\_ptr.offset(pixel\_offset) = u32::from\_le\_bytes(\[pixel\[2\], pixel\[1\], pixel\[0\], pixel\[3\]\]);
        }
    }

    let clipboard\_data = SetClipboardData(CF\_BITMAP, image\_bitmap.cast());
    DeleteObject(image\_bitmap.cast());

    CloseClipboard();
}
}
In the above code:
- image_buffer is the byte array containing the image data in RGBA format.
- width and height represent the dimensions of the image.
- Finally, you can call the copy_image_to_clipboard function with your desired image data:
fn main() { let image_buffer = vec![...]; // The image data as a byte array let width = ...; // Image width let height = ...; // Image height
copy\_image\_to\_clipboard(&image\_buffer, width, height);
}
Make sure to replace ... with the appropriate values for your image. After running the program, the image should be copied to the Windows clipboard.
How to handle different image orientations and rotations when writing to the Windows clipboard using Rust?
When writing images to the Windows clipboard using Rust, you can handle different image orientations and rotations by manipulating the image data before writing it to the clipboard. You can use the image crate to load and manipulate the images, and the clipboard-win crate to write to the clipboard.
Here is an example of how you can handle different image orientations and rotations:
- Add the required dependencies to your Cargo.toml:
[dependencies] image = "0.23" clipboard-win = "0.1"
- Load the image using the image crate:
use image::{open, DynamicImage};
fn load_image(path: &str) -> Result<DynamicImage, image::ImageError> { open(path) }
- Manipulate the image to handle different orientations and rotations:
fn handle_image(image: DynamicImage) -> DynamicImage { // Check the image's orientation and rotation // Manipulate the image accordingly // Rotate the image to the desired orientation or rotation
// Example manipulation: rotate the image by 180 degrees
image.rotate180()
}
- Write the manipulated image to the clipboard using the clipboard-win crate:
use clipboard_win::{Clipboard, formats::Image};
fn write_image_to_clipboard(image: DynamicImage) { let mut clipboard = Clipboard::new().unwrap();
// Convert the manipulated image to a byte vector
let mut image\_data = Vec::new();
image.write\_to(&mut image\_data, image::ImageOutputFormat::PNG)
    .unwrap();

// Write the image data to the clipboard
clipboard.set\_image(&image\_data, Image::PNG).unwrap();
}
- Put it all together:
fn main() { let image_path = "path/to/your/image.png";
// Load the image
let image = load\_image(image\_path).unwrap();

// Manipulate the image
let manipulated\_image = handle\_image(image);

// Write the manipulated image to the clipboard
write\_image\_to\_clipboard(manipulated\_image);
}
This example shows how you can handle different image orientations and rotations when writing to the Windows clipboard using Rust. Modify the image manipulation step based on your specific needs and handle different orientations and rotations accordingly.
What is the mechanism for encoding and decoding images in Rust when interacting with the Windows clipboard?
To encode and decode images in Rust when interacting with the Windows clipboard, you can use the Windows clipboard API provided by the winapi crate, along with the image crate for reading and writing image files.
Here's an example of encoding an image to the Windows clipboard in Rust:
- Add the dependencies to your Cargo.toml file:
[dependencies] winapi = "0.3" image = "0.23"
- Import the necessary modules in your Rust code:
extern crate winapi; use winapi::um::winuser::{ClipboardOpen, ClipboardSetData, ClipboardClose, CF_BITMAP}; use image::DynamicImage; use image::bmp::BmpEncoder;
fn main() { // Open the clipboard unsafe { ClipboardOpen(ptr::null_mut()); }
// Load the image from a file (replace "image\_path" with the path to your image file)
let image = image::open("image\_path").expect("Failed to open image file");

// Convert the image to BMP format
let mut bmp\_data: Vec<u8> = Vec::new();
let encoder = BmpEncoder::new(&mut bmp\_data);
encoder.encode(&image.to\_rgb8(), image.width(), image.height(), image.color());

// Set BMP data to clipboard
let h\_clipboard\_data = unsafe { GlobalAlloc(GMEM\_MOVEABLE, bmp\_data.len() as u64) };
let lock = unsafe { GlobalLock(h\_clipboard\_data) };
unsafe { ptr::copy\_nonoverlapping(bmp\_data.as\_ptr(), lock as \*mut u8, bmp\_data.len()) };

unsafe {
    ClipboardSetData(CF\_BITMAP, h\_clipboard\_data);
    ClipboardClose();
}
}
- Run the application to encode the image and set it in the Windows clipboard.
To decode an image from the Windows clipboard, you can utilize a similar approach:
extern crate winapi; use winapi::um::winuser::{ClipboardOpen, ClipboardGetClipboardData, ClipboardClose, CF_BITMAP}; use image::DynamicImage; use image::bmp::BmpDecoder;
fn main() { // Open the clipboard unsafe { ClipboardOpen(ptr::null_mut()); }
// Get BMP data from the clipboard
let h\_clipboard\_data = unsafe { ClipboardGetClipboardData(CF\_BITMAP) };

// Lock BMP data into memory
let lock = unsafe { GlobalLock(h\_clipboard\_data) };

// Create a slice from the locked memory
let slice = unsafe { slice::from\_raw\_parts(lock as \*const u8, bmp\_data\_len) };

// Create a new \`Vec\` from the slice
let bmp\_data: Vec<u8> = slice.to\_vec();

// Release the lock
unsafe {
    GlobalUnlock(h\_clipboard\_data);
}

// Decode the BMP data into an image
let decoder = BmpDecoder::new(&bmp\_data\[..\]).expect("Failed to decode BMP data");
let image = DynamicImage::from\_decoder(decoder).expect("Failed to decode image");

// Process the decoded image as needed
// ...

// Close the clipboard
unsafe {
    ClipboardClose();
}
}
Note that this code snippet assumes Windows-specific APIs and makes use of the winapi crate along with the image crate for encoding/decoding BMP files. You may need to adapt it to your specific use case and handle error cases appropriately.