Best Outdoor Storage Sheds with Floors to Buy in July 2026
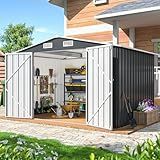
YADSUNY 10x8 FT Outdoor Storage Shed, Metal Garden Tool Shed with Updated Frame Structure and Lockable Doors, Ideal for Backyard Garden Patio Lawn, Grey
- DURABLE DESIGN: RUST- AND UV-RESISTANT GALVANIZED STEEL FOR ALL-WEATHER PROTECTION.
- EASY ASSEMBLY: REINFORCED STRUCTURE ENSURES 35% SIMPLER SETUP.
- SECURE STORAGE: LOCKABLE DOOR AND EFFECTIVE VENTILATION FOR OPTIMAL SAFETY.


Aoxun 6.2x4 FT Shed Outdoor Storage Shed with Lockable Doors & Slooping Roof Metal Garden Tool Shed for Backyard, Patio, Poolside (Brown)
-
DURABLE DESIGN: HEAVY-DUTY STEEL FRAME WITHSTANDS HARSH WEATHER FOR LONGEVITY.
-
VERSATILE USE: SERVES AS A GARDEN SHED, PET SHELTER, OR STORAGE SOLUTION.
-
EASY ASSEMBLY: STEP-BY-STEP MANUAL ENSURES QUICK, HASSLE-FREE SETUP.

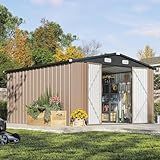
DAUSOLA 10x10 FT Outdoor Storage Shed, Metal Garden Tool Shed with Updated Frame Structure, Lockable Doors and Windows, Ideal for Backyard Garden Patio Lawn, Grey
-
DURABLE GALVANIZED STEEL: ALL-WEATHER, RUST-RESISTANT, AND UV-PROTECTED.
-
ENHANCED DESIGN: EASY 35% ASSEMBLY WITH REINFORCED, STABLE STRUCTURE.
-
AMPLE STORAGE: SPACIOUS DIMENSIONS, SECURE FEATURES, AND GREAT ORGANIZATION.

IRONCK 8x6FT Outdoor Storage Shed with Lockable Doors, 7.4x5.3FT Base Galvanized Steel Metal Garden Tool Shed with Breathable Vent for Yard Bins/Generator/Wheelbarrow Storage, Brown
- DURABLE GALVANIZED STEEL ENSURES LONG-LASTING OUTDOOR PROTECTION.
- SPACIOUS DESIGN FITS BIKES, TOOLS, OR EVEN AS A PET HOUSE.
- EASY ASSEMBLY WITH GUIDES MAKES SETUP A BREEZE FOR EVERYONE.
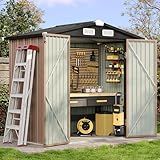
Aoxun 10 x 12FT Outdoor Storage Shed with Double Hinged Large Door Utility Garden Shed with Lockable Door & Sloped Roof Metal Sheds Outdoor Storage for Garden, Backyard, Patio and Backyard, Brown
-
MAXIMIZE SPACE: STORE LARGE ITEMS & KEEP ESSENTIALS ORGANIZED EFFORTLESSLY.
-
WEATHERPROOF SECURITY: LOCKABLE DOOR AND SLOPED ROOF PREVENT LEAKS & MOISTURE.
-
VERSATILE STORAGE: IDEAL FOR TOOLS, TOYS, FURNITURE, AND SEASONAL ITEMS!
Vongrasig 5 x 3 x 6 FT Outdoor Storage Shed Clearance, Metal Garden Shed with Large Window and Lockable Door, Anti-Corrosion Waterproof Tool Shed for Backyard Patio, Lawn (Dark Gray)
- WEATHER-RESISTANT DESIGN: DURABLE STEEL CONSTRUCTION RESISTS RUST AND ROT.
- BRIGHT & COMFORTABLE: LARGE WINDOWS AND VENTS ENSURE AMPLE SUNLIGHT.
- VERSATILE USE: IDEAL FOR STORAGE, PETS, AND GARDEN TOOLS-MEETS ALL NEEDS!
Outdoor storage sheds with floors are typically designed to be weather-resistant, but their level of water resistance or waterproofing can vary depending on the materials used and the quality of the construction. Many sheds include features such as treated wood, metal, or plastic materials that offer some degree of protection against rain and moisture. However, not all sheds are completely waterproof. The presence of a floor can help protect the contents from ground moisture, but additional measures-such as sealing seams, ensuring proper roof construction, and maintaining the shed over time-may be necessary to enhance water resistance. It's important to choose a shed with good drainage, a reliable roofing system, and quality sealing to better withstand weather conditions. If you need specific waterproofing, check the product specifications and consider adding additional waterproofing treatments if necessary.
What is the cost comparison of different waterproofing methods for sheds?
When considering waterproofing methods for sheds, it's important to weigh the costs against the effectiveness and longevity of each method. Here's a comparative overview of several common waterproofing options:
- Sealant/Waterproofing Paint: Cost: Typically ranges from $15 to $50 per gallon. Application: Applied directly to wood surfaces, forming a barrier against moisture. Advantages: Easy to apply, relatively inexpensive. Considerations: Needs reapplication every few years, especially in harsh climates.
- Bitumen Membrane: Cost: Generally between $1.50 and $2.50 per square foot. Application: Rolled onto surfaces, often used on roofs or as an underlayer. Advantages: Highly effective for roofs, long-lasting protection. Considerations: Can be difficult to apply without professional help.
- EPDM (Ethylene Propylene Diene Monomer) Rubber Roofing: Cost: Around $0.80 to $1.50 per square foot. Application: Installed as sheets over the roof and sides. Advantages: Durable, UV resistant, excellent for sheds with flat or low-slope roofs. Considerations: Requires precision in installation to avoid leaks.
- Tar Paper/Felt: Cost: About $0.30 to $0.50 per square foot. Application: Used under shingles or on walls as a moisture barrier. Advantages: Affordable, easy to install. Considerations: Not meant to be exposed to the elements; used in conjunction with other materials.
- Liquid Rubber: Cost: Approximately $50 to $100 per gallon. Application: Applied like paint, often used for sealing roofs and other surfaces. Advantages: Seamless, highly flexible, and durable membrane. Considerations: Ensure proper surface preparation to maximize adherence.
- Silicone-Based Waterproofing: Cost: Typically $20 to $60 per gallon. Application: Rolled or sprayed onto surfaces. Advantages: Good for wood, easy to apply, provides UV protection. Considerations: May require reapplication depending on exposure and climate.
In addition to material costs, consider labor costs if you're hiring professionals, which can significantly increase the overall expenditure. The choice of method largely depends on your shed's specific needs, climate, budget, and personal preference for DIY versus professional installation. It's often beneficial to select a combination of methods (e.g., using a liquid rubber roof with treated wood sealants) to ensure comprehensive protection against moisture.
What is the importance of a waterproof floor in a shed?
A waterproof floor in a shed is important for several reasons:
- Protection from Moisture: Waterproofing prevents moisture from seeping into the floor, which can lead to mold, mildew, and rot. This is especially crucial if the shed is used to store items that are sensitive to moisture, such as tools and electronics.
- Structural Integrity: Water can weaken the structural integrity of the floor over time. A waterproof floor is more durable and can withstand exposure to the elements, extending the lifespan of the shed.
- Ease of Cleaning: Waterproof floors are generally easier to clean. Spills and dirt can be wiped away without worrying about water damage, maintaining the appearance and cleanliness of the shed.
- Pest Prevention: Damp environments can attract pests such as insects and rodents. Waterproof floors help to keep the shed dry and less appealing to these undesirables.
- Versatility in Use: With a waterproof floor, the shed can be used for a wider range of purposes, including as a workshop or hobby space where liquids might be used.
- Property Value: A well-maintained, waterproof shed can add value to a property, as it is seen as a durable and useful addition to the home.
Overall, a waterproof floor helps maintain the functionality and longevity of a shed, protecting both the structure and its contents from water-related damage.
What is the common cause of leaks in shed floors?
A common cause of leaks in shed floors is poor drainage around the shed. If water does not properly drain away from the shed, it can pool around the base and eventually seep into the shed, leading to leaks. Additionally, improper or damaged flooring materials, such as untreated wood that has rotted, can allow water to penetrate. Other causes can include cracks or gaps in the flooring, insufficient waterproofing or sealing, and issues with the shed’s foundation that lead to settling and cracking. Ensuring proper site preparation, good drainage, and regular maintenance can help prevent these issues.
How to apply a waterproof membrane to a shed floor?
Applying a waterproof membrane to a shed floor is a great way to protect it from moisture damage. Here are some steps to help you do this effectively:
- Preparation: Clean the Surface: Remove any dirt, dust, or debris from the floor. Use a broom or vacuum and, if necessary, a mop with a mild detergent to ensure the surface is clean and free of any contaminants. Dry the Surface: Allow the floor to dry completely. A damp or wet surface will prevent proper adhesion of the waterproof membrane. Inspect the Surface: Check for any cracks or holes. Use concrete filler or wood putty to fill gaps, as needed, to create a smooth, even surface.
- Select the Membrane: Choose a waterproof membrane suitable for the material of your shed floor. Options include liquid-applied membranes, sheet membranes, or self-adhesive versions.
- Apply a Primer: If required, apply a primer to the floor surface to enhance the adhesion of the membrane. Make sure to follow the manufacturer's instructions regarding drying time and application techniques.
- Cut the Membrane: Measure the floor dimensions and cut the membrane to size, allowing for a slight overlap at the edges and seams. Lay out the membrane pieces to ensure they fit well before attaching them.
- Attach the Membrane: For Sheet and Self-Adhesive Membranes: Peel off any backing paper, if applicable, and lay the membrane onto the floor. Use a roller or flat tool to smooth out any bubbles or creases and ensure good adhesion. For Liquid Membranes: Use a brush, roller, or trowel to apply the liquid evenly across the floor surface. Follow the manufacturer's instructions for the number of coats required and recommended drying time between coats.
- Seal the Edges and Seams: Use a waterproof tape or an additional layer of the membrane to seal any joints, seams, or edges. This provides extra protection against moisture penetration.
- Cure and Dry: Allow the membrane to dry and cure as per the product’s instructions. This ensures that the membrane forms a proper waterproof barrier.
- Inspect and Test: Once the membrane has set, inspect it for any gaps or areas that may need additional sealing. If possible, conduct a water test to ensure it is completely waterproof.
By following these steps, you can effectively apply a waterproof membrane to your shed floor, protecting it from moisture and extending its lifespan.