
Best LED Hoverboards for Kids to Buy in July 2026
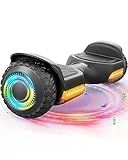
Gyroor Balancing Scooter New G13 All Terrain Balancing Scooter with LED Lights & 500W Motor, Self Balancing Off Road with Bluetooth for Kids ages 6-12 and Adults-Black
-
POWERFUL DUAL MOTORS: CLIMB 15° HILLS AT 7.75 MPH WITH EASE.
-
FUN & SAFE RIDES: LED LIGHTS ENHANCE VISIBILITY, ATTRACTING ATTENTION.
-
MUSIC ON THE MOVE: BUILT-IN BLUETOOTH SPEAKERS FOR ULTIMATE FUN.


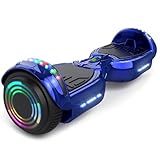
Gyroor Self Balancing Scooter New G13 All Terrain Balancing Scooter with LED Lights & 500W Motor, Self Balancing Off Road with Bluetooth for Kids ages 6-12 and Adults-Blue
- POWERFUL DUAL MOTORS: CLIMB 15° HILLS AT 7.75 MPH EFFORTLESSLY!
- COOL LED LIGHTS: BRIGHTEN YOUR RIDE WITH FUN LIGHTS AND MUSIC!
- SAFETY CERTIFIED: UL2272 STANDARD ENSURES WORRY-FREE RIDING FOR ALL!
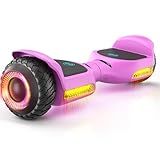
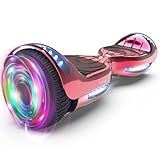
Gyroor Self Balancing Scooter New G13 All Terrain Balancing Scooter with LED Lights & 500W Motor, Self Balancing Off Road with Bluetooth for Kids ages 6-12 and Adults-Pink
-
POWERFUL PERFORMANCE: DUAL 250W MOTORS TACKLE 15° CLIMBS AT 7.75 MPH.
-
FUN & SAFE: COOL LED LIGHTS AND UL2272 CERTIFIED FOR SAFE RIDING.
-
ENJOY MUSIC ON-THE-GO: BUILT-IN BLUETOOTH SPEAKER FOR A FUN RIDE EXPERIENCE.
SIMATE Hoverboard, Bluetooth All Terrain Hover Boards with LED Lights and APP Control, Gifts for Kids Adults Girls Boys, for All Ages
-
POWERFUL PERFORMANCE: DUAL 250W MOTORS, TOP SPEED 7.5 MPH, AND 7.5-MILE RANGE.
-
FUN & SAFE RIDE: BUILT-IN BLUETOOTH SPEAKERS AND BRIGHT LED LIGHTS INCLUDED.
-
USER-FRIENDLY CONTROLS: APP CONTROL FOR SPEED SETTINGS, LIGHTS, AND BATTERY INFO.

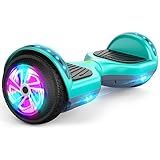
SIMATE Hoverboard, Bluetooth All Terrain Hover Boards with LED Lights and APP Control, Gifts for Kids Adults Girls Boys, for All Ages
-
ALL-TERRAIN FUN: ENJOY A SAFE, SMOOTH RIDE ON ANY SURFACE WITH EASE.
-
MUSIC ON THE MOVE: BUILT-IN BLUETOOTH SPEAKERS FOR AN UNFORGETTABLE RIDE!
-
SMART CONTROL: MANAGE SPEED AND SETTINGS EASILY WITH THE XSCAR APP.

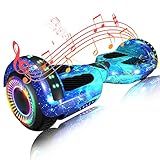
SIMATE Hoverboard, Bluetooth All Terrain Hover Boards with LED Lights and APP Control, Gifts for Kids Adults Girls Boys, for All Ages
-
LONG-LASTING FUN: ENJOY RIDES WITH 7-MILE RANGE AND FLEXIBLE SPEED MODES.
-
SAFETY & ENTERTAINMENT: RIDE SAFELY WITH LED LIGHTS AND BLUETOOTH SPEAKERS.
-
USER-FRIENDLY APP: CONTROL SPEED, LIGHTS, AND BATTERY EASILY WITH XSCAR APP.
FLYING-ANT Self Balance Scooter 6.5" with Speaker and LED Lights Red
- EXPERIENCE SAFETY AND FUN WITH FLYING-ANT HOVERBOARDS FOR EVERYONE!
- LIGHT UP YOUR RIDE: FLASHING WHEELS BRING EXCITEMENT AT SUNSET!
- ENJOY SMOOTH RIDES AND MUSIC WITH OUR HIGH-QUALITY BLUETOOTH HOVERBOARDS!
Hoverstar Bluetooth Hoverboard with LED Wheels Chrome Color Self Balance Scooter for Kids, Teenager (Chrome Blue)
-
UL CERTIFIED SAFETY STANDARDS ENSURE QUALITY AND PEACE OF MIND.
-
HIGH-INTENSITY HEADLIGHTS AND LED LIGHTS FOR SAFER, FUN RIDES.
-
BUILT-IN BLUETOOTH SPEAKER DELIVERS EXTRAORDINARY SOUND EXPERIENCE.
SUNDERWELL Electric Hoverboard with LED Lights and Bluetooth Speaker, Hover Board with 6.5" Flashing Wheels, Self Balancing Scooter Top Speed of 10MPH, Gifts for Kids (Chrome Red)
-
LONG-LASTING BATTERY: CHARGES IN JUST 2-3 HOURS FOR 8-MILE RANGE.
-
USER-FRIENDLY DESIGN: EASY FOR BEGINNERS, STABLE WITH ONE STEP.
-
FUN ON THE GO: BLUETOOTH SPEAKERS FOR A GREAT AUDIO EXPERIENCE.
Kids' hoverboards often come with LED lights. These lights are typically integrated into various parts of the hoverboard, such as the wheels or the deck, to enhance the aesthetic appeal and make the device more attractive to children. Besides adding a fun visual element, LED lights can also improve visibility, making the rider more noticeable in low-light conditions, which can contribute to safety. The inclusion of LED lights can vary depending on the model and brand of the hoverboard, so it's essential to check the product specifications if this feature is important to you.
How to customize the LED lights on a hoverboard?
Customizing the LED lights on a hoverboard can be a fun way to personalize your ride. The exact method will depend on your hoverboard model, but here are some general steps and ideas to help you customize your hoverboard's LED lights:
- Check the User Manual: Some hoverboards come with built-in customization options accessible through a mobile app or control panel. Make sure to read the user manual for any specific instructions related to LED light customization.
- Mobile App: Some hoverboards have companion apps that allow you to control LED lights. Download the app specified in the user manual, and connect your hoverboard via Bluetooth. Look for LED customization options in the app, where you can change colors, create patterns, or set lights to react to music.
- Manual Settings: Some hoverboards have buttons or built-in controls to change LED settings manually. Look for button combinations that change colors or light patterns. This information is usually available in the user manual.
- Replace LED Lights: If your hoverboard doesn't have built-in customization options, you can consider replacing the LED lights. Purchase LED strips or kits compatible with your hoverboard. Make sure they match the voltage and size. Carefully open the hoverboard casing following the manufacturer's instructions, and replace the LEDs with your new ones. Be cautious of the warranty and safety when making any hardware changes.
- Add External Decorations: Instead of replacing existing LEDs, you can add additional LED strips using adhesive-backed LED tape. Ensure you use battery-powered or properly wired LEDs to avoid overloading the hoverboard's electrical system. Secure the strips with clips or adhesives, ensuring they don't interfere with the wheel movement.
- Use Third-Party Accessories: Look for third-party accessories and attachments designed for hoverboards. These might include light-up wheels, under-glow kits, or other decorative lighting solutions.
- Safety Precautions: Always prioritize safety and ensure that any LED modifications do not interfere with the hoverboard's operation. Avoid tampering with the hoverboard's internal wiring if you're not experienced with electronics. Consider professional help if you are unsure about modifying the hardware.
Make sure any changes comply with local laws and safety guidelines, particularly if you plan to use your hoverboard in public places.
How to store a hoverboard with LED lights safely?
Storing a hoverboard with LED lights safely involves several steps to ensure that both the electrical components and the overall structure remain in good condition. Here’s a guide to help you store it properly:
- Clean the Hoverboard: Before storing, ensure the hoverboard is clean. Use a slightly damp cloth to wipe down its surface, removing any dirt or debris. Avoid using excessive water, especially near electrical components and LED lights.
- Charge the Batteries: Fully charge the hoverboard before storing, but avoid overcharging. If you plan to store it for an extended period (e.g., several months), check the battery level periodically (every 3 months) and recharge if it drops below 20-30%.
- Power Off: Make sure the hoverboard is completely powered off before storage to avoid unnecessary battery drain and potential LED light damage.
- Choose a Suitable Storage Location: Store in a cool, dry place away from direct sunlight and moisture. Avoid extreme temperatures as they can damage the battery and affect the performance of LED lights and other electronic components.
- Avoid Humidity: High humidity can damage electronic components. If storing in a basement or garage, use a dehumidifier to maintain optimal conditions.
- Protect from Dust: Cover the hoverboard with a dust cover or a clean, dry cloth or store it in its original packaging to keep dust and insects away.
- Store Horizontally: Place the hoverboard on a flat, level surface in its natural position. Avoid leaning it against a wall as it might tip over and get damaged.
- Secure Charging Accessories: Store the charger and any additional accessories in a dry place, keeping them organized and ready for future use.
- Periodic Checks: Every few months, check on the hoverboard to ensure that there are no signs of leaks, corrosion, or other forms of damage. Also, make sure the battery level is maintained properly.
By following these steps, you can help prolong the life of your hoverboard and ensure its readiness for use when you take it out of storage.
What is the best terrain for hoverboards with LED lights?
Hoverboards with LED lights are generally designed for smooth, flat surfaces to provide the best riding experience and ensure safety. Here are some terrains where these hoverboards perform best:
- Paved Roads and Sidewalks: Smooth, even surfaces are ideal for hoverboards. They allow for stable movement and minimize the risk of falling due to uneven terrain.
- Indoor Surfaces: Hoverboards excel on indoor flooring such as hardwood, tile, or polished concrete. The smooth surfaces allow for better control and maneuverability.
- Paved Paths in Parks: Many parks have specially paved trails that can be suitable for hoverboards. These paths provide a mix of good scenery and safe riding conditions.
While some hoverboards are designed for off-road use and can handle grass, dirt, or gravel, those equipped primarily with LED lights are often not built for such terrains. Always check the hoverboard's specifications and intended use before attempting to ride on more challenging surfaces.
How to adjust the brightness of LED lights on a hoverboard?
Adjusting the brightness of LED lights on a hoverboard can vary depending on the specific model and design of the hoverboard. Here are some general approaches you can try:
- Check the User Manual: Many hoverboards come with a user manual that includes information on how to customize settings, including LED light brightness. Look for a section related to LED settings or lighting.
- Mobile App: Some hoverboards have a compatible mobile app that allows you to control various features, including LED light settings. Check if your hoverboard has an app, download it, and explore the lighting options.
- Button or Remote Control: Certain hoverboards include buttons or remote controls that let you toggle through various light presets. If your hoverboard has such an option, refer to the manual for instructions on how to use it.
- Safe Mode / Power Mode Adjustment: Some hoverboards come with different modes that automatically adjust features like speed and lighting. Switching between modes might indirectly change the brightness if it's integrated with those settings.
- Consult the Manufacturer: If none of the above options work, contact the manufacturer’s customer support for specific guidance related to your model.
If you are unable to find a specific method for adjusting LED brightness on your hoverboard, it may be that the brightness level isn’t adjustable with your current model.
What is the difference between hoverboards with and without LED lights?
Hoverboards with LED lights and those without primarily differ in terms of aesthetics, visibility, and, sometimes, safety features. Here's a closer look at these differences:
- Aesthetics: With LED Lights: Hoverboards equipped with LED lights tend to have a more modern and eye-catching appearance. The lights can come in various colors and patterns, enhancing the visual appeal. Without LED Lights: These hoverboards have a simpler and more minimalistic design. Some users may prefer this understated look.
- Visibility: With LED Lights: The lights can improve visibility in low-light conditions, making it easier for others to see you, which can be particularly useful for evening or night-time riding. Without LED Lights: Users will have to rely solely on ambient light, which might make them less noticeable in dark environments.
- Safety: With LED Lights: The increased visibility from LED lights can enhance safety by making it easier for pedestrians, cyclists, and motorists to spot the hoverboard. Some models use LED lights as indicators for device status or to signal when turning. Without LED Lights: These models might lack the same level of visibility, potentially posing a safety risk in low-light conditions unless riders wear additional reflective gear or lights.
- Battery Life: With LED Lights: The LED lights consume additional battery power, which could slightly reduce the hoverboard's overall battery life, depending on the usage and configuration of the lights. Without LED Lights: These models might enjoy marginally longer battery life since there is no additional power draw from lights.
- Cost: With LED Lights: Typically, hoverboards with LED lights may be slightly more expensive than their non-LED counterparts, as the lights add an additional feature that could increase production costs. Without LED Lights: Often, these models are more affordably priced due to their simpler design.
In choosing between the two, consider your preferences for style, the conditions in which you'll be riding, safety needs, and budget.