Best WxPython Toggle Switches to Buy in July 2026
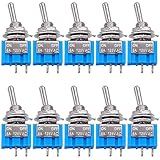
COROTC 8 Pack Toggle Switches, 2 Pin 20A 125V AC/ 15A 250V AC ON Off Switch, SPST Car Rocker Switches with Boot Cap Cover, 12V Heavy Duty Waterproof Toggle Switch
-
VERSATILE ON/OFF CONTROL: EASILY TOGGLE BETWEEN ON/OFF FOR VARIOUS APPLICATIONS.
-
WEATHERPROOF DESIGN: INCLUDES RUBBER CAP FOR MOISTURE AND DUST PROTECTION.
-
DURABLE & LONG-LASTING: EXCEEDS 50,000 CYCLES FOR SUPERIOR RELIABILITY AND VALUE.


Lutron Ariadni/Toggler LED+ Dimmer Light Switch for Dimmable LED, Halogen and Incandescent Dimmer Switch, 150W, Single-Pole/3-Way, AYCL-153P-WH, White
-
FLICKER-FREE DIMMING: TESTED ON THOUSANDS OF BULBS FOR SMOOTH PERFORMANCE.
-
VERSATILE USE: IDEAL FOR SINGLE-POLE OR 3-WAY APPLICATIONS IN ANY ROOM.
-
CUSTOM LIGHTING LEVELS: OVER 250 SETTINGS FOR PERFECT AMBIANCE AT ANY TIME.
Nilight 90012E Heavy Duty Rocker Toggle 15A 250V 20A 125V SPST 2Pin ON/Off Switch Metal Bat Waterproof Boot Cap Cover-5 Pack, 2 Years Warranty
-
DURABLE DESIGN: 50,000+ CYCLES FOR LONG-LASTING PERFORMANCE.
-
CHIC APPEARANCE: HIGH-END LOOK ENHANCES YOUR EQUIPMENT'S STYLE.
-
EASY INSTALLATION: QUICK CONNECTIONS WITH SCREWS OR SOLDER OPTIONS.
Taiss 10PCS SPST Mini Toggle Switch 2 Pin 2 Position ON/Off Miniature Toggle Switch 6A 125V MTS-101
- DURABLE SPDT LATCHING TOGGLE SWITCH FOR RELIABLE OPERATION.
- COMPACT DESIGN: PERFECT FOR TIGHT SPACES AND EASY INSTALLATION.
- VALUE PACK: 10 SWITCHES INCLUDED FOR COST-EFFECTIVE SOLUTIONS.
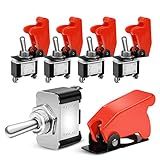
Nilight 90014E Heavy Duty Rocker Toggle Switch 12V 20A Red Cover SPST ON/Off 2Pin Car Truck Boat-5 Pack
-
SECURE OPERATION: RED SAFETY COVER PREVENTS ACCIDENTAL STARTS.
-
EASY INSTALLATION: QUICK TO INSTALL WITH 12MM MOUNTING DIAMETER.
-
VERSATILE USE: IDEAL FOR CARS, BOATS, ATVS, AND MORE MOTORIZED VEHICLES.

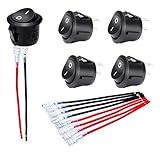
Nilight 6PCS 5PIN SPST Rocker Switches with 6 Sets Jumper Wires Set 20A/12V 10A/24V On/Off Toggle Switches with Night Glow Sticker for Trucks Boats Auto Motorcycles,2 Years Warranty (90131F) , Blue
- HIGH-QUALITY, DURABLE DESIGN ENSURES LONG-LASTING PERFORMANCE.
- SIMPLE INSTALLATION WITH VERSATILE 5-PIN SPST REPLACEMENT SWITCHES.
- INCLUDES DIY STICKERS FOR PERSONALIZED CONTROL OF YOUR DEVICES.
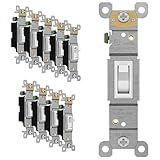
ENERLITES Toggle Light Switch, Single Pole, 15A 120-277V, Grounding Screw, Residential Grade, UL Listed, 88115-W-10PCS, White (10 Pack), 10 Count
- DURABLE DESIGN: IMPACT-RESISTANT POLYCARBONATE & SOLID STEEL CONSTRUCTION.
- VERSATILE FIT: SHALLOW BODY DESIGN FITS STANDARD JUNCTION BOXES EASILY.
- BROAD COMPATIBILITY: IDEAL FOR HOMES, OFFICES, AND COMMERCIAL SPACES.
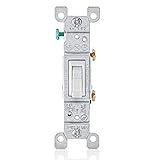
Leviton 15 Amp, 120 Volt, Toggle Framed Single-Pole AC Quiet Switch, Residential Grade, Grounding, 10-Pack, 1451-2WM, White
- QUICK PUSH-IN WIRING ALLOWS FOR FASTER, EFFORTLESS INSTALLATION.
- VERSATILE TERMINAL SCREWS HANDLE VARIOUS WIRE GAUGES EASILY.
- DURABLE THERMOPLASTIC CONSTRUCTION ENSURES LONG-LASTING PERFORMANCE.
DaierTek ON Off Round Rocker Switches SPST 20mm Mini 12 Volt DC Mini Circle Toggle Switch 12V for Car Automotive RV 2 Pin Switch 120V Wired KCD1-5Pack
- EASY INSTALLATION: SNAP-IN DESIGN FITS 0.787 MOUNTING HOLES EFFORTLESSLY.
- DURABLE MATERIAL: NYLON PA66 AND BRASS TERMINALS ENSURE LONG-LASTING USE.
- VERSATILE FUNCTIONALITY: PERFECT FOR AUTOMOTIVE, RVS, AND HOUSEHOLD USE.

VONVOFF Toggle Switch,ON/Off SPST with Pre-soldered Wires,3v/5v/12v/24v/72v/110v/220v/240v/ Mini Toggle Switches for car,Truck, Light,Test Machine,Industrial Equipment.3 Pins 2 Positions (10pcs+Wire)
- OPERATES AT 1V-250V, PERFECT FOR VERSATILE APPLICATIONS!
- DURABLE DESIGN LASTS UP TO 20,000 TOGGLES FOR LONG-TERM USE.
- PRE-WIRED FOR EASY INSTALLATION, REDUCING LABOR COSTS!
In wxPython, toggle switches can be implemented using the wx.ToggleButton class, which provides a button with a state that can be toggled on or off. To add a toggle button to your application, first import the necessary wxPython module and create a frame to serve as the main window of your application. Within this frame, you can create a wx.ToggleButton and place it using a sizer or by setting its position directly. You can bind an event handler to the toggle button's EVT_TOGGLEBUTTON event to perform actions based on the button's state. The toggle button can be queried with the GetValue or GetValue() method to determine whether it is currently in the toggled (pressed) state or not. By updating the button's label or performing an action when the state changes, you can create an interactive and responsive UI element.
How to load an image in wxPython?
Loading and displaying an image in a wxPython application can be done using classes such as wx.Image, wx.Bitmap, and wx.StaticBitmap. Here’s a basic example to illustrate how you can achieve this:
import wx
class MyFrame(wx.Frame): def __init__(self, *args, **kw): super(MyFrame, self).__init__(*args, **kw)
    # Load the image
    image\_path = "path\_to\_image.jpg"  # Replace with your image file path
    image = wx.Image(image\_path, wx.BITMAP\_TYPE\_ANY)

    # Resize image to fit the frame
    image = image.Scale(200, 150, wx.IMAGE\_QUALITY\_HIGH)
    bitmap = wx.Bitmap(image)

    # Add the image to a StaticBitmap
    static\_bitmap = wx.StaticBitmap(self, wx.ID\_ANY, bitmap)

    # Set up frame layout
    sizer = wx.BoxSizer(wx.VERTICAL)
    sizer.Add(static\_bitmap, 0, wx.ALL | wx.CENTER, 5)
    self.SetSizer(sizer)

    # Set frame size
    self.SetSize((250, 200))
    self.SetTitle("Image Viewer")
class MyApp(wx.App): def OnInit(self): frame = MyFrame(None) frame.Show() return True
if __name__ == "__main__": app = MyApp() app.MainLoop()
Explanation:
- wx.Image: This class is used to load an image into memory. Images can be loaded from various formats, and wx.BITMAP_TYPE_ANY allows wxPython to automatically detect the image type.
- wx.Bitmap: Once you have loaded an image using wx.Image, you convert it to a wx.Bitmap, which can be displayed in a wxPython widget.
- Display the Image: A wx.StaticBitmap widget is used for displaying bitmaps (images) on the frame.
- Scaling: The example uses the Scale method to resize the image to fit within a specific dimension. This is optional and can be adjusted per your requirements.
- Path: Ensure you replace "path_to_image.jpg" with the actual path to your image file.
Make sure you have wxPython installed (pip install wxPython) and replace the image path with the correct location of the image file on your filesystem. This will create a window displaying your image with the ability to adjust the size of the window as needed.
What is the wxPython Frame class?
The wx.Frame class in wxPython is a key component for building graphical user interfaces (GUIs) in Python applications. It represents a window or frame that can contain other controls, menus, and widgets. Frames are often used as the main window in an application, providing a base onto which other visual components and elements can be added.
Key features of the wx.Frame class include:
- Window Structure: It typically contains a title bar, borders, and optionally menu bars, toolbars, and status bars.
- Parent-Child Relationship: Other widgets and controls are often added to a frame as its children, making it the container for various interface elements.
- Event Handling: wx.Frame can handle various events, such as close events, size changes, and key presses, enabling interactive and responsive applications.
- Customizability: You can customize the appearance and behavior of a frame using different styles and attributes when creating the frame.
- Lifecycle Management: The frame is responsible for managing its own show/hide state and can be opened, closed, resized, and repositioned through programmatic control.
Here is a basic example of creating a simple application with a frame using wxPython:
import wx
class MyApp(wx.App): def OnInit(self): self.frame = MyFrame(None, title="Hello wxPython") self.frame.Show() return True
class MyFrame(wx.Frame): def __init__(self, parent, title): super(MyFrame, self).__init__(parent, title=title, size=(300, 200)) self.panel = wx.Panel(self) self.Bind(wx.EVT_CLOSE, self.on_close)
def on\_close(self, event):
    dlg = wx.MessageDialog(self, "Are you sure you want to close this application?",
                           "Confirm Exit", wx.YES\_NO | wx.NO\_DEFAULT | wx.ICON\_QUESTION)
    if dlg.ShowModal() == wx.ID\_YES:
        self.Destroy()
    dlg.Destroy()
if __name__ == "__main__": app = MyApp() app.MainLoop()
In this example, a simple frame with a title is created. The frame handles the close event and asks the user for confirmation before closing the application. This is just a basic setup, and wxPython provides myriad features to develop full-fledged applications with sophisticated interfaces.
What is a dialog in wxPython?
In wxPython, a dialog is a type of window that is typically used to communicate with the user and request information or provide notifications. It is a transient window that behaves like a temporary child to a parent window (usually a frame) and is often modal, meaning it captures the user input focus and temporarily disables input to other windows in the application until the dialog is closed.
Dialogs in wxPython are used for a variety of purposes, including:
- Simple Notifications: Displaying messages, alerts, or warnings using message dialogs like wx.MessageBox.
- User Input: Collecting input from the user through dialogs like wx.TextEntryDialog for simple text input or wx.FileDialog for file selection.
- Configuration: Allowing for more complex interactions, such as adjusting settings using a wx.PropertySheetDialog or a custom dialog populated with various controls (text boxes, checkboxes, etc.).
- Custom Dialogs: Creating entirely custom dialogs via subclassing wx.Dialog to tailor specific interactions and layouts to the application's needs.
Dialogs can be either modal or non-modal. Modal dialogs block interaction with other windows in the application until the dialog is closed, making them suitable for situations where immediate user attention and action are required. Non-modal dialogs, on the other hand, allow users to continue interacting with other windows in the application while the dialog remains open.
In wxPython, the wx.Dialog class serves as the base class for creating dialogs. This class can be subclassed to design custom dialogs with specific behaviors and layouts.
Here’s a simple example of creating a modal dialog in wxPython:
import wx
class MyDialog(wx.Dialog): def __init__(self, parent, title): super(MyDialog, self).__init__(parent, title=title, size=(250,150))
    panel = wx.Panel(self)
    vbox = wx.BoxSizer(wx.VERTICAL)

    hbox = wx.BoxSizer(wx.HORIZONTAL)
    self.btn\_close = wx.Button(panel, label='Close', size=(70, 30))
    self.btn\_close.Bind(wx.EVT\_BUTTON, self.on\_close)
    hbox.Add(self.btn\_close, flag=wx.LEFT|wx.BOTTOM, border=5)

    vbox.Add(hbox, flag=wx.ALIGN\_CENTER|wx.TOP, border=10)
    panel.SetSizer(vbox)

def on\_close(self, event):
    self.Destroy()
app = wx.App(False) frame = wx.Frame(None, wx.ID_ANY, "Main Window") frame.Show()
dialog = MyDialog(None, "My Dialog") dialog.ShowModal() dialog.Destroy()
app.MainLoop()
In this example, the MyDialog class is created by subclassing wx.Dialog, and an instance of this dialog is shown modally. The dialog presents a simple interface with a "Close" button that allows the user to dismiss the dialog.
What is a ListCtrl in wxPython?
In wxPython, ListCtrl is a versatile widget used to display lists of items in a multi-column format. It is part of the wx.lib.agw module and provides functionality comparable to a table or spreadsheet, allowing users to present and interact with potentially large sets of data.
Here are some key features and usage scenarios for wx.ListCtrl:
- Display Modes: You can display the content in different modes, such as: wx.LC_ICON: Large icons with labels. wx.LC_SMALL_ICON: Small icons with labels. wx.LC_LIST: Simple list, where items are arranged vertically without column headers. wx.LC_REPORT: Detailed report view, similar to a table, with column headers and multiple rows.
- Columns and Rows: In wx.LC_REPORT mode, you can create multiple columns, each with a header. This mode is particularly useful for showing tabular data with multiple attributes per item.
- Sorting and Resizing: ListCtrl supports sorting capabilities. Columns can be resized dynamically, and you can implement custom sorting behavior for data.
- Editability: Depending on the requirements, items within ListCtrl can be made editable, either partially or fully, enabling simple data entry operations.
- Event Handling: It generates various events such as item selection, item deselection, item activation, and others, which can be handled to provide interactive experiences.
- Customization: You can customize its appearance and behavior using methods to change colors, fonts, and item rendering, providing flexibility to suit the application's aesthetic and functional needs.
Here is a simple example of how to create a basic ListCtrl in wxPython:
import wx
class MyFrame(wx.Frame): def __init__(self): super().__init__(parent=None, title='ListCtrl Example') panel = wx.Panel(self)
    list\_ctrl = wx.ListCtrl(panel, style=wx.LC\_REPORT)

    # Add columns
    list\_ctrl.InsertColumn(0, 'Column 1', width=100)
    list\_ctrl.InsertColumn(1, 'Column 2', width=100)

    # Add rows/data
    index = list\_ctrl.InsertItem(0, 'Row 1 Item 1')
    list\_ctrl.SetItem(index, 1, 'Row 1 Item 2')

    index = list\_ctrl.InsertItem(1, 'Row 2 Item 1')
    list\_ctrl.SetItem(index, 1, 'Row 2 Item 2')

    sizer = wx.BoxSizer(wx.VERTICAL)
    sizer.Add(list\_ctrl, 1, wx.EXPAND)
    panel.SetSizer(sizer)

    self.Show()
if __name__ == '__main__': app = wx.App(False) frame = MyFrame() app.MainLoop()
In this example, a wx.ListCtrl is created with two columns, and a couple of rows of data are added to it. You can expand this basic setup to include more advanced features and handle user interactions as needed.