
Best Outdoor Storage Sheds with Floors to Buy in July 2026

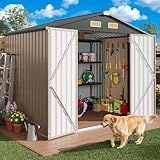
YADSUNY 10x8 FT Outdoor Storage Shed, Metal Garden Tool Shed with Updated Frame Structure and Lockable Doors, Ideal for Backyard Garden Patio Lawn, Grey
-
DURABLE CONSTRUCTION: BUILT WITH RUST-RESISTANT GALVANIZED STEEL.
-
EASY ASSEMBLY: 35% EASIER SETUP FOR HASSLE-FREE INSTALLATION.
-
SPACIOUS STORAGE: ORGANIZES ALL YOUR TOOLS WITH AMPLE SPACE.


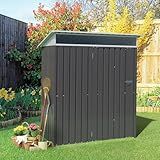
Aoxun 6.2x4 FT Shed Outdoor Storage Shed with Lockable Doors & Slooping Roof Metal Garden Tool Shed for Backyard, Patio, Poolside (Brown)
-
DURABLE DESIGN: HEAVY-DUTY STEEL CONSTRUCTION WITHSTANDS HARSH WEATHER.
-
VERSATILE USE: PERFECT FOR STORAGE, PET SHELTER, OR GARBAGE ENCLOSURE.
-
EASY SETUP: CLEAR MANUAL AND LABELED PARTS FOR QUICK ASSEMBLY.

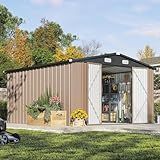
DAUSOLA 10x10 FT Outdoor Storage Shed, Metal Garden Tool Shed with Updated Frame Structure, Lockable Doors and Windows, Ideal for Backyard Garden Patio Lawn, Grey
-
DURABLE STEEL BUILD: WATERPROOF, RUST-RESISTANT, AND UV-PROTECTED.
-
EASY ASSEMBLY: REINFORCED DESIGN MAKES SETUP 35% EASIER AND STABLE.
-
AMPLE STORAGE SPACE: SPACIOUS DESIGN FOR TOOLS AND OUTDOOR ESSENTIALS.
IRONCK 8x6FT Outdoor Storage Shed with Lockable Doors, 7.4x5.3FT Base Galvanized Steel Metal Garden Tool Shed with Breathable Vent for Yard Bins/Generator/Wheelbarrow Storage, Brown
-
HEAVY-DUTY BUILD: MADE FROM GALVANIZED STEEL FOR ULTIMATE DURABILITY.
-
EASY ACCESS & VENTILATION: DOUBLE DOORS AND TOP VENT FOR CONVENIENCE.
-
SPACIOUS & VERSATILE USE: PERFECT FOR TOOLS, PETS, OR OUTDOOR STORAGE NEEDS.
Aoxun 10 x 12FT Outdoor Storage Shed with Double Hinged Large Door Utility Garden Shed with Lockable Door & Sloped Roof Metal Sheds Outdoor Storage for Garden, Backyard, Patio and Backyard, Brown
-
SPACIOUS DESIGN: ACCOMMODATES ALL OUTDOOR ESSENTIALS WITH SMART ORGANIZATION.
-
WEATHER-RESISTANT: ENGINEERED ROOF AND DURABLE MATERIALS PROTECT YOUR ITEMS.
-
MULTI-PURPOSE USE: IDEAL FOR TOOLS, FURNITURE, AND GEAR-VERSATILE FOR ANY SPACE.
Vongrasig 5 x 3 x 6 FT Outdoor Storage Shed Clearance, Metal Garden Shed with Large Window and Lockable Door, Anti-Corrosion Waterproof Tool Shed for Backyard Patio, Lawn (Dark Gray)
- DURABLE, WEATHER-RESISTANT DESIGN ENSURES LONG-LASTING PERFORMANCE.
- BRIGHT WINDOW AND VENTS CREATE A COMFORTABLE, WELL-LIT STORAGE SPACE.
- VERSATILE USAGE AS GARDEN STORAGE, TOOL SHED, OR SAFE PET HOUSE.
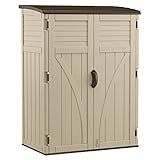
Suncast Outdoor Storage Cabinet Waterproof Resin Vertical Outdoor Storage Shed (54 cu. ft.) for Patio, Garden Tools, Cushions, & Equipment. Weatherproof Plastic Multi-Wall Design, Capacity Made in USA
- SECURE STORAGE WITH PADLOCK-READY HANDLES FOR PEACE OF MIND.
- DURABLE, ALL-WEATHER CONSTRUCTION REQUIRES ZERO MAINTENANCE.
- TALL DESIGN ACCOMMODATES LONG-HANDLED TOOLS AND BULKY ITEMS.

Vongrasig 5 x 3 x 6 FT Outdoor Storage Shed, Metal Tool Shed Clearance Garden Steel Shed with Side Window and Lockable Door Waterproof Tool Shed for Backyard Patio, Lawn (Gray)
- WEATHER-RESISTANT DESIGN: STRONG STEEL PLATES PREVENT RUST AND ROT.
- BRIGHT AND AIRY: SIDE WINDOW AND VENTS ENSURE A COMFORTABLE WORKSPACE.
- VERSATILE USE: IDEAL FOR TOOLS, GARDEN STORAGE, OR EVEN A PET HOUSE.
The longevity of outdoor storage sheds with floors depends on several factors, including the materials used, the quality of construction, the climate, and the level of maintenance. Typically, wooden sheds can last anywhere from 15 to 30 years if they are properly maintained and protected from moisture and pests. Metal sheds are generally more durable and resistant to weather elements, potentially lasting 20 to 50 years, but they may be susceptible to rust in very humid or salty environments if not treated. Resin or plastic sheds are resistant to rot and insects, and they can last around 10 to 20 years, although prolonged exposure to harsh UV rays might cause the materials to degrade over time. Regular maintenance, such as repainting, rustproofing, cleaning, and ensuring proper drainage, can significantly extend the life of a shed. The foundation and flooring conditions also play a critical role, as a stable and even base helps prevent structural issues.
How to maintain a metal storage shed?
Maintaining a metal storage shed is essential to ensure its longevity and functionality. Here are some steps you can follow to keep your shed in good condition:
- Regular Cleaning: Wash the shed with water and mild detergent every few months to remove dirt, dust, and stains. Use a soft-bristle brush or sponge to avoid scratching the metal surface.
- Rust Prevention: Regularly inspect your shed for any signs of rust or corrosion. Treat rusted areas with a wire brush, sandpaper, or a specific rust remover. Apply a rust-inhibiting primer and repaint the affected areas with a suitable outdoor metal paint to protect it from further rust.
- Seal Joints and Gaps: Check the seams, joints, and around windows or doors for gaps or leaks. Use a silicone-based sealant to fill these areas to prevent moisture ingress.
- Roof Maintenance: Clear any debris, such as leaves or branches, from the roof regularly to prevent water pooling and potential damage. Ensure the roof's waterproofing elements, like seals and coatings, are intact and repair any damage promptly.
- Check the Foundation: Ensure that the foundation or flooring is stable and level. A solid foundation helps prevent structural issues. Keep the area around the shed clear to promote proper drainage and prevent long-term contact with moisture.
- Lubricate Moving Parts: Apply lubricants to hinges, locks, and any other moving parts to ensure smooth operation and prevent rust.
- Inspect for Damage: Regularly check for any physical damage like dents or scratches. Repair minor damage to prevent it from worsening and causing bigger issues.
- Vegetation Control: Keep plants, shrubbery, and weeds trimmed around the shed to prevent them from growing against the structure, which can trap moisture and lead to rust or mold.
- Pest Control: Inspect for signs of pests. Seal any holes or gaps where rodents or insects might enter, and consider using pest deterrents if needed.
- Regular Assessment: Conduct a thorough inspection at least twice a year, preferably before and after winter, to address any maintenance needs promptly.
By following these maintenance tips, you can extend the life of your metal storage shed and keep it in optimal condition for years to come.
What is the role of ventilation in shed durability?
Ventilation plays a crucial role in the durability of a shed by ensuring that the interior environment remains conducive to preserving the structure and any items stored within. Here are some key aspects of how ventilation contributes to shed durability:
- Moisture Control: Good ventilation helps to control moisture levels inside the shed. Moisture can lead to condensation, which promotes mold, mildew, and rot. These issues can compromise the structural integrity of wooden components and damage stored items.
- Temperature Regulation: Proper airflow helps to regulate temperature extremes within the shed. Without ventilation, heat can build up, especially in metal or plastic sheds, which can lead to warping or deterioration of materials over time. Ventilation also prevents overheating of stored items, which might be sensitive to temperature fluctuations.
- Air Quality: Ventilation ensures a constant supply of fresh air, which helps to dispel musty odors and reduce the concentration of airborne pollutants or chemicals that might be stored in the shed. This is particularly important if the shed is used to store items like paints, fertilizers, or other chemicals.
- Pest Deterrence: A well-ventilated shed is less likely to attract pests such as rodents and insects, which are often drawn to damp and humid environments. By reducing moisture and maintaining airflow, the shed becomes a less inviting habitat for these creatures.
- Structural Longevity: In the long term, ventilation helps maintain the structural components of the shed. Wood, for example, is less likely to warp, swell, or decay if moisture and humidity are kept in check. This protection extends the life of the shed and reduces the need for frequent repairs or replacements.
To ensure proper ventilation, consider incorporating features like vents, windows, or air gaps, and keep vents unblocked and clean. The specific needs may vary depending on the shed's materials, size, location, and the regional climate.
How to repair a damaged shed floor?
Repairing a damaged shed floor can be a straightforward process, depending on the extent of the damage. Here’s a step-by-step guide:
- Inspect the Damage: Check the floor thoroughly to determine the extent of the damage. Look for rotted, warped, or broken boards, as well as any signs of mold or water damage.
- Gather Materials and Tools: Depending on the damage, you may need replacement plywood or boards, treated lumber, screws, nails, a saw, a drill, a hammer, a pry bar, sandpaper, a spirit level, and wood sealant or preservative.
- Remove Damaged Sections: Use a pry bar or a saw to carefully remove any damaged boards. Be careful not to damage the surrounding areas. If the damage is minimal, you might only need to replace a few boards.
- Inspect the Joists: While the floor is open, inspect the joists for damage, especially if the problem was water-related. Replace any compromised joists with treated lumber.
- Prepare the Area: Clean away any debris and repair any small cracks or holes in the foundation or joists with wood filler or epoxy. Ensure that the work area and any exposed joists are dry to prevent future rot.
- Cut and Install New Boards: Cut new boards or plywood to the required size. Use treated lumber or exterior-grade plywood to prevent future issues with moisture. Install the boards, ensuring they are level with the existing floor and securely fastened to the joists.
- Secure the Boards: Use screws or nails to secure the new boards in place. Screws are often preferable as they provide a stronger and more secure hold. Make sure all boards are flush and secure to prevent tripping hazards.
- Sand and Finish: Sand any rough edges to ensure a smooth surface. Apply a wood sealant or preservative to protect the new wood from moisture and pests.
- Final Inspection: Check the floor for stability and make any necessary adjustments.
- Prevent Future Damage: Consider adding a vapor barrier underneath the shed or improving the drainage around the shed to prevent water issues. Regularly inspect the shed for water leaks or moisture build-up.
Repairing the floor can also be an opportunity to assess the overall condition of the shed and make other improvements.
What is the advantage of a double-layer shed floor?
A double-layer shed floor offers several advantages compared to a single-layer floor. Here are some key benefits:
- Increased Strength and Durability: A second layer adds to the overall strength and durability of the floor, allowing it to support heavier loads without sagging or warping over time.
- Better Insulation: A double-layer floor can provide better thermal and sound insulation, creating a more comfortable environment inside the shed, especially if used for purposes beyond simple storage.
- Improved Moisture Resistance: With an additional layer, the floor can be more resistant to moisture, protecting the inner layer and the shed contents from dampness and potential water damage. This is especially beneficial in areas prone to high humidity or occasional flooding.
- Enhanced Load Distribution: The second layer helps distribute weight more evenly across the floor, reducing pressure points and minimizing the risk of damage from heavy objects.
- Smoother Surface: Adding a second layer can help create a more even and smooth surface, which is beneficial for both aesthetic reasons and practicality when moving items in and out of the shed.
- Flexibility for Modifications: If you plan to make modifications or add interior elements such as partitions or built-in shelving, a double-layer floor can offer a more stable foundation to accommodate these changes.
- Noise Reduction: A thicker floor helps in reducing noise from inside the shed as well as vibrations, which could be advantageous if the shed is used as a workshop.
- Longevity: Overall, the additional layer can extend the lifespan of the shed floor by providing better protection against the elements and daily wear and tear.
While a double-layer floor may involve more upfront cost and effort in construction, the benefits it provides in terms of durability, protection, and functionality can outweigh these initial investments.